Showing posts with label javascript. Show all posts

Wednesday, 5 November 2025

Screen Flow LWC Local Actions in Winter '26


Original image created by GPT 5o based on a prompt from Bob Buzzard

Introduction

The Winter '26 release of Salesforce introduced Lightning Web Components as local actions in screen flows. This allows client-side JavaScript to be executed as a 'function' in the flow, without the need for a round trip to the server for an Apex action. 

Sample Actions

For this blog post I created a couple of LWCs to act as local actions :

  • A modal that displays a warning/reminder to a user and make them think about what they were about to do
  • A toast that displays the results of the user's request
In order to use an LWC as a local action, it must implement a function named invoke, which carries out the JavaScript processing. The flow runtime executes this function when it encounters a local action element tied to an LWC. The invoke method for my modal local action is shown below:

  @api title;
  @api size;
  @api content;

  @api async invoke() {
  const result=await ModalDemo.open({
            size: this.size,
            title: this.title,
            content: this.content
        });
  console.log(result);
}
This opens the modal and displays a message based on the title, size and content properties supplied by the flow, making it suitable for reuse across multiple scenarios. In order to allow a flow to pass properties to an LWC, you need to decorate the property with @api in the LWC and define it in the targetConfigs section of the js-meta.xml file:
   <targets>
        <target>lightning__FlowAction</target>
    </targets>
    <targetConfigs>
        <targetConfig targets="lightning__FlowAction">
            <property name="title" type="String" label="Modal title" role="inputOnly" />
            <property name="content" type="String" label="Modal content" role="inputOnly" />
            <property name="size" type="String" 
                      label="Modal size" default="large" role="inputOnly" />    
        </targetConfig>
    </targetConfigs>

Note that I've defined these with a role of inputOnly, as the component only uses these properties to display the modal.

The Flow


I have simple flow based on the scenario of deleting a contact:


The Warning Modal configuration supplies the property values for the modal for this scenario. 


These properties are simple text values here, but any resource can be used, as this the case for the Success Toast action which uses the contactInformation formula resource:


which is constructed from the record detail of the contact to be deleted:


Executing the Flow


For demo purposes I've added the flow to a Lightning App Builder page - note that it doesn't delete anything, just claims to have done so!


A Gotcha


Fun fact - my original idea for this demo was to have a confirmation dialog asking if you were sure you wanted to delete the record. I had to pivot from this, as it appears that it is currently not possible to pass information back to the flow from the LWC. 

This would typically be achieved by publishing a FlowAttributeChangeEvent to update a property indicating if the user has confirmed or not, but when I try this (even when that is all the invoke method does!) I get the following error from the LWC:


I'm not sure whether this is me (I don't think so, as I've confirmed I'm doing the right thing based on multiple blogs and articles), unsupported (I can't find anything in the docs), or a bug, but it does rather limit the usefulness of this feature so hopefully it's either my mistake or Salesforce sort it out soon!

Related Posts/More Information


Sunday, 16 July 2023

Salesforce CLI OpenAI Plug-in


Image generated using StableDiffusion 2.1 via https://huggingface.co/spaces/stabilityai/stable-diffusion

Introduction

I've finally found time to have a play around with the OpenAI API, and was delighted to find that it has a NodeJS library, so I can interact with it via Typescript or JavaScript rather than learning Python. Not that I have any issue with learning Python, but it's not something that is that useful for my day to day work and thus not something I want to invest effort in right now.

As I've said many times in the past, anyone who knows me knows that I love a Salesforce CLI Plug-in, and that is where my mind immediately went once I'd cloned their Github repo and been through the (very) quick overview. 

The Plug-In

I wasn't really interested in surfacing a chat bot via the Salesforce CLI - for a start, it wouldn't really add anything over and above the public OpenAI chat page

The first area I investigated was asking it to review Apex classes and call out any inefficiencies or divergence from best practice. While this was entertaining, and found some real issues, it was also wildly inaccurate (and probably something my Evil Co-Worker will move forward with to mess with everyone). 

I then built out a couple of commands to generate titles and abstracts for conference sessions based on Salesforce development concepts, but as the Dreamforce call for papers is complete for this year, that didn't seem worth the effort.

I landed on a set of explainer commands that would ask the AI model to explain something to help a more junior developer:

  • apex - explain a topic in the context of the Apex programming language
  • cli - explain a Salesforce CLI command, along with an example
  • salesforce - explain a Salesforce topic using appropriate language for a specific audience - admins, devs, execs etc.
Accessing the OpenAI API is very straightforward:

Install the OpenAI Package

> npm install openai

Create the API instance
    import { Configuration, OpenAIApi } from 'openai';

    const configuration = new Configuration({
        apiKey: process.env.OPENAI_API_KEY,
    });
    const openai = new OpenAIApi(configuration);
Note that the API Key comes from the OPENAI_API_KEY environment variable - if you want to try out the plug-in yourself you'll need an OpenAI account and your own key. 

Create the Completion

This is where the prompt is passed to the model so that it can generate a response:
    const completion = await openai.createCompletion({
        model: 'text-davinci-003',
        max_tokens: maxTokens,
        prompt,
        temperature
      });

      result = (completion.data.choices[0].text as string);
Note that the completions API is legacy and received it's final update in July 2023. I chose this simply because it's cheap. When you are writing a new plug-in connecting to a third party system you get a lot of stuff wrong and I was keen not to rack up too large a bill while I was learning! The Chat Completions API is slightly different, in that it receives a list of messages and can call functions with results. It's not dramatically different though, so I felt anything I learned applied to both.

I moved this into a shared function, hence most of the call is parameterised. The createCompletion function can take many parameters, but here's the explanation of those that I've used:
  • model - the large language model to use
  • max_tokens - the maximum number of tokens to generate the response. A token is typically thought to be around 4 characters, so will sometimes represent words and sometimes parts of words. Input and output token counts are how you get charged for API use, so you want to keep them down where you can. The function defaults to 16 which in practice is fairly useless for a response to a human, so I've typically upped it to 256
  • prompt - the question/task that I've set the model
  • temperature - a value between 0 and 2.0 that indicates how accurate a response I want. I find that 0.6 works pretty well. If you change this, do it in small increments, as I asked it to review an Apex class with a temperature of 1.5 and got pretty much gibberish.
And that's about it. The rest of the code is available at the Github repository - it's mostly standard CLI Plug-In stuff of handling flags and displaying the response.

The Plug-In In Action

Once I've installed the plug-in from NPM, using the following command :

> sf plugins install bbai

I can ask for some explanations. First, explain the Salesforce concept of groups. As I don't provide details of the audience, it defaults to programmers:

> sf bbai explain salesforce -t groups

Here are the results


Groups in Salesforce are a way to organize and manage users in the system. They allow you to categorize users based on their roles and responsibilities, allowing for more streamlined access to information. For example, you can create a group for all the programmers within your organization, allowing them to access the same resources, documents, and tasks. Additionally, groups can be used to assign tasks, send messages, and create reports. By creating groups, you can quickly and easily manage permissions, tasks, and data access for your programming team.


Now the same command for an exec audience - notice the difference?

> sf bbai explain salesforce -t groups -s executive

Here are the results


Groups in Salesforce allow organizations to manage and control access to records and data. Groups are used to assign users to roles within the organization and to grant them access to the appropriate records. By using groups, organizations can easily assign the same set of permissions to multiple users, allowing them to quickly and easily manage access rights. This makes it easier to manage user permissions, and also helps to ensure that users only have access to the data and records they need to do their job. Groups also streamline the process of granting and revoking access rights, making it easier for organizations to stay secure and compliant.


And now I want to start working with some of these concepts, but I don't understand how to get my code into the instance via the CLI:

sf bbai explain cli -c "source push"             

Here are the results


Salesforce CLI command source push is used to deploy source from the local environment (e.g. a developer’s machine) to a Salesforce org. This command is useful in a DevOps process, as it enables developers to quickly and easily deploy their code changes to a Salesforce org for testing and deployment.


Example Execution: 

sfdx force:source:push --targetusername devorg --sourcepath /path/to/source/directory/


The command above will deploy all source code in the specified directory to the org with the username devorg.

Conclusions

Something that really stood out in this was the simplicity of the integration - it's literally a few lines of code. Which is as it should be - with generative AI, English is the programming language so most of the effort should go into the prompt rather than getting set up to send the prompt. Looking ahead a few years, I can see this being a game changer for integrating systems. Rather than starting with a book of API specifications that you need to adhere to, there will be a single entry point where you send conversational requests to a model trained on the specific data. "Return the id and all name and address fields of all the contacts we have that work for financial services customers in JSON format", without needing to develop that specific interface.

The Cost

This was top of mind for me during this experiment. I've seen situations in the past where request based charging really racked up during testing. OpenAI allows you to set a hard and soft limit, so that you can't get into that situation, but it also charges by the token for both input and output. When you aren't that familiar with how many tokens might be in a 2-3 line prompt. After building my plug-in, with the usual number of mistakes, and testing it for several hours, I'd used the princely sum of $0.16. 

While that might sound like there's nothing to worry about, but the latest models are more expensive per token and can handle significantly more tokens both for input and output, so you may find that things stack up quickly. I've seen news stories lauding the ability to send an entire book to a generative AI as context, but no mention of how much you'll be charged to do that!

More Information


Sunday, 14 May 2023

Light DOM Scoped Slots in Summer 23

Introduction

It's that time again - another Salesforce release is a few weeks away, the preview release notes are out, and preview scratch orgs can be spun up to try out some of the new features. There's a few changes around Lightning Components in the upcoming release, and the first one that caught my eye was the concept of scoped slots, made possible by the general availability of the light DOM.

The light DOM is what we used to call the DOM before web components came along - the standard Document Object Model representing the structure of a web page that is visible and accessible to any JavaScript that cares to look. The light aspect comes from the fact that web components by default use shadow DOM - a hidden DOM structure attached to the regular DOM that only the component can see. 

Scoped slots are an inversion of the usual slot behaviour seen with Lightning Web Components. The standard case allows a parent component to pass markup into a child component to render in specific locations. Scoped slots turns this on its head and allows child components to pass information up to parent components that can be rendered in a specific slot. All of which sounds very cool, but at first glance it seemed a solution looking for a problem. The example in the release notes didn't do much to change this view, as they showed a child iterating a list and the parent rendering the contents of the list item. Given that the parent can iterate the list just as easily as the child, I couldn't see the value that was added.

One thing I've found with Lightning Web Components is a lot of the new features have equivalents in another JavaScript framework - Vue.js seems to be the prime candidate at the moment, and sure enough there's the concept of scoped slots there. Unfortunately the various blogs that I read on this topic didn't help my understanding enormously - when you aren't familiar with the framework then the examples aren't always helpful. What I did take away from this is the value in scoped slots is to separate the generation of the data from the rendering, so that it is available for re-use. The release notes example didn't really provide this as the list iteration is the same regardless of whether you do it in the parent or child, so I needed to figure out another use case.

The Sample

Simple list iteration is easy, but what about the case where I have a JavaScript object created from an Apex Map and want to iterate that? I can't do this in markup, instead I have to create a list of properties from the object. This feels like a situation where a child component that can handle any conversion and iteration required and simply send the properties back to the parent. 

My component that handles this is called mapIterator, and when it receives an object via an @api property, it creates a list from it:

set objMap(value) {
    this._objMap=value;
    if (this._objMap) {
        this.values=[];
        for (let key in this._objMap) {
            this.values.push(this._objMap[key]);
        }
    }
}

and the HTML markup simply iterates this and makes each entry available to the parent via the lwc:slot-bind directive, remembering to render in light DOM mode:

<template lwc:render-mode="light"> 
    <template for:each={values} for:item="value">
        <slot key={value} lwc:slot-bind={value}></slot>
    </template>
</template>

I have several parent components that make use of this - one to generate a simple list of accounts, one to generate a list of account cards, and one to generate a list of opportunity cards. The mapIterator provides the conversion and iteration of the object properties to each of this with no changes required. You can find all of these at the Github repository, but here's the markup from the simple list :

<c-map-iterator obj-map={accountsMap}>
    <template lwc:slot-data="value">
        <div class="slds-p-left_small slds-p-bottom_xx-small">
            <strong>ID:</strong> {value.Id}
        </div>
        <div class="slds-p-left_large slds-p-bottom_small">
            <strong>Name:</strong>{value.Name}
        </div>
    </template>
</c-map-iterator>

Access to the element from the iterator is provided by the lwc:slot-data directive, and as you can see the parent handles all the presentation side of things.

Conclusion

There is definite value here in separating the conversion/iteration from the rendering of the content. That said, I think you might run into issues if you are rendering the iterated elements using markup that must be a direct descendant of a containing element. In that case you won't be able to separate everything, as you get the child element markup in the way. I think there you'd likely need specialisations of the iterator that also renders the container, which won't feel quite as clean.

More Information


Sunday, 30 April 2023

Reactive Flow Components in Spring 23


Introduction

A typical scenarios where I favour lightning pages over flows is where a user's decisions around field values need to have a major impact on the rest of the elements being displayed, and where a wizard interface would slow the user down too much. A great example of this is our BrightMEDIA order booking page. As the user inputs information about the type of advert, where it needs to appear, what size it is and when it appears, the price is dynamically recalculated and displayed. The user typically has the customer on the phone, and there may be a few cycles of tweaking the details to hit a price point - what happens if we make it a bit smaller, move it to another section etc. Paging back and forward through the wizard wouldn't be a great experience, along with the need to keep saving the order as navigation between pages takes place. 

With the Spring 23 release of Salesforce, it looks like in future flow will become a candidate for this kind of user interface with the advent of the Reactive Flow Components beta. Simply put, you can wire the input of one component up to the output of another component, and react when changes occur. 

As this is a beta, you'll have to opt-in to it for any org where you want to use reactive components by checking the box in the Automation Settings 

The Sample

A lot of the demos around reactive anything tends to be a table of accounts that updates when the user inputs the desired number of entries. That's exactly what I started with to get a handle on how this works, but it's not overly interesting, so I decided to return to our BrightMEDIA accelerator for inspiration. 

One of the more complex Lightning Components we have in the order booking page is the data picker. This can render as a drop down or a calendar, with dates available for selection rendered in specific styles depending on whether capacity is available, if they are contiguous with a selected start date, and many other rules. 

So for my sample I have a couple of custom Lightning Web Components:

  • A Publication Picker - this is a simple choice style component, but I've had to go custom as the standard choice component doesn't yet have reactive support. Each publication has a checkbox that indicates if it publishes on weekends as well as weekdays.
  • A Date Picker - this is a calendar component that by default displays a 7 day week, but if the selected Publication doesn't publish on weekends, switches to a 5 day week.
I create a simple screen flow and add a two column screen component, with my two custom components:


The Publication Picker defines an output property named publishesWeekends, which is set to the value from the selected Publication. I wire this to the weekends input property on the datePicker:


When I run the flow, as I switch my choices between Publications, the Date Picker changes how it renders to reflect 7 days a week publishing:


or 5 days a week:


It's early days for this, but definitely a step in the right direction. This feels like an area where you'll benefit from developer support to create truly reactive experiences, as this will really pop with custom components that can change their styling based on user selections. 

The Code


You can find the code behind the sample in Github. Spin up a scratch org, deploy the code, create a couple of publications and run the flow.  Don't forget to opt in to the beta as outlined above, or like me you'll sit there scratching your head trying to figure out what you've broken :)
More Information


Wednesday, 29 March 2023

Lightning Web Component References in Spring '23

Introduction

Another week, another post about new LWC directives in 'Spring 23 - this time the lwc:ref directive. As the name suggests, this provides a reference to the component, one that can be used in JavaScript to access the element with a minimum of fuss.

Usage

To define a reference to a component, simply specify the lwc:ref directive in the HTML:

<h1 class="slds-var-m-bottom_small" lwc:ref="Heading1">Directives</h1>

and to access the element in JavaScript via the reference:

const headingEle=this.refs.Heading1;

As this.refs is an object, you can also retrieve a reference based on a variable:

const refVal='Heading1';

   ...
   
const chosenEle=this.refs[refval];

Notes/Gotchas

The reference value in the HTML markup must be a string literal - you can't use properties to dynamically generate the reference. This has the knock-on effect that you can't use it in loops to generate a unique reference for each element. If you try, you'll get an error similar to the following when you deploy or push your source:
     LWC1158:
         Invalid lwc:ref usage on element "<li>". lwc:ref cannot be used inside
         for:each or an iterator.

Hopefully this will change in a future release, as it's a key use case that has been a struggle since Visualforce days. 

You can, however, define multiple references with the same name - in this case the last one defined will win. I'm surprised that this isn't blocked by the platform, as it feels like a really easy mistake to make and one that I'm sure I'll encounter a lot over the next couple of years!

If you extract a reference that doesn't exist, in true JavaScript fashion it will return null rather than indicating an error. Always check your reference resolved to an element before taking any further action!

Why Use Refs

So why should we use references, when we can already provide a reference via a data attribute, and dynamically generate the value to boot? There are a few good reasons:
  •  Clarity. A data attribute is a generic mechanism for storing additional information on an HTML element - information that is useful to the application. In order to determine the purpose of this information, I need to examine the JavaScript to figure out how it is used. A reference, on the other hand, has a single purpose - to provide a way to locate the element based on the reference value - no need to look at any JavaScript. As mentioned above, I have to compromise on this clarity and fall back on data attributes to dynamically generate a value, but hopefully that will be coming soon.
  • Cleanliness. Data attributes appear in the rendered HTML, while references don't. This also has the benefit that you aren't exposing something you rely on to possible external interference or for someone else's code to rely on, thus creating an unexpected dependency.

  • Performance - my opinion! I'd also imagine that it's more performant to use references than executing selector queries - the this.refs object is built once, applies to the current template only, and I then extract elements anywhere in my JavaScript with no additional effort. Using selectors I have to execute a query each time I need an element, and I might need multiple selectors to find disparate elements by their attributes. This is the case in Vue.js which has it's own references implementation, so I'd imagine LWC is similar. 

Related Posts


Saturday, 17 December 2022

The Org Documentor and the Order of Execution Diagram

Introduction

Earlier this year (2022) Salesforce Architects introduced a diagrammatic representation of the order of execution, which was a game changer in terms of easing understanding. I've had a task on my todo list since then to figure out how I could incorporate it into the Org Documentor, and thanks to using up some annual leave in a freezing December, I've finally had time to work on it.

Click to View

I already have information about the configured automation organised by the order of execution step, but currently in a text format:


so it made sense to try to repurpose this. I really liked the idea of making the diagram clickable, via an image map, but I wasn't overly keen on adding JavaScript to display popups with the details of the configured automation, so I went hunting for a CSS/HTML only solution. 

I found it at Mate Marschalko's Medium post, which showed how to use the :target pseudo-class to show or hide overlay divs without a single line of JavaScript, so set about applying this technique to the Org Documentor via a new EJS template, heavily based on my existing order of execution template. I also needed to generate the image map element based on selected areas of the Salesforce diagram, for which I used <img-map> - I did find that it all went awry after I selected 4-5 areas, so I did them one at a time and copied the coordinates over to my new template. 

After a few hours work I had a reference to the Salesforce diagram in the generated documentation for each object, via the new Image Detail column:


but with elements that could be clicked on:


which would display the automation configured for the object for that specific step and a description if the user cared to read more.


Albeit with a couple of caveats:
  • Because the red line around the clickable element is applied to an <area> element, these only display when the element is clicked. This means that to find what is clickable you need to mouse around looking for the change in the pointer (or look at the text version of the order of execution for the object and identify what is supported there)

  • The page jumps around a bit under you. This is due to the nature of the :target psueudo class - when you click on an element, the URL is updated with a fragment identifying the popup required, which transforms from zero size to it's configured size in the centre of the page. This causes the browser to scroll down to show it correctly. When you close the popup, the URL is changed to remove the fragment, which makes the browser jump to the top of the page. This could be obviated by using a smaller image, but my view is it's better to live with this and have an image that you can read.

Try it Yourself


Version 4.1. 0 of the plugin includes this functionality and is available from NPM.

The sample output has been regenerated on Render,com, so if you access:


and click element 3 - Executes "Before Save" record triggered flows, you can see it in action.

Related Posts


Sunday, 20 November 2022

LWC Alerts in Winter 23


Introduction

The Winter 23 release of Salesforce provided something that, in my view, we've been desperately seeking since the original (Aura) Lightning Components broke cover in 2014 - modal alerts provided by the platform. I'd imagine there are hundreds if not thousands of modal implementations out there, mostly based on the Lightning Design System styling, and all being maintained separately. Some in Aura, some in LWC, but all duplicating effort.

I feel like we have cross-origin alert blocking in Chrome to thank for this - if that wasn't breaking things then I can't see Salesforce would suddenly have prioritised it after all these years - but it doesn't matter how we got them, we have them!

Show Me The Code!

The alerts are refreshingly simple to use too - simply import LightningAlert:

import LightningAlert from 'lightning/alert';

and then execute the LightningAlert.open() function:

    async showAlert() {
        await LightningAlert.open({
            message: 'Here is the alert that will be shown to the user',
            theme: 'warning',
            label: 'Alerted',
            variant: 'header'
        });
    }

and the user sees the alert


The LightningAlert.open() function returns a promise that is resolved when the alert is closed. Note that I've used an async function and the await keyword - I don't have any further processing to carry out while the alert is open, so I use await to stop my function until the user closes the alert. 

Demo Site


When there's a component like this with a number of themes and variants, I typically like to create myself a demo page so I can easily try them all out when I need to. In this case I have a simple form that allows the user to choose the theme and variant, then displays the alert with the selected configuration. 


In the past I'd have exposed this through one of my Free Force sites, but those all disappeared a few months ago so I needed to start again. The new location is https://demo.bobbuzzard.org, which is a Google Site with a custom domain. This particular demo can be found at: https://demo.bobbuzzard.org/lwc/alerts  - it's a Lightning Web Component inside a Visualforce Page using Lightning Out, so with the various layers involved it may take a couple of seconds to render the first time. It does allow guest access though, so worth the trade off in my view. 

Related Posts


Saturday, 2 April 2022

The Org Documentor Keeps On Executing


Introduction

Back in February I added support for some of the steps of the order of execution, mostly because of the flow ordering support added in Spring 22. This has created a nice backlog of work to support more of the steps, starting with duplicate rules which I added in today. 

Duplicate Rules

This is a slight departure from earlier releases of the documentor, in that I haven't added processing of duplicate rules to generate a dedicated page, I've just added them to the order of execution page. If you think they need their own page, or more likely their own section in the object detail pages, please raise a request in the Github repository and I'll see what I can do.


The order of execution page lists the active duplicate rules and the matching rules that they depend on. I'm undecided as to whether any more information is needed, but again if you think there is, please feel free to raise an issue in the repo.


As always, you can see an updated example of the order of execution, and the other pages, generated from the sample metadata at the Heroku site.

Updated Plug-in


Version 4.0.5 of the plug-in has this new functionality and can be found on NPM

If you already have the plug-in installed, just run sfdx plugins:update to upgrade to 4.0.5 - run sfdx plugins once you have done that to check the version.

The source code for the plug-in can be found in the Github repository.

Columbo Close


Just one more thing, not related to the Documentor itself but the Google site that I use to document it. This now has it's own custom domain - orgdoc.bobbuzzard.org. With a small amount of DNS changes to apply the custom domain to the site, Google provides the SSL certificate for me, which is nice.

Related Posts


Sunday, 27 February 2022

Org Documentor - (Some of) The Order of Execution

Introduction

It's been a while since I made any changes to the Org Documentor, partly because I've been focused in other areas, and partly because I didn't need anything else documented. This changed with the Spring 22 release of Salesforce and the Flow Trigger Explorer

I really liked the idea of the explorer, but was disappointed that it showed inactive flows and didn't reflect the new ordering capabilities. Why didn't they add that, I wondered. How hard could it be? Then it occurred to me that I could handle this myself through the Org Documentor. It turns out I couldn't handle all aspects, but still enough to be useful. More on that later.

Flow Support

Up until now I hadn't got around to including flows in the generated documentation, and this clearly needed to change if I wanted to output the order they were executed in. 

As long as API version 54 is used, the execution order information comes back as expected, and getting these in the right order and handling collisions based on names is straightforward with a custom comparator function. Sadly I can't figure out the order when there is no execution information defined, as CreatedDate isn't available in the metadata. Two out of three ain't bad.

Order of Execution

As there are multiple steps in the order of execution, and most of those steps require different metadata, I couldn't handle it like I do other metadata. Simply processing the contents of a directory might help for one or two steps, but I wanted the consolidated view. To deal with this I create an order of execution data structure for each object that appears in the metadata, and gradually flesh this out as I process the various other types of metadata. So the objects add the validation rule information, triggers populate the before and after steps, as do flows. 

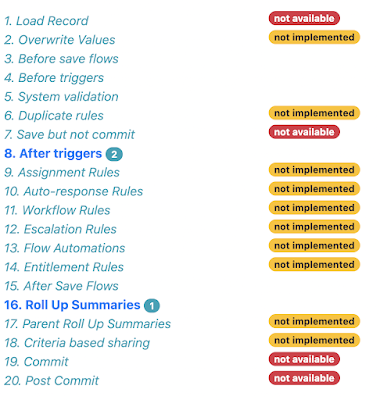
As everyone knows, there's a lot of steps in the order of execution, and I'm not attempting to support all of them right now. Especially as some of them (write to database but don't commit) don't have anything that metadata influences! Rather than trying to detail this in a blog post that I'd have to update every time I change anything, the order of execution page contains all the steps and adds badges to show which are possible to support, and which are supported:


As you can see, at the time of writing it's triggers and flows plus validation rules and roll up summaries. 

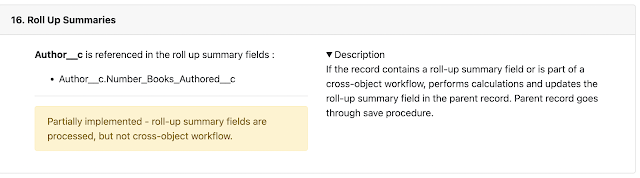
Steps where there is metadata that influences the behaviour appear in bold with a badge to indicate how many items there are. Clicking on the step takes you to the section that details the metadata:


You can see an example of the order of execution generated from the sample metadata at the Heroku site.

Updated Plug-in


Version 4.0.1 of the plug-in has this new functionality and can be found on NPM

If you already have the plug-in installed, just run sfdx plugins:update to upgrade to 4.0.1 - run sfdx plugins once you have done that to check the version.

The source code for the plug-in can be found in the Github repository.

Related Posts


Saturday, 19 February 2022

Lightning Web Component Getters

Introduction

When Lightning Web Components were released, one feature gap to Aura components I was pleased to see was the lack of support for expressions in the HTML template. 

Aura followed the trail blazed by Visualforce in allowing this, but if not used cautiously the expressions end up polluting the HTML making it difficult to understand. Especially for those that only write HTML, or even worse are learning it. Here's a somewhat redacted version from one of my personal projects from a few years ago:

Even leaving aside the use of i and j for iterator variables, it isn't enormously clear what name and lastrow will evaluate to.

Handling Expressions in LWC

One way to handle expressions is to enhance the properties that are being used in the HTML. In the example above, I'd process the ccs elements returned from the server and wrap them in an object that provides the name and lastrow properties, then change the HTML to iterate the wrappers and bind directly to those properties. All the logic sits where it belongs, server side. 

This technique also works for non-collection properties, but I tend to avoid that where possible. As components get more complex you end up with a bunch of properties whose sole purpose is to surface some information in the HTML and a fair bit of code to manage them, blurring the actual state of the component. 

The Power of the Getter

For single property values, getters are a better solution in many cases. With a getter you don't store a value, but calculate it on demand when a method is invoked, much like properties in Apex. The template can bind to a getter in the same way it can to a property, so there's no additional connecting up required.

The real magic with getters in LWC is they react to changes in the properties that they use to calculate their value. Rather than your code having to detect a change to a genuine state property and update avalue that is bound from the HTML, when a property that is used inside a getter changes, the getter is automatically re-run and the new value calculated and used in the template.

Here's a simple example of this - I have three inputs for title, firstname and lastname, and I calculate the fullname based on those values. My JavaScript maintains the three state properties and provides a getter that creates the fullname by concatenating the values:

export default class GetterExample extends LightningElement {
    title='';
    firstname='';
    lastname='';

    titleChanged(event) {
        this.title=event.detail.value;
    }

    firstnameChanged(event) {
        this.firstname=event.detail.value;
    }

    lastnameChanged(event) {
        this.lastname=event.detail.value;
    }
    
    get fullname() {
        return this.title + ' ' + this.firstname + ' ' + this.lastname;
    }
}

and this is used in my HTML as follows:

<template>
    <lightning-card title="Getter - Concatenate Values">
        <div class="slds-var-p-around_small">
            <div>
                <lightning-input label="Title" type="text" value={title} onchange={titleChanged}></lightning-input>
            </div>
            <div>
                <lightning-input label="First Name" type="text" value={firstname} onchange={firstnameChanged}></lightning-input>
            </div>
            <div>
                <lightning-input label="Last Name" type="text" value={lastname} onchange={lastnameChanged}></lightning-input>
            </div>
            <div class="slds-var-p-top_small">
                Full name : {fullname}
            </div>
        </div>
    </lightning-card>
</template>

Note that I don't have to do anything to cause the fullname to rerender when the user supplies a title, firstname or lastname. The platform detects that those properties are used in my getter and automatically calls it when they change. This saves me loads of code compared to aura.

You can also have getters that rely on each other and the whole chain gets re-evaluated when a referenced property changes. Extending my example above to use the fullname in a sentence:

get sentence() {
    return this.fullname + ' built a lightning component';
}

and binding directly to the setter:

<div class="slds-var-p-top_small">
    Use it in a sentence : {sentence}
</div>

and as I complete the full name, the sentence is automatically calculated and rendered, even though I'm only referencing another getter that was re-evaluated:


You can find the component in my lwc-blogs repository at : https://github.com/keirbowden/lwc-blogs/tree/main/force-app/main/default/lwc/getterExample

Another area that Lightning Web Components score in is they are built on top of web standards, so if I want to change values that impact getters outside of the user interactions, I can use a regular setinterval  rather than having to wrap it inside a $A.getCallback function call, as my next sample shows:


In this case there is a countdown property that is calculated based on the timer having been started and not expiring, and an interval timer that counts down to zero and then cancels itself:

timer=30;
interval=null;

startCountdown() {
    this.interval=setInterval(() => {
        this.timer--;
        if (this.timer==0) {
           clearInterval(this.interval);
        }
    }, 1000);
}

get countdown() {
    let result='Timer expired';
    if (null==this.interval) {
        result='Timer not started';
    }
    else if (this.timer>0) {
        result=this.timer + ' seconds to go!';
    }

    return result;
}
and once again, I can just bind directly to the getter in the certainty that if the interval is populated or the timer changes, the UI will change with no further involvement from me.
<div class="slds-var-p-top_medium">
    <div class={countdownClass}>{countdown}</div>
</div>

Note that I'm also using a getter to determine the colour that the countdown information should be displayed in, removing more logic that would probably be in the view if using Aura:


You can also find this sample in the lwc-blogs repo at : https://github.com/keirbowden/lwc-blogs/tree/main/force-app/main/default/lwc/getterCountdown

Related Posts