| Tweet |
Apex Snippets in Visual Studio Code

Introduction
As I’ve written about before, I switched over to using Microsoft Visual Studio Code as soon as I could figure out how to wire the Salesforce CLI into it for metadata deployment. I’m still happy with my decision, although I do wish that more features were also supported when working in the metadata API format rather than the new source format. When using an IDE with plugins for a specific technology, such as the Salesforce Extension Pack, it’s easy to focus on what the plugins provide and forget to look at the standard features. Easy for me anyway.
Snippets
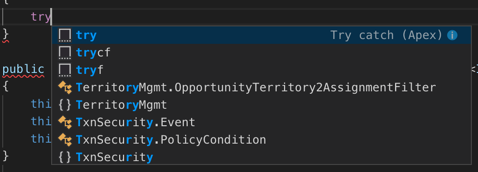
Per the docs, "Code snippets are small blocks of reusable code that can be inserted in a code file using a context menu command or a combination of hotkeys”. What this means in practice is that if I type in ‘try”, I’ll get offered the following snippets, which I can move between with the up and down arrow (cursor) keys:

Note the information icon on the first entry - clicking this shows me the documentation for each snippet and what will be inserted if I choose the snippet. This is particularly important if I install an extension containing snippets from the marketplace that turns out to have been authored by my Evil Co-Worker - I can see exactly what nefarious code would be inserted before I continue:

Which is pretty cool - with the amount of code i write, saving a few keystrokes here and there can really add up.
User Defined Snippets
The good news is that you aren’t limited to the snippets provided by the IDE or plugins - creating user defined snippets is, well a snip (come on, you knew I was going there). On MacOS you access the Code ->Preferences -> User Snippets menu option:

and choose the language - Apex in my case - and start creating your own snippet.
Example
Here’s an example from my apex snippets:
	"SObject_List": {
		"prefix": "List<",
		"body": [
			"List<${1:object}> ${2:soList}=new List<${1}>();"
		],
		"description":"List of sObjects"
	}
Breaking up the JSON:
- The name of my snippet is “SObject_List”.
- The prefix is “List<“ - this is the sequence of characters that will activate offering the snippet to the user.
- The body of the snippet is "List<${1:object}> ${2:soList}=new List<${1}>();”
- $1 and $2 are tabstops, which are cursor locations. When the user chooses the snippet, their cursor will initially be placed in $1 so they can enter a value, then they hit tab and move to $2 etc.
- $1.object is a tabstop with a placeholder - in this case the first tabstop will contain the value “object” for the user to change.
- If you use the same tabstop in several places, when the user updates the first instance this will change all other references
- Description is the detail that will be displayed if the user has hit the information icon.
The following video shows the snippet in use while creating an Apex class - note how I only type ‘Contact’ once, but both instances of ‘object’ get changed.
Nice eh? And all done via a configuration file.
Related Posts
- SFDX and the Metadata API Part 4 - VS Code Integration
- Official documentation for user defined snippets