Showing posts with label Github. Show all posts

Saturday, 22 March 2025

Keep Your Agentforce Dev Org Alive and Kicking


Image generated by OpenAI GPT4o in response to a prompt by Bob Buzzard

This post was updated on 12th April to point the Github repo links to V1.0, as a pull request to allow multiple dev orgs to be "renewed" at once was merged to the main branch. Thanks Warren Walters for the PR.

Introduction

One of the major announcements at TrailblazerDX '25 was the availability of Salesforce Developer Editions with Agentforce and Data Cloud. This is something that just about everyone has been asking for since the first generative AI features went GA in April 2024. Everything else that wasn't associated with a paid contract expired - Trailhead specials after 5 days and Partner SDOs couldn't be taken past 90 days, and even getting that far required raising a case to extend it past the default 30 days. The icing on the cake was the metadata support wasn't fantastic, which meant manually recreating features after spinning up a new org, which gets a bit samey after the fifth time.

Developer Editions don't live forever though - if you don't use them you lose them. After 180 days for the non-Agentforce variant (now known as legacy) and an evanescent 45 days if you want the generative AI features. Although to be fair, the signup page states that Salesforce "may" terminate orgs that are unused for 45 days rather than "will", but if you've put a lot of effort in you don't want to take any risks.

45 days sounds like a long time and it's easy to assume you'll manage to remember a login every 6 weeks or so, but my experience is that it's easy to get distracted and miss a slot. Machines are much better at remembering to do things on a schedule, so this is one task that I prefer to hand off - in this case to a Github Action.

Access Dev Org Action

Github Actions allows automation of software workflows through YAML (YAML Ain't Markup Language) files. Typically I'd use actions for continuous integration tasks on a project - automated build and test every night, for example - but I can also use it for something simpler. In this case, running a Salesforce CLI command against my dev org. If you set up your environment and secret name as I have, you'll be able to use my YAML file exactly as is.

Setup Dev Org

The first thing to do is get your new dev org and setup CLI access. Sign up for a new Agentforce dev org at : 

https://www.salesforce.com/form/developer-signup/?d=pb

Then connect it to the Salesforce CLI using the command:

> sf org login web -o AFDevOrg

Login with your username/password and approve the oauth access.

Execute the following CLI command:

> sf org display -o AFDevOrg --json --verbose

and copy the Sfdx Auth Url output value

Now you have this value, you can move on to the Github steps.

Create Your Repository

In order to use Github actions on a free account, your repository will need to be public. This doesn't mean that your Dev Org becomes public property, as you'll be storing the Sfdx Auth Url in an environment secret that only you as the repository owner can see:


Create Your Environment and Secret

Once you've created your repository, you need an environment to store your secret - click the Settings tab on the top right and choose the Environments option on the left hand menu:

Click the New environment on the resulting page, then name your environment and click the Configure environment button:


On the resulting page, scroll down to the Environment secrets section and click the Add environment secret button:

Name your secret, paste the Sfdx Auth Url value in the Value textbox and click the Add secret button.


Create and Execute Your Action

The final setup step is to create the YAML file for your action. This needs to live in the .github/workflows repository subfolder and can be called anything you like - I've gone for:

.github/workflows/renew.yaml

Once the file is present, clicking on the Actions tab will show the name of the action in the All workflows list on the left hand side - Renew Agentforce Dev Org Lease in this case.


Click on the name to see the run history and other options. There are no runs yet, but I've defined a workflow_dispatch event trigger so that I can run it on demand - in my experience this is well worth adding.


Start a run by clicking the Run workflow dropdown and the resulting Run workflow button:

I find that either the page doesn't refresh or I can't wait for that to happen, so I click the Actions tab again to see the In progress run:


Clicking on the run name gives me a little more detail:


And clicking the card shows me workflow steps - I've waited until they all completed successfully, so my run is green!


Switching out to my dev org, upon checking my user record I can see that there's an entry matching the action execution, although obviously it comes from a Github IP address in the US:


And that's it. As well as the workflow_dispatch event trigger, I've also specified a cron trigger so that it executes at 20:30 every Monday - more than every 45 days, but that gives me some wiggle room if my job starts failing and I don't get around to fixing it quickly.

More Information


Saturday, 29 August 2020

Adding IP Ranges from a Salesforce CLI Plug-in


Introduction

I know, another week, another post about a CLI plug-in. I really didn't intend this to be the case, but I recently submitted a (second generation) managed package for security review and had to open up additional IP addresses to allow the security team access to a test org. I'm likely to submit more managed packages for review in the future, so I wanted to find a scriptable way of doing this. 

It turned out to be a little more interesting than I'd originally expected, for a couple of reasons.

It Requires the Metadata API


To add an IP range, you have to deploy security settings via the metadata API. I have done this before, to enable/disable parallel Apex unit tests, but this was a little different. If I create a security settings file with the new range(s) and deploy them, per the Metadata API Docs, all existing IP ranges will be turned off:

    To add an IP range, deploy all existing IP ranges, including the one you
    want to add. Otherwise, the existing IP ranges are replaced with the ones
    you deploy. 

Definitely not what I want!

It Requires a Retrieve and Deploy


In order to get the existing IP addresses, I have to carry out a metadata retrieve of the security settings from the Salesforce org, add the ranges, then deploy them. No problem here, I can simply use the retrieve method on the metadata class that I'm already using to deploy. Weirdly, unlike the deploy function, the retrieve function doesn't return a promise, instead it expected me to supply a callback. I couldn't face returning to callback hell after the heaven of async/await in my plug-in development, so I used the Node Util.Promisify function that turns it into a function that returns a promise. Very cool.

const asyncRetrieve = promisify(conn.metadata.retrieve);
const retrieveCheck = await asyncRetrieve.call(...);
The other interesting aspect is that I get the settings back in XML format, but I want a JavaScript object to manipulate, which I then need to turn back into XML to deploy.

To turn XML into JavaScript I use fast-xml-parser, as this has stood me in good stead with my Org Documentor. To get at the NetworkAccess element:

import { parse} from 'fast-xml-parser';

  ...

const settings = readFileSync(join(tmpDir, 'settings', 'Security.settings'), 'utf-8');
const md = parse(settings);

let networkAccess = md.SecuritySettings.networkAccess;

Once I've added my new ranges, I convert back to XML using xml2js:

import { Builder } from 'xml2js';

  ...

const builder = new Builder(
   {renderOpts:
      {pretty: true,
       indent: '    ',
       newline: '\n'},
    stringify: {
       attValue(str) {
           return str.replace(/&/g, '&')
                     .replace(/"/g, '"')
                     .replace(/'/g, ''');
       }
    },
    xmldec: {
        version: '1.0', encoding: 'UTF-8'
    }
});

const xml = builder.buildObject(md);

The Plug-In


This is available as a new command on the bbsfdx plug-in - if you have it installed already, just run 

sfdx plugins: update 

to update to version 1.4

If you don't have it installed already (I won't lie, that hurts) you can run:

sfdx plugins:install bbsfdx
 
and to add one or more ranges: 

sfdx bb:iprange:add -r 192.168.2.1,192.168.2.4:192.168.2.255 -u <user>

The -r switch defines the range(s) - comma separate them. For a range, separate the start and end addresses with a colon. For a single address, just skip the colon and the end address.

Related Posts


Saturday, 22 August 2020

App Builder Page Aware Lightning Web Component

Introduction

This week I've been experimenting with decoupled Lightning Web Components in app builder pages, now that we have the Lightning Message Service to allow them to communicate with each other without being nested. 

A number of the components are intended for use in record home and app pages, which can present challenges, in my case around initialisation. Some of my components need to initialise by making a callout to the server, but if they are part of a record home page then I want to wait until the record id has been supplied. Ideally I want my component to know what type of page it is currently being displayed in and take appropriate action.

Inspecting the URL

One way to achieve this is to inspect the URL of the current page, but this is a pretty brittle approach as if Salesforce change the URL scheme then it stands a good chance of breaking. I could use the navigation mixin to generate URLs from page references and compare those with the current URL, but that seems a little clunky and adds a delay while I wait for the promises to resolve.

targetConfig Properties

The solution I found with the least impact was to use targetConfig stanzas in the component's js-meta.xml configuration file. From the docs, these allow you to:

Configure the component for different page types and define component properties. For example, a component could have different properties on a record home page than on the Salesforce Home page or on an app page.

It was this paragraph that gave me the clue - different properties depending on the page type!

You can define the same property across multiple page types, but define different default values depending on the specific page type. In my case, I define a pageType property and default to the type of page that I am targeting:

<targetConfigs>
    <targetConfig targets="lightning__RecordPage">
        <property label="pageType" name="pageType" type="String" default="record" required="true"/>
    </targetConfig>
    <targetConfig targets="lightning__AppPage">
        <property label="pageType" name="pageType" type="String" default="app" required="true"/>
    </targetConfig>
    <targetConfig targets="lightning__HomePage">
        <property label="pageType" name="pageType" type="String" default="home" required="true"/>
    </targetConfig>
</targetConfigs>

so for a record page, the pageType property is set as 'record' and so on.

In my component, I expose page type as a public property with getter and setter methods (you only need the @api decorator on one of the methods, and convention right now seems to be the getter) :

@api get pageType() {
    return this._pageType;
}

set pageType(value) {
    this._pageType=value;
    this.details+='I am in a(n) ' + this._pageType + ' page\n';
    switch (this._pageType) {
        case 'record' :
             this.details+='Initialisation will happen when the record id  is set (which may already have happened)\n';
             break;
            ;;
        case 'app' :
        case 'home' :
            this.details+='Initialising\n';
            break;
    }                
 }

and similar for the record id, so that I can take some action when that is set:

@api get recordId() {
    return this._recordId;
}

set recordId(value) {
    this._recordId=value;
    this.details+='I have received record id ' + this._recordId + ' - initialising\n';
}

then I can add the component to the record page for Accounts:


a custom app page:


and the home page for the sales standard application:

and in each case the component knows what type of page it has been added to. 

Of course this isn't foolproof - my Evil Co-Worker could edit the pages and change the values in the app builder, leading to all manner of hilarity as my components wait forlornly for the record id that never comes. I could probably extend my Org Documentor to process the flexipage metadata and check the values haven't been changed, but in reality this is fairly low impact sabotage and probably better that the Evil Co-Worker focuses on this rather than something more damaging.

Show Me The Code!

You can find the code at the Github repo.

Related Posts


Saturday, 15 August 2020

Org Documentor and AuraEnabled Classes


Introduction

In the Winter 21 release of Salesforce, access to AuraEnabled methods in Apex classes will be restricted to users with profiles or permission sets that grant access to those classes. If you've been working in a sandbox recently you've probably encountered this already, as the critical update for this was enabled on August 8th.

Figuring out who (if anyone) has access to classes isn't straightforward, as you have to trawl through the profiles and permission sets and check each one. Salesforce have created an Aura Enabled Scanner application that can be installed via an unlocked package, which checks packaged and unpackaged code, but it does require that you login to Salesforce each time you need to check things.

This seemed like a good candidate for my Org Documentor Salesforce CLI Plug-In - something that can be run on a schedule, check that any new classes used as controllers for Aura or Lightning Web Components are accessible, and show which profiles/permission sets have access.


Configuration

To add processing for AuraEnabled classes, an additional stanza is required in the configuration file passed to the bbdoc command - here's what it looks like in my example repo:

"auraenabled": {
    "name": "auraenabled",
    "description": "AuraEnabled Class Access", 
    "subdirectory": ".",
    "image": "images/auraenabled.png",
    "suffix":"object",
    "groups": {
        "other": {
            "name":"other", 
            "title":"AuraEnabled Components",
            "description": "All components with Apex controllers"
        }
    }
}

As with other metadata types, you can specify multiple groups to slice up your components into functional areas - I've lumped them all into one group as I only have one component!


Output

The index (home) page for the org report displays a new card for the AuraEnabled metadata:


An error badge is displayed if there are one or more classes used as controllers for components that aren't accessible from any profile or permission set. 

Clicking in to the details shows the groups and errors:


and clicking into the group shows the detail for each component, with classes that aren't accessible highlighted as errors:


Note that if a Lightning Web Component accesses multiple Apex classes, there will be a row for each class with the same component name in the report, as shown above.


Processing

I was quite pleased by how little code I had to write to add support for this:

  • A classes map structure is created in memory, profilesAndPermSetsByClassname, where each entry has the Apex class name as a key and a value object containing lists of permission sets and profiles with access to the class. This is generated by loading all of the profile and permission set metadata and iterating the ClassAccess sections. 

  • The component groups are iterated, and for each entry in the group:

    • If it is an Aura Component, the controller attribute from the <aura:component/> tag is extracted

    • If it is a Lighting Web Component (which can access multiple Apex classes), @salesforce/apex/ lines are identified and the Apex class name extracted. 

      For each class:

      • The entry for the class in the profilesAndPermSetsByClassname map is extracted. If this is null or both of the profile and permission set lists are empty, the classname is added to the error collection displayed on the group page.

      • A row is added to the JavaScript object backing the group page showing the profiles/permission sets that have access, adding the error highlight colour if there are none.


Plug-In

The updated bbddoc Salesforce CLI plug-in providing AuraEnabled support can be found on NPM, and the source code is available in the Github repository. 


Why not use the AuraEnabledScanner?

You absolutely should - I do, to configure access. This works with the AuraEnabledScanner rather than replacing it. As development continues, new classes and components are added to your codebase. The Org Documentor flags up any that don't have appropriate access, and you can then login to an org that your metadata is deployed to, run the scanner and fix up the access. 

The scanner also handles managed classes which the Org Documentor doesn't, as it works against your metadata on disk rather than everything installed in a specific org instance.


Related Posts

Sunday, 29 December 2019

Going GUI over the Salesforce CLI

Going GUI over the Salesforce CLI

Introduction

The Salesforce CLI has been around since 2016, and its predecessor (the Force.com CLI) is even older, debuting at Dreamforce 2013, and both of these have been making developers lives better ever since. While these tools aren’t just for devs, as a fair amount of admin work can be carried out using them, the command line doesn’t always have broad appeal to those who don’t spend most of their working lives writing code or manually executing commands. 

Now the command line isn’t the only way to access some (but not necessarily all) Salesforce CLI commands - the Salesforce VS Code extensions provide access to a large number through the command palette, and it’s relatively straightforward to add simple use cases by configuring custom tasks. That said, it’s a bit of a sledgehammer to crack a nut, as it’s a full fledged IDE being used to display a couple of dialogs and some output, and there’s a fair bit of installation/configuration required which can quickly take people out of their comfort zone.

Every time I heard about a need for a GUI for the CLI, I’d think to myself that it couldn’t be that hard to build one. A lot of it is around wrapping the CLI commands in Node scripts and presenting the output, something I’ve been doing for years. Typically what happens next is I keep putting off doing anything about it, someone else gets there before me, and I get annoyed at my lack of action. This time I was determined things would be different, and earlier in 2019 this collided with my desire to learn to build cross platform apps using Electron, so I finally got got going on YASP (Yet Another Side Project). 

This post is a light touch on the technical side of things as there’s a fair bit to cover and I don’t want to put people off using the GUI because of too much detail. For anyone interested in knowing more about how the internals work, rest assured there will be more posts. Many more. Far more than you expect or want.

The GUI App

The GUI is built using Electron, a combination of Node JS and Chromium (essentially open source Chrome). If you can write HTML and JavaScript you can build an Electron app - there’s obviously a bunch of specifics to learn, but I found it a very interesting experience. I have intentionally not used any kind of additional framework, instead I’m manipulating the DOM of the various windows using vanilla JavaScript.

Everything in Electron starts with the main process - this manages the application lifecycle and interacts with the operating system. The main process is responsible for creating the windows that the user interacts with, and the main window for my application looks like this:

The body of the page is a set of tabs, each of which have a grid of buttons, each button associated with a Salesforce CLI command. The tabs and commands are configurable via the app/shared/commands.js file included with the application. At present this is a smallish set of commands, but others are pretty close to ready and will be added in the coming weeks. The file embedded in the app will also be the starting point for the app, but users will be able create a local version to tailor the tabs and commands to their exact requirements. 

Clicking a command button opens another window to configure and execute the command:

The page for any command is constructed dynamically based on the configuration from the app/shared/commands.js file, which I’ll cover in a future blog post.  What it does mean is that, as long as the parameters for the command are either simple or already handled, adding a new command is simply a matter of adding a stanza to the commands.js file. 

As this is intended to be helpful to those who aren’t that comfortable with the command line, the command to be executed is displayed as the parameter details are entered. In fact there’s no need to execute a command from the app, a user can simply construct the command then copy and paste it to a command line session if they so desire.

The page header has the following buttons:

Help - this opens up the Help page for the command, with the Overview text again coming from the app/shared/commands.js file, and the Command Help coming directly from the Salesforce CLI.

Change Directory - after following the instructions in the README file, the GUI app starts in the cloned repository directory, which may not be where commands need to be executed from (to pick up a project specific sfdx-project.json file, for example). Clicking this button allows the user to change the working directory. If the directory is changed from the main page, this will apply to all commands executed thereafter, whereas if it is changed from a command page hen it only applies to that command window. The current working directory is always displayed on the footer of a window.

Show Log - when you execute a command the output is shown in a Log modal. If you close this you can re-open it at any point in time by clicking the Show Log button.

Supported Commands

For the initial release, the following commands are supported:

  • Login to Org - authenticate a user for a Salesforce instance
  • Logout of Org - clear a previously authenticated user - always do this for orgs containing real data
  • Default Username - set the default user for future commands, either in a specific project directory or globally. 
    Note that the GUI takes this is a default value that the user may with to change, so it will simply be pre-selected in the Org dropdown
  • Default Dev Hub - set the default developer hub user for future commands, either in a specific project directory or globally. 
    Again, the GUI takes this as a default value that can be overwritten.
  • Open Org - this is the command I use the most by far as with my various duties as CTO of BrightGen ad myriad side projects, I’m forever needing to be in a different org.
  • Create Scratch Org - create a Salesforce DX scratch org
  • Delete Scratch Org - delete a scratch org prior to its scheduled expiry time

I have more commands that are pretty close to ready, so there will be more added over the first weeks of 2020, assuming time allows.

All of the commands implicitly add a —json switch so that the output can be parsed programmatically - this does mean that you won’t see any output until the command is complete, so patience is required.

Caching Org Names

Any command that requires a user or dev hub user provides a datalist (a dropdown that you can also search in) with options based on the required org type (scratch, dev hub, any). The Salesforce CLI command to retrieve the orgs the user is currently authenticated against takes quite a while if you are authenticated against a lot of orgs, so this is run at startup and the results cached in a file with any authentication tokens removed. Any commands which change the authenticated orgs (e.g. creating a scratch org) will require the org cache to be refreshed, which can take a few moments. If you carry out any commands outside of the GUI which add or remove orgs, simply click the Refresh Orgs button on the main page and this will update the cached information.

Getting Started

Obviously you need to have the Salesforce CLI installed before you can work with the GUI. Assuming you have this, you can simply clone the repository, execute npm install to install the dependencies, then execute npm run start to fire up the GUI and away you go. The dependency installation takes a little while if you are on a slow internet connection, as Electron is touch on the large side.

Note that I’ve tested the GUI on MacOS Catalina and Windows 10. It might work on other OS and it might not. Caveat emptor.

Related Posts


Thursday, 13 September 2018

Background Utility Items in Winter 19

Background Utility Items in Winter 19

Introduction

The Winter 19 release of Salesforce introduces the concept of Background Utility Items, Lightning Components that are added to the Lightning Experience utility bar but don’t take up any real estate, can’t be opened and have no user interface. This is exactly what I was looking for when I put together my Toast Message from a Visualforce Page blog - the utility bar component that received the notification to show a toast message doesn’t need to interact with the user, but still has an entry. The user can also click on the item and receive a lovely empty popup window:

Screen Shot 2018 09 08 at 08 09 52

Not the worst user experience in the world, but not the best either. I guess in production I’d probably put a message that this item isn’t user configurable. One item like this isn’t so bad, but imagine if there were half a dozen - a large chunk of the utility bar would be taken up with items that only serve to distract the user, although I’d definitely loo to combine them all into a single item if I could.

Refresher

In case you haven’t committed the original blog post to memory (and I’m not going to lie, that hurts), here’s how it works:

Toast


I enter a message in my Lightning component, which fires a toast event (1), this is picked up by the event handle in the Visualforce JavaScript, which posts a message (2) that is received by the Lightning component in the utility bar. This fires it’s own toast event (3) that, as it is executing in the one.app container, displays a toast message to the user.

Implement the Interface

Removing the UI aspect is as simple as implementing an interface - lightning:backgroundUtilityItem. Once i’ve updated my component definition with this (and changed the domain references to match my pre-release org):

<aura:component 
    implements="flexipage:availableForAllPageTypes,lightning:backgroundUtilityItem" 
    access="global" >

    <aura:attribute name="vfHost" type="String"
             default="kabprerel-dev-ed--c.gus.visual.force.com"/>
    <aura:handler name="init" value="{!this}" action="{!c.doInit}"/>
</aura:component>

When I open my app now, there’s nothing in the utility bar to consume space or attract the user, but my functionality works the same:

Toast2

You can find the updated code at my Winter 19 Samples github repo.

Related


Sunday, 24 June 2018

Sharing your Salesforce App on Github

Sharing your Salesforce App on Github

Share

Introduction

Over the years there’s been a few ways to give away Salesforce apps. When I first started 10 years ago there was a Google Code Share accessible from the Developerforce site, but that star waned some time ago. There’s also unmanaged packages, but that typically requires someone to install your package into an org before they can look at the contents of the app, which is fine if they know they want to use it in it’s entirety, but less useful if they want to use your app as s starting point or example for something that they are doing.

Over the last few years, Github has become the de-facto way to share and collaborate on code. As well as providing (free for public) Git repository hosting, it has a bunch of other cool features to allow people to collaborate:

  • Pull requests, to allow changes to be reviewed, discussed and refined before they are merged.
  • Issue tracking, to capture ideas, feature requests, bugs
  • Releases, so that you can wrap and ship specific versions

A collection of useful applications in Github is also a signal to potential employers that you are passionate about app creation and I’m sure won’t do your career any harm. It’s also a great way to share a sample application after presenting at a user group or World Tour event.

I’m using my Summer 18 samples codebase as the example Salesforce application for this post. Note that this post assumes you have created a Github account and completed Git setup.

But Github is Microsoft now

It is, but under Satya Nadella we’re seeing a new Microsoft, particularly around open source. Even if you are nervous around what might happen to Github in the future, you are putting your application out there for everyone to use, so it’s not like it’s some big secret that Microsoft might help themselves to. I can see how a Microsoft competitor with a business account might be worried about security,  but for public applications it’s not something I’d be concerning myself with.

Metadata

The most common mechanism of storing an application outside of Salesforce is extracting the metadata via the Metadata API (SalesforceDX Scratch Org format is the new kid on the block, but at the moment is more likely to be of interest to ISVs in my opinion). There are various mechanisms for extracting metadata, requiring various degrees of setup, such as:

  • An IDE, such as the Force.com IDE, where you can choose from a subset of metadata to retrieve
  • The Force.com Migration Tool (ant), where you’ll need to define a manifest file (package.xml) describing the metadata you want to retrieve
  • The Salesforce CLI, via the force:mdapi:retrieve subcommand - again you’ll need a manifest file
  • The Force.com CLI, via the export and fetch commands.

In my view the Force.com CLI is still the easiest tool to use to export metadata - I wrote a blog post explaining how to do this a while ago.

Once you have your metadata exported you will have a structure similar to the following:

Screen Shot 2018 06 24 at 10 27 04


Creating a Local Repository

Github uses Git to manage the set of files that make up your application, stored in a data structure known as a repository. This enables tracking of changes to files (and much more besides). In order to create a repository, however, you need to extract your application from Salesforce.

Once your metadata is extracted from Salesforce it’s in a state where you can easily migrate it to other orgs, but it isn’t set up to be managed by Git. To turn your codebase into a local Git repository, you use the git init command:

$ git init .

Initialized empty Git repository in /Users/kbowden/GithubBlog/.git/

You can then run git status and see that you have indeed turned your app into a repository:

$ git status 

On branch master
No commits yet
Untracked files:

  (use "git add ..." to include in what will be committed)

       src/

nothing added to commit but untracked files present (use "git add" to track)

So you have a repository, but none of your applications files are being tracked by it. To achieve this, execute git add to stage the files and then git commit to commit them to the repository:

$ git add src

$ git commit
[master (root-commit) 35fa327] Created.
31 files changed, 202 insertions(+)
create mode 100644 src/aura/Navigator/Navigator.auradoc
create mode 100644 src/aura/Navigator/Navigator.cmp
      ...

create mode 100644 src/classes/UtilityController.cls
create mode 100644 src/classes/UtilityController.cls-meta.xml

Note that the git commit command will open an editor for your commit message.

Create the Remote Repository

Now that the code is being tracked by Git, the final step is to create the remote Github repository and push your local changes to it.

There are various ways to set up a remote repository, I use the following steps as it reminds me to set up the README.md file that serves as the “home page” for the repository on Github:

  1. Login to Github
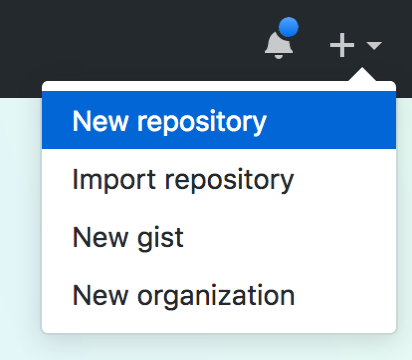
  2. Click the + button on the top right and on the resulting dropdown menu, select New Repository

    Screen Shot 2018 06 24 at 11 02 08
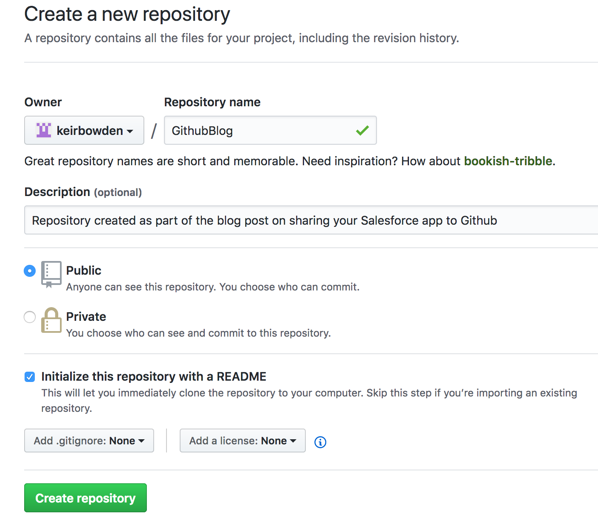
  3. Fill out the resulting form, making sure to tick the box titled 'Initialize this repository with a README’, and click the Create Repository button

    Screen Shot 2018 06 24 at 11 03 45

  4. On the resulting page, click the ‘Clone or Download’ button and copy the Web URL:

    Screen Shot 2018 06 24 at 11 06 44

  5. Add the remote repository, using the Web URL copied in the step above. I’ve named the remote ‘origin’ as this is going to be the main repository going forward:
    $ git remote add origin https://github.com/keirbowden/GithubBlog.git
  6. Verify the remote:
    $ git remote -v

    origin https://github.com/keirbowden/GithubBlog.git (fetch)
    origin https://github.com/keirbowden/GithubBlog.git (push)

Pushing Local to Remote

The remote Github repository is now created and associated with the local repository. There’s nothing in the remote repository apart from the README.md file, so the next step is to push the contents of the local repository. Before this can be done, the contents of the remote repository must be merged in, as it has changes (README.md) that aren’t in the local repo.

The git pull command fetches the changes from the remote repository and merges them into the named branch in a single action. As the local and the remote repository have been created separately, use the '--allow-unrelated-histories' option to allow everything to be coerced into a single set of files:

$ git pull origin master --allow-unrelated-histories

From https://github.com/keirbowden/GithubBlog
* branch master -> FETCH_HEAD
Merge made by the 'recursive' strategy.
README.md | 2 ++
1 file changed, 2 insertions(+)
create mode 100644 README.md

Finally, push the consolidated repository to Github via the git push command:

$ git push origin master

Counting objects: 30, done.
Delta compression using up to 8 threads.
Compressing objects: 100% (24/24), done.
Writing objects: 100% (30/30), 4.71 KiB | 1.57 MiB/s, done.
Total 30 (delta 2), reused 0 (delta 0)
remote: Resolving deltas: 100% (2/2), done.
To https://github.com/keirbowden/GithubBlog.git
f956682..be01baf master -> master

All Done

Accessing the repository on Github shows the entire Salesforce application is now available:

Screen Shot 2018 06 24 at 11 28 15

Related Posts


Thursday, 14 June 2018

Building my own Learning System - Part 7

Building my own Learning System - Part 7

Learning

Introduction

Since I last blogged about my learning system I’ve started using it at BrightGen, for example to onboard developers onto our BrightMedia accelerator, where it has been generally well received. Not least by me, as it means that I don’t need to spend multiple hours with every developer, going through the same content which they may or may not be listening to. I’m also seeing some customers indicating that they’d like to pick up development tasks in BrightMedia projects. Thanks to my original design decision of distributing content across multiple endpoints, I can expose content to upskill the customers without giving away internal BrightGen content, or them even knowing that other content exists.

I’ve added in some features that are useful, to me at least, including:

  • Filtering by topic
  • Executing as a user (the github repo has the concept of running as a specific email address, as it’s unauthenticated)
  • Added an info modal, detailing the recent changes, which I keep forgetting to update, so if you use the unmanaged package to install it will likely be at least one version out of date :)

The great thing about building my own learning system though, is that I am learning by building it.

Learning by Building

As I’m adding features to my learning system I’m also learning more. Not just the Salesforce features that I expected to learn about, such as using the latest standard lightning components, but other areas that aren’t even Salesforce related.

Most recently I’ve been learning more about how to operate on Github. Up until now I’ve just typically created a repo when I wrote a blog post and added to it when I wrote another blog post on the same topic. Now that I’ve got a project that I’m trying to keep a bit more organised, I’m :

  • Adding details of fixes/features into CHANGELOG.md (I’m pretty good on this one - much better than my modal. I probably need to automate updating the modal from the change log).
  • Creating releases
  • Adding diffs to CHANGELOG.md that show all changes between releases 

This wasn’t something that I expected when I started working on my learning system and, once again, shows the value of side projects. I knew that I’d learn, but surprised even myself.

Related Information

All previous posts about the learning system have moved to a dedicated page on my blog. The code is available in the following repositories.