Showing posts with label controller. Show all posts

Saturday, 10 May 2014

Transient List Command Button Woes

Doug Grimwade, one of our tech leads at BrightGen, hit a strange problem this week around command buttons (or links) not executing the action method they were associated with, but simply refreshing the page.  Dwindling the page and controller down to their essentials we were left with:

Controller:

public with sharing class RepeatCtrl
{
  public transient List<Account> accounts {get; set;}
  public Integer counter {get; set;}
	
  public RepeatCtrl()
  {
    counter=3;
    setupAccounts();
  }

  private void setupAccounts()
  {
    accounts=[select id, Name from Account order by CreatedDate asc limit :counter];
  }
	
  public void incCounter()
  {
    System.debug('### Inc Counter Called');
    counter++;
    setupAccounts();
  }
}

Page:

<apex:page controller="RepeatCtrl">
  <apex:form >
    <apex:pageBlock title="Accounts">
      <apex:pageblocktable value="{!accounts}" var="acc">
        <apex:column value="{!acc.Name}" />
        <apex:column headerValue="Action">
          <apex:commandButton value="Inc Counter" action="{!incCounter}" />
        </apex:column>
      </apex:pageblocktable>
  
      <br/><apex:outputText value="Counter value = {!counter}" />
    </apex:pageBlock>
  </apex:form>
</apex:page>

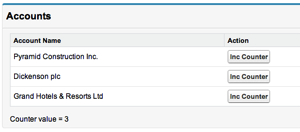
 The basic premise of this page (remember this is reduced to reproduce the problem) is to display a list of accounts, with the size of the list dictated by the counter property.  Pressing any of the buttons should increment the counter and refresh the list with an additional element.  

Opening the page displayed the initial list as expected:
Screen Shot 2014 05 10 at 15 35 14

However, clicking a button didn’t work as expected:
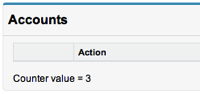
Screen Shot 2014 05 10 at 15 36 21

the list has disappeared and the counter value hasn’t incremented.  Investigations in the log file showed that the action method wasn’t being called, as the debug information didn’t appear.  

Moving the post back to an action function, invoked by a click handler on the command button fixed things:

<apex:actionFunction action="{!incCounter}" name="incCounter"/>
...
<apex:commandButton value="Inc Counter" action="{!incCounter}"
        	onclick="incCounter(); return false;"/>


As did adding a command button outside the pageblocktable worked correctly - the counter was incremented and the list displayed four elements:
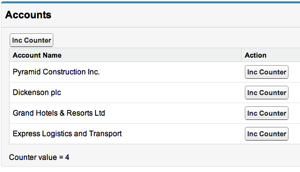
Screen Shot 2014 05 10 at 15 39 38

So it appeared that the issue, for some reason, was that the component carrying out the postback was nested inside the pageblocktable iterator element.  

While I dug around on the Developer Forums for a solution, Doug was trying various tweaks to the code and found the problem - the transient nature of the list of accounts.  Making this list non-transient and storing it in the Visualforce view state fixed the problem: 

public with sharing class RepeatCtrl
{
	public List<Account> accounts {get; set;}

...

Armed with this information I continued googling to see if this was documented behaviour, but this turned up no results.  Remembering that Visualforce is essentially built on JSF, I searched in that direction, and turned up a promising hit:

JSF2 Command Button Not Working

which states:

If command button is nested in a ui:repeat tag, command button or link will not work until the iterating bean/List is in view scope or bigger scope.

...

JSF iteration controls generally maintain a cursor to do their work, and the only way that the cursor can function properly is if the referenced datamodel is in a non-transient scope. For JSF1, that means Session Scope or higher. For JSF2, View Scope or higher.

View Scope in JSF equates to View State in Visualforce, so this matched our scenario.  Even though the command button didn’t use or rely on any element in the list being iterated, that fact that it was inside the iterator meant that the list had to be reconstructed server side before the command button would work correctly.  

A couple of lessons learned here then - transient has some side effects and if you can’t find behaviour documented in Visualforce, its always worth a look at the building blocks of the technology. We were quite pleased that it didn’t take us 6 hours to find the fix, even if we didn’t understand the solution correctly, unlike the poster with the JSF problem. Hopefully this blog will help the next developer to encounter this issue fix it even faster.

One last thing on an unrelated note - the @forcedotcom twitter handle has been replaced with @salesforcedevs 

Saturday, 15 March 2014

Reading Barcodes in Salesforce1

A little over a month ago I wrote a post on Reading QR Codes in Salesforce1. At the time I added an entry to my todo list to investigate barcode reading through a similar mechanism. A twitter post from @cherfeldman asking if this was possible in Salesforce1 moved it up to the top and so I started looking into it in earnest.

One of my key requirements was to be able to process the code on device, as I didn’t want to be sending high resolution images  from a phone or tablet back to the server, especially if I’m using what passes for mobile broadband outside of a big city in the UK.

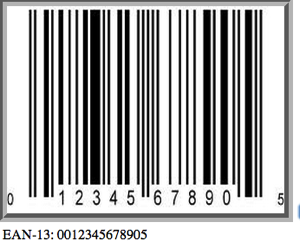
Some goggling threw up a few JavaScript packages, but based on the demos provided by most of them, Eddie Larsson’s Barcode Reader looked to be the pick of the bunch. The demo page shows some pretty impressive decoding - multiple codes per image, blurry images, rotated through 90 + 180 degrees etc.  It also handles a number of formats - Code128, Code93, Code39 and EAN-13.

Creating a prototype in Visualforce was exceptionally straightforward - I just had to download the JavaScript that does the heavy lifting (DecoderWorker.js) and upload this as a static resource to my developer edition of Salesforce and then cut and paste the source of the example upload page and surround it with a few Visualforce tags. 

Screen Shot 2014 03 15 at 07 12 34

While it was great to get this working so easily, it wasn’t a huge amount of use as it stood, as it simply decodes the image and outputs the associated number. The first thing I did was to add a field to my account sobject of “Barcode”, so that scanning a barcode could take the user to a Salesforce record. I then tweaked the JavaScript to:

  • Output the time taken to decode 
  • Allow the user to choose when to decode the image, in case a picture didn’t turn out that great
  • Add a “Restart” button to reload the page, as hitting the back button and then trying to decode didn’t work 100% of the time
  • Execute a controller method via JavaScript remoting to retrieve the id of the matching record

Trying this out on my laptop decoded the barcode in around 3-4 seconds, however the same thing on my iPhone or iPad took some time and the user had no idea what was happening, so clearly something to hold their interest was required.

Looking at the underlying JavaScript, it makes use of HTML5 Web Workers to fire off multiple decoders to attack the barcode from various angles concurrently.  

var DecodeWorker = new Worker("{!URLFOR($Resource.DecodeWorker)}");
var RightWorker = new Worker("{!URLFOR($Resource.DecodeWorker)}");
var LeftWorker = new Worker("{!URLFOR($Resource.DecodeWorker)}");
var FlipWorker = new Worker("{!URLFOR($Resource.DecodeWorker)}");

where $Resource.DecodeWorker is the static resource reference for the DecodeWorker.js file.

Without web workers, things would be even slower as one decoder would have to finish before the next one could start, but I was still seeing decode times of around a minute.  I therefore decided to notify the user that the workers had been launched, and then post regular messages to indicate they were still running until they had either all completed or the barcode had been successfully processed.  I could do this through alerts or dialogs, but a few weeks ago Jeff Douglas’ Force.com Weekly linked to a rather nice JavaScript library for notifying users - alertify.js. I’ve used this a couple of times and its reliable, fast and looks great so I decided this was the way to go.

Adding alertify to a page is as simple as including three CSS and JavaScript files - I’ve uploaded the alertify zip as a static resource in my developer edition so I can include the files from that:

<apex:stylesheet value="{!URLFOR($Resource.alertify, 
'alertify.js-0.3.11/themes/alertify.core.css')}"/> <apex:stylesheet value="{!URLFOR($Resource.alertify,
'alertify.js-0.3.11/themes/alertify.default.css')}"/> <apex:includeScript value="{!URLFOR($Resource.alertify,
'alertify.js-0.3.11/lib/alertify.min.js')}"/>

I can then post a message to the user from JavaScript via a single function call:

alertify.log('Launching workers');

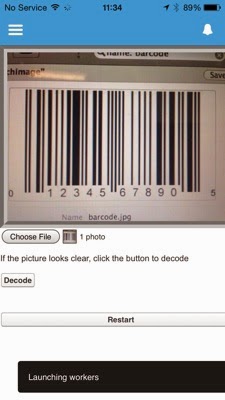
The user experience is now take a picture of a barcode or pick one from the device gallery, and click the “Decode” button if it looks good, as which point the user is told that work has started:

IMG 1153

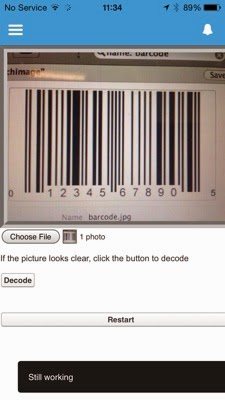
while the workers are running, regular messages are alerted through a JavaScript timer:

interval=setInterval(function(){alertify.log('Still working');},5000);


IMG 1154

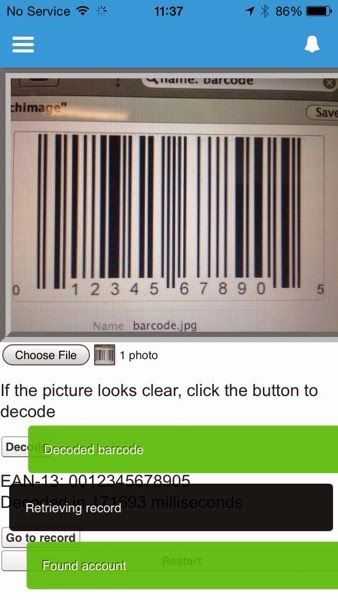
Then when the decoding completes, messages are displayed to indicate the success/failure and assuming success, the controller method is executed to find a record where the Barcode field matches the decoded value.

IMG 1157

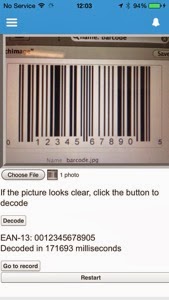
the decoded value and time taken is then displayed, and a button to navigate to the record is displayed:

IMG 1158

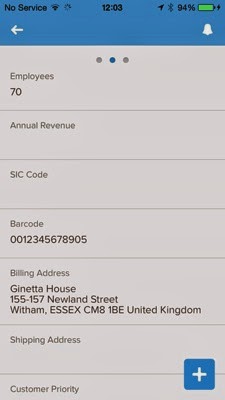
Clicking the "Go to record” button goes to the record matching the barcode, which is my BrightGen account:

IMG 1159

The full page source is available at this gist, and the associated controller at this gist. You’ll also need to set up the static resources for:

  • alertify -  download the zip file, then upload as a static resource named ‘alertify'
  • decoder worker - download the file, then upload as a static resource named ‘DecodeWorker'.
    Note that this isn't coming from the github repository, as the code has changed since I originally wrote this post - instead this is the version that I downloaded back in 2014. 

Note that this won’t work on Android 4.4, as it appears that the ability to access the camera via a file input was removed from the chromium web view in this version - you can read more about this in the Cordova JIRA entry.

Saturday, 20 July 2013

Publisher Actions - Not Just Creating Records

The Summer 13 Salesforce release introduced Publisher Actions - these allow additional chatter actions to be added to the publisher, over and above the standard Post, File, Link and Poll actions.   Some setup is required before you can use Publisher Actions - this is detailed in the Salesforce help here.

There are four types of Publisher Actions - Create and Custom for a specific object, and Global Create and Global Custom.  The Create actions allow a new record to be created directly from the chatter feed.  Create for a specific object allows a new record to be created that is related to the object the feed appears on - for example, to create a new Opportunity from an Account chatter feed where the Opportunity account id is set to the id of the Account the feed appears on. Global Create allows a new record to be created from a feed, but with no relationship to any existing object.  One very useful aspect of the Create actions is that you can specify default values for fields, which goes some way to removing the need for URL-hacking.

The Custom actions allow a Visualforce page to be displayed in a chatter feed - the specific object variant of this means that the standard controller must be used, as the id of the record the chatter feed appears on will be passed to the page, while the Global variant uses a custom controller. An example of a Custom action is to display the location of an account on a map - while you can also achieve this via an embedded Visualforce page on the standard record view, making it a Publisher Action means it is displayed on demand, so those users that aren't interested in that information don't have to wait for the map to render.

Custom actions can also create information. In this post I'll demonstrate how to create a Publisher action to post summary information to a feed.

Here at BrightGen, we have a Service Management offering for Salesforce. Rather than waiting until the end of the month to find out how we are doing for a particular customer, its useful to push information out on a regular basis. In this post I'll demonstrate how to create a Custom action that posts a snapshot of case information to an account record.

The snapshot will contain details of cases created this month, cases closed this month and the current number of open cases for the account.

As this is an object specific action, the page uses the account standard controller and the additional functionality is provided by a controller extension. This executes a number of queries to get the case information required.  The snippet below determines the number of cases closed this month:

Date startDate=System.today().toStartOfMonth();
Date endDate=System.today().addMonths(1).toStartOfMonth();
List<AggregateResult> ars=[select COUNT(Id) closedCount
		 	   from Case
		 	   where Status='Closed'
		 	   and AccountId=:accId
			   and ClosedDate>=:startDate
		   	   and ClosedDate<:endDate];

Integer result=0;
if (ars.size()>0)
{
	AggregateResult ar=ars[0];
	result=(Integer) ar.get('closedCount');
}

Once all the information is gathered, this is posted to the feed programmatically:

FeedItem item=new FeedItem();
item.ParentId=accId;
item.body='Service snapshot\n' +
          'As of ' + System.now().format('dd/MM/yyyy')  +
          '\nNew Cases : ' + getNewCases() +
          '\nClosed Cases : ' + getClosedCases() +
          '\nOpen Cases : ' + getOpenCases();
		
insert item;
		
ApexPages.addMessage(new
ApexPages.Message(ApexPages.Severity.INFO, 'Snapshot Posted'));
posted=true;

Note the final line of this snippet, which sets the boolean property posted to true - this property is used in to automatically refresh the page, otherwise the post does not get displayed to the user.

The page simply displays the details and provides a button for the user to post the details to the feed:

  <apex:pageBlock title="Service Snapshot">
    <apex:pageBlockButtons location="bottom">
      <apex:commandButton value="Post to Feed" action="{!post}" />
    </apex:pageBlockButtons>
    <apex:pageBlockSection columns="1">
      <apex:pageBlockSectionItem >
        <apex:outputLabel value="Closed Cases" />
        <apex:outputText value="{!closedCases}" />
      </apex:pageBlockSectionItem>
      <apex:pageBlockSectionItem >
        <apex:outputLabel value="New Cases" />
        <apex:outputText value="{!newCases}" />
      </apex:pageBlockSectionItem>
      <apex:pageBlockSectionItem >
        <apex:outputLabel value="Open Cases" />
        <apex:outputText value="{!openCases}" />
      </apex:pageBlockSectionItem>
    </apex:pageBlockSection>
  </apex:pageBlock>

The automatic refresh (which is based on the technique described in this blog post) is provided by the following, conditionally rendered, JavaScript:

  <apex:outputPanel rendered="{!posted}">
   <script>
      window.top.location='/{!Account.id}';
   </script>
 </apex:outputPanel>

The code for the controller extension can be found in this gist, and the Visualforce page in this gist. You'll need to save these into your Salesforce edition to complete the next steps.

Next, create a publisher action for this page - navigate to Setup -> Customize -> Accounts -> Buttons, Links, and Actions and click the New Action button.

Scroll down to the Chatter Feed section and fill out the details as shown in the screenshot below and click the Save button.

Screen Shot 2013 07 20 at 13 14 52

(note that this assumes you have saved the Visualforce page with the name ChatterAccountSnapshot - if that is not the case, pick the name that you saved the page under from the Visualforce Page pick list).

To add the Publisher Action to the chatter feed, edit the page layout for the Account record.  Scroll down to the Chatter Feed section - if you see the following text, click the 'overidde the global layout' to make the actions editable for that layout:

Screen Shot 2013 07 20 at 13 21 34

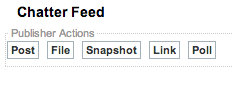
The Chatter Feed section will then contain the following standard actions:

Screen Shot 2013 07 20 at 13 23 19

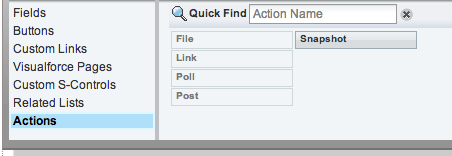
Next, select the Actions entry from the menu at the top left of the page layout editor:

Screen Shot 2013 07 20 at 13 24 50

Drag the Snapshot entry from the right hand side to the Chatter Feed section - note that this can be placed anywhere in the list of actions:

Screen Shot 2013 07 20 at 13 25 40

and finally save the page layout.


Now lets take a look at the Publisher Action in action:

Navigating to an account view page shows the new Snapshot action in the Chatter Publisher. Clicking the Snapshot button displays the Visualforce page with the case detais:

Screen Shot 2013 07 20 at 13 27 01

Clicking the Post to Feed button posts the information to the chatter feed and then refreshes the page to display the post to the user:

Screen Shot 2013 07 20 at 13 29 17


Wednesday, 2 May 2012

Opportunity Status Chart

An important aspect when working on Opportunities (or anything with a process that a record progresses through) is to knowing how far through the Sales Process a particular Opportunity is.  While some users may be familiar enough with the Sales Process to be able to figure this out immediately from the Stage Name, a visual indicator always helps.

Something I've been working on for a while now is using a line chart for just this purpose.  The key elements of this are:


  • List all of the Stages for the Opportunity - if record types are in use, this should be the Stages applicable to that record type
  • Plot a green line and markers for Stages that have been completed (or skipped, if the Opportunity has jumped into the process at an advanced staged
  • Plot a red line and markers for Stages still to come

The first point had always been a sticking point, but I managed to solve this using back in January by allowing Visualforce to render the specific picklist for the record, and then sending this back to the controller prior to processing the record, as detailed in this post.

It will come as no surprise to regular readers of this blog that I chose to handle the second and third points using the Dojo Charting framework.  I've finally completed the charting code  - below is a screenshot showing the chart embedded into the standard Opportunity record view page:


The controller simply walks the Stage Names and adds them to a complete list until it encounters the current state.   All Stage Names after this go into a todo list - note that both Closed-Won and Closed-Lost appear, and also the default '-- None-- entry - probably not what is desired and left as an exercise for the avid student.  The page is as follows:

<apex:page standardController="Opportunity" extensions="OpportunityStatusChartController" showheader="false" standardstylesheets="false" sidebar="false">
<head>
  <script type="text/javascript" src="https://ajax.googleapis.com/ajax/libs/dojo/1.5/dojo/dojo.xd.js"
        djConfig="parseOnLoad: true,
      modulePaths: { 
          'dojo': 'https://ajax.googleapis.com/ajax/libs/dojo/1.5/dojo', 
          'dijit': 'https://ajax.googleapis.com/ajax/libs/dojo/1.5/dijit', 
         'dojox': 'https://ajax.googleapis.com/ajax/libs/dojo/1.5/dojox' 
             }
    ">
  </script>
  <link rel="stylesheet"
    href="https://ajax.googleapis.com/ajax/libs/dojo/1.5/dijit/themes/claro/claro.css" />
</head>
<body class="claro">
  <apex:form id="frm">
    <apex:actionFunction name="reloadWithStages" action="{!reload}" />
    <div id="test1" style="width: 100%; height: 150px;"></div>
    <apex:outputPanel layout="block" id="vals" style="display:none">
      <apex:inputField value="{!Opportunity.StageName}" required="false" id="stages"/>
      <apex:inputText value="{!valsText}" required="false" id="back"/>
    </apex:outputPanel>
  </apex:form>
  <apex:outputField value="{!Opportunity.StageName}" rendered="false"/>

  <script>
  function reload()
  {
     var ele=document.getElementById('{!$Component.frm.stages}');
     var idx=0;
     var valText='';
     for (idx=0; idx<ele.length; idx++)
     {
        valText+=ele.options[idx].text + ':';
     }
   
     var backele=document.getElementById('{!$Component.frm.back}');
     backele.value=valText;
   
     reloadWithStages();
  }

  <apex:outputPanel layout="none" rendered="{!NOT(loadOnce)}">
    dojo.require("dojox.charting.Chart2D");
    dojo.require("dojox.charting.axis2d.Default");  
    dojo.require("dojox.charting.plot2d.Default");
    dojo.require("dojox.charting.plot2d.StackedLines");
    dojo.require("dojox.charting.plot2d.Columns");
    dojo.require("dojox.charting.plot2d.Bars");
    dojo.require("dojox.charting.plot2d.ClusteredBars");
    dojo.require("dojox.charting.plot2d.StackedBars");
    dojo.require("dojox.charting.plot2d.Bubble");
    dojo.require("dojox.charting.plot2d.Grid");
    dojo.require("dojox.charting.plot2d.Pie");

    dojo.require("dojox.charting.themes.PlotKit.green");

    dojo.require("dojox.charting.action2d.Highlight");
    dojo.require("dojox.charting.action2d.Magnify");
    dojo.require("dojox.charting.action2d.MoveSlice");
    dojo.require("dojox.charting.action2d.Shake");
    dojo.require("dojox.charting.action2d.Tooltip");

    dojo.require("dojox.charting.widget.Legend");

    dojo.require("dojo.colors");
    dojo.require("dojo.fx.easing");
    dojo.require("dojo.date.stamp");
    dojo.require("dojo.date.locale");

    makeCharts = function(){

 var myMap={
  <apex:repeat value="{!labels}" var="label">
      '{!label.idx}':'{!label.text}'<apex:outputText value="," rendered="{!label.idx!=labelCount}"/>
  </apex:repeat>
            };
            
 var chart1 = new dojox.charting.Chart2D("test1");
 chart1.setTheme(dojox.charting.themes.PlotKit.green);
 chart1.addPlot("default", {type: "Default", lines: true, markers: true, tension:2});
 chart1.addAxis("x",
 { 
    majorTick: {stroke: "black", length: 3},
    majorTickStep:1, 
  minorTicks: false, 
  microTicks: false,
  min: 0,
  max: {!labelCount},
  rotation:30, 
  font: "6pt Tahoma",
  labels: [
  <apex:repeat value="{!labels}" var="label">
      {value: {!label.idx}, text:'{!label.text}'}<apex:outputText value="," rendered="{!label.idx!=labelCount}"/>
  </apex:repeat>
  ]
  
 });
 
 chart1.addSeries("cleared", 
   [
       <apex:repeat value="{!doneStageNumbers}" var="stage">
    {x: {!stage}, y: 2},
    </apex:repeat>
   ]);
 chart1.addSeries("todo", 
   [
       <apex:repeat value="{!todoStageNumbers}" var="stage">
    {x: {!stage}, y: 2},
    </apex:repeat>
   ],
   {plot: "default", stroke: {color:"#FE2E2E"}}
   );
   
 var myMap={
  <apex:repeat value="{!tooltips}" var="tooltip">
   "{!tooltip.idx}": "{!tooltip.text}",
  </apex:repeat>
            };
            
 var anim1a = new dojox.charting.action2d.Magnify(chart1, "default");
 var anim1b = new dojox.charting.action2d.Tooltip(chart1, "default",
 {
     text : function(o) {
         return (myMap[o.x])
                       }
        });
   
 chart1.render();
    };
  </apex:outputPanel>
   dojo.addOnLoad(
     <apex:outputPanel layout="none" rendered="{!loadOnce}">
        reload
     </apex:outputPanel>
     <apex:outputPanel layout="none" rendered="{!NOT(loadOnce)}">
 makeCharts
     </apex:outputPanel>
      );
  </script>
</body>
</apex:page>

Essentially this page has two distinct functions - the first to render a hidden form containing an input field for the StageName field, and then submit the values back via javascript, while the second is to actually render the chart based on the values.  The completed stages are plotted as a separate series to those that remain, to allow that part of the chart to be rendered in a different colour and markers. I've also thrown in a tooltip on each of my markers so that I can display some help/explanation text about each of the stages.

The controller is quite a simple one:
public class OpportunityStatusChartController
{
 public List<Tuple> labels {get; set;}
 public List<Tuple> tooltips {get; set;}
 public List<Integer> doneStageNumbers {get; set;}
 public List<Integer> todoStageNumbers {get; set;}
 public Integer labelCount {get; set;}
 public Boolean loadOnce {get; set;}
 public String valsText {get; set;}
        private Opportunity opp;
 
 public OpportunityStatusChartController(ApexPages.StandardController std)
 {
  opp=(Opportunity) std.getRecord();
  loadOnce=true;
 }
 
 public PageReference reload()
 {
  init();
  loadOnce=false;
  
  return null;
 }
 
 
 public void init()
 {
  labels=new List<Tuple>();
  tooltips=new List<Tuple>();
  doneStageNumbers=new List<Integer>();
  todoStageNumbers=new List<Integer>();
  
  labelCount=0;
  Boolean done=false;
  labels.add(new Tuple(labelCount++, '.'));
  
  for (String val : valsText.split(':'))
  {
   if (!done)
   {
    doneStageNumbers.add(labelCount);
   }
   else
   {
    todoStageNumbers.add(labelCount);
   }
    
   if (val==opp.StageName)
   {
    done=true;
    todoStageNumbers.add(labelCount);
   }
   labels.add(new Tuple(labelCount, val));
   toolTips.add(new Tuple(labelCount, 'Help for ' + val + ' stage'));
   labelCount++;
  }  
  labels.add(new Tuple(labelCount, '.'));
 }
 
 public class Tuple 
 {
  public Integer idx {get; set;}
  public String text {get; set;}
  
  public Tuple(Integer inIdx, String inText)
  {
   idx=inIdx;
   text=inText;
  }
 }
}

The labels are returned in a containing Tuple class along with an index, which is the x-axis position of the ploy.  Everything is plotted at the same level on the y-axis, as I want a straight line chart.

I can then change the record type of the Opportunity, save it and the chart updates accordingly:


You can see a live example of this on my demo site - simply click on one of the Opportunities to see the progress chart.