Showing posts with label Chatter. Show all posts

Saturday, 27 September 2014

London Salesforce Developers September Meetup

The September gathering of the London Salesforce Developers took place on September 24th at the Make Positive offices on the south side of the River Thames.  The talk this month was a continuation of the previous month’s integration theme on Multi Org Collaborative Architecture, by Richard Clark.

IMG 1468

I’m not going to give too much away about this talk, as it was a dry run for Dreamforce. If you aren’t going to Dreamforce you’ll be able to view the slide deck and probably a recording of the talk as most dev zone sessions are recorded.

What I will say is that there is some good, generic single versus multi-org content which anyone considering the two strategies will find useful, followed by a deeper dive into the challenges and solutions around cross-org collaboration.

As usual this was followed by a trip to a local hostelry for some further discussion and networking (and the usual delays on my train home, as my twitter followers know only too well!).

The inaugural meetup of the London Salesforce Admins takes place on Thursday October 2nd - I’m attending this so stay tuned for a write up after the event.

Sunday, 7 September 2014

Salesforce1 Notifications from Apex

As documented in the Salesforce Summer 14 Release Notes, there are a number of activities that send a Salesforce1 notification to a user (assuming they haven’t disabled any), but all of these require manual actions to be taken via chatter.  While playing around with some code to notify the owner of a Salesforce system that a new user had been created in their system, I wanted to be able to send a notification programmatically.

The least intrusive mechanism looked to be a post to my profile, with a mention to the user in question - “Keir Chatter” in my case.  My first attempt at this was to simply create a FeedPost instance and set the body of the post to ‘@[Keir Chatter] a new user has been created’. Unfortunately, this simply placed the raw text ‘@[Keir Chatter]’ into the feed and didn’t get picked up as a mention at all.  

After a little research, I realised that I needed to use the Chatter Connect API, specifically the version of the postFeedItem method that takes a ConnectApi.FeedItemInput as a parameter, as the documentation makes clear (the bold is mine): 


postFeedItem(String, ConnectApi.FeedType, String, ConnectApi.FeedItemInput, ConnectApi.BinaryInput)

Adds a feed item to the specified feed from the context user Use this method to post rich text, including @mentions and hashtags, and to attach a file to a feed item. You can also use this method to share a feed item and add a comment. 


Generating a FeedItemInput is a little more complex than simply adding a body property to a post - the mention and the message have to be constructed separately as segments and then attached.  As I wanted this to be reusable, I created a utility method that would take a user id and message and take care of all the heavy lifting (the utility method also excludes attempts to notify yourself - i.e. to post an @mention to yourself on your own chatter feed):

ConnectApi.MessageBodyInput messageInput = 
new ConnectApi.MessageBodyInput();
messageInput.messageSegments = 
new List<ConnectApi.MessageSegmentInput>(); // create and add the mention segment ConnectApi.MentionSegmentInput mentionSegment =
new ConnectApi.MentionSegmentInput(); mentionSegment.id = userId; messageInput.messageSegments.add(mentionSegment); // create and add the message body segment ConnectApi.TextSegmentInput textSegment; textSegment = new ConnectApi.TextSegmentInput(); textSegment.text = message; messageInput.messageSegments.add(textSegment); // create the FeedItemInput and add the messageInput to it ConnectApi.FeedItemInput input =
new ConnectApi.FeedItemInput();
input.body = messageInput;

// finally, post to the current user's feed
ConnectApi.ChatterFeeds.postFeedItem(null, 
ConnectApi.FeedType.News, 'me', input, null);

I then created a simple trigger to notify the user whose name begins with ‘keir.chatter’ when a new user is added to the system - note that this is a chatter free user - the user doesn’t need a full Salesforce license as the post isn’t associated with a Salesforce record:

trigger user_ai on User (after insert)
{
  User notifyUser=[select id from User where
                    username like 'keir.chatter%'];
  MentionUtils.NotifyUser(notifyUser.Id,
            ' a new user has been created - ' +
            trigger.new[0].username);
}

Note that the trigger is set up to handle a single record at a time, purely for the purposes of this post.  This does show up one weakness of this technique though, as there is no way to bulk post a number of messages at the time of writing (September 2014).  If I needed to handle multiple records in this case I’d just post a large message containing information about all of the users that had been added.  If I needed to notify a different user per record, I’d have to use some asynchronous processing (either @future or batch Apex) to avoid breaching governor limits.

Adding a new user to the system:


Screen Shot 2014 09 07 at 16 04 51


sends a notification to my chatter user:


Screen Shot 2014 09 07 at 16 54 16


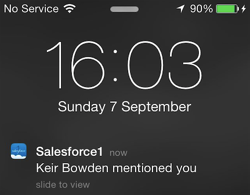
accessing Salesforce1 shows the red bell indicating I’ve received a notification:


Screen Shot 2014 09 07 at 16 55 37


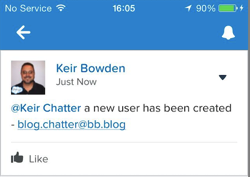
tapping the bell shows a summary of the post:


Screen Shot 2014 09 07 at 16 55 53


and finally, click on the notification takes me to the full post:


Screen Shot 2014 09 07 at 16 56 08


I’ve added this utility class and unit test to my SF1Utils github repository and unmanaged package that I created for an earlier post

Thursday, 7 November 2013

Visualforce in Chatter Mobile

Chatter mobile 4.2 for iOS launched this week and one feature has generated a lot of interest - the ability to include Visualforce in the application. Daniel Hoechst produced a blog post explaining how to achieve this in record time.

At first glance it might seem that this doesn’t add much over and above a regular HTML5 application that is executed from the mobile device browser - in fact an application wouldn't even require the consumption of a tab to expose the Visualforce page.  

The difference is that the chatter application refreshes an oauth token to gain access to the pages and data, so users don’t need to rekey their user id and password each time they access the application.  This is a big deal.

To achieve this without the chatter application, you’d be looking at building a remote start hybrid application using Xcode on a mac and if my experience is anything to go by, spending a fair amount of time playing the provisioning/distribution profile guessing game. You’d also need to either purchase an enterprise distribution license or make your application available through the apple app store. Throw in the being a Salesforce partner building applications on behalf of customers, and things get even more complicated. Did I mention that this is a big deal?

I’ve had a quick play around with the iPhone and iPad variants - the fact that the iPad has more real-estate and supports landscape mode means I focused on that in the first instance.

Burning a tab for each Visualforce page that you wish to surface in the application is a bit of an overhead, especially in Enterprise Edition where you quickly become tab-poor if you build a number of custom applications. The good news is that the tab that you surface doesn’t have to be tied to a particular purpose, so you can build a jumping off page that allows you to access any amount of other pages.  Even better, only the page present in the tab needs to be marked as available for mobile.

To demonstrate this I’ve created a simple jQuery Mobile page that presents a listview with a couple of options. Each of these options opens a new jQuery Mobile page, one that I wrote ages ago to demonstrate navigation, and the other a sample application for swipe navigation that I blogged about a few months ago.  The page source is shown below:

<apex:page showheader="false" sidebar="false" standardstylesheets="false">
<html>
    <head>
    <title>Chatter Mobile Page</title>
    
    <meta name="viewport" content="width=device-width, initial-scale=1" />

    <apex:stylesheet value="https://ajax.aspnetcdn.com/ajax/jquery.mobile/1.3.0/jquery.mobile-1.3.0.min.css" />
    <apex:includeScript value="https://ajax.aspnetcdn.com/ajax/jQuery/jquery-1.9.1.min.js"/>
    <apex:includeScript value="https://ajax.aspnetcdn.com/ajax/jquery.mobile/1.3.0/jquery.mobile-1.3.0.min.js"/>
</head>

<body>
  <ul data-role="listview">
    <li><a href="/apex/JQM">JQM Page</a></li>
    <li><a href="/apex/JQMSwipe">JQM Swipe</a></li>
  </ul>
</body>
</html>
</apex:page>

I then made this page available to mobile by ticking the “Available for Salesforce mobile apps” checkbox on the edit page, creating a Visualforce tab and adding this to the available Chatter mobile tabs via the Setup -> Administration Setup -> Mobile Administration -> Mobile Navigation setup menu option.  When I open the chatter mobile application the new page is available under the apps menu:

Screen Shot 2013 11 07 at 17 55 52


clicking the VF Page app opens my basic jQuery Mobile page:


Screen Shot 2013 11 07 at 17 57 08


clicking one of the links, the JQM Swipe for example, opens that page:


Screen Shot 2013 11 07 at 17 58 55


Once I’m done with this page I can click the left arrow icon at the top right of the page to go back to my jumping off page.


Saturday, 20 July 2013

Publisher Actions - Not Just Creating Records

The Summer 13 Salesforce release introduced Publisher Actions - these allow additional chatter actions to be added to the publisher, over and above the standard Post, File, Link and Poll actions.   Some setup is required before you can use Publisher Actions - this is detailed in the Salesforce help here.

There are four types of Publisher Actions - Create and Custom for a specific object, and Global Create and Global Custom.  The Create actions allow a new record to be created directly from the chatter feed.  Create for a specific object allows a new record to be created that is related to the object the feed appears on - for example, to create a new Opportunity from an Account chatter feed where the Opportunity account id is set to the id of the Account the feed appears on. Global Create allows a new record to be created from a feed, but with no relationship to any existing object.  One very useful aspect of the Create actions is that you can specify default values for fields, which goes some way to removing the need for URL-hacking.

The Custom actions allow a Visualforce page to be displayed in a chatter feed - the specific object variant of this means that the standard controller must be used, as the id of the record the chatter feed appears on will be passed to the page, while the Global variant uses a custom controller. An example of a Custom action is to display the location of an account on a map - while you can also achieve this via an embedded Visualforce page on the standard record view, making it a Publisher Action means it is displayed on demand, so those users that aren't interested in that information don't have to wait for the map to render.

Custom actions can also create information. In this post I'll demonstrate how to create a Publisher action to post summary information to a feed.

Here at BrightGen, we have a Service Management offering for Salesforce. Rather than waiting until the end of the month to find out how we are doing for a particular customer, its useful to push information out on a regular basis. In this post I'll demonstrate how to create a Custom action that posts a snapshot of case information to an account record.

The snapshot will contain details of cases created this month, cases closed this month and the current number of open cases for the account.

As this is an object specific action, the page uses the account standard controller and the additional functionality is provided by a controller extension. This executes a number of queries to get the case information required.  The snippet below determines the number of cases closed this month:

Date startDate=System.today().toStartOfMonth();
Date endDate=System.today().addMonths(1).toStartOfMonth();
List<AggregateResult> ars=[select COUNT(Id) closedCount
		 	   from Case
		 	   where Status='Closed'
		 	   and AccountId=:accId
			   and ClosedDate>=:startDate
		   	   and ClosedDate<:endDate];

Integer result=0;
if (ars.size()>0)
{
	AggregateResult ar=ars[0];
	result=(Integer) ar.get('closedCount');
}

Once all the information is gathered, this is posted to the feed programmatically:

FeedItem item=new FeedItem();
item.ParentId=accId;
item.body='Service snapshot\n' +
          'As of ' + System.now().format('dd/MM/yyyy')  +
          '\nNew Cases : ' + getNewCases() +
          '\nClosed Cases : ' + getClosedCases() +
          '\nOpen Cases : ' + getOpenCases();
		
insert item;
		
ApexPages.addMessage(new
ApexPages.Message(ApexPages.Severity.INFO, 'Snapshot Posted'));
posted=true;

Note the final line of this snippet, which sets the boolean property posted to true - this property is used in to automatically refresh the page, otherwise the post does not get displayed to the user.

The page simply displays the details and provides a button for the user to post the details to the feed:

  <apex:pageBlock title="Service Snapshot">
    <apex:pageBlockButtons location="bottom">
      <apex:commandButton value="Post to Feed" action="{!post}" />
    </apex:pageBlockButtons>
    <apex:pageBlockSection columns="1">
      <apex:pageBlockSectionItem >
        <apex:outputLabel value="Closed Cases" />
        <apex:outputText value="{!closedCases}" />
      </apex:pageBlockSectionItem>
      <apex:pageBlockSectionItem >
        <apex:outputLabel value="New Cases" />
        <apex:outputText value="{!newCases}" />
      </apex:pageBlockSectionItem>
      <apex:pageBlockSectionItem >
        <apex:outputLabel value="Open Cases" />
        <apex:outputText value="{!openCases}" />
      </apex:pageBlockSectionItem>
    </apex:pageBlockSection>
  </apex:pageBlock>

The automatic refresh (which is based on the technique described in this blog post) is provided by the following, conditionally rendered, JavaScript:

  <apex:outputPanel rendered="{!posted}">
   <script>
      window.top.location='/{!Account.id}';
   </script>
 </apex:outputPanel>

The code for the controller extension can be found in this gist, and the Visualforce page in this gist. You'll need to save these into your Salesforce edition to complete the next steps.

Next, create a publisher action for this page - navigate to Setup -> Customize -> Accounts -> Buttons, Links, and Actions and click the New Action button.

Scroll down to the Chatter Feed section and fill out the details as shown in the screenshot below and click the Save button.

Screen Shot 2013 07 20 at 13 14 52

(note that this assumes you have saved the Visualforce page with the name ChatterAccountSnapshot - if that is not the case, pick the name that you saved the page under from the Visualforce Page pick list).

To add the Publisher Action to the chatter feed, edit the page layout for the Account record.  Scroll down to the Chatter Feed section - if you see the following text, click the 'overidde the global layout' to make the actions editable for that layout:

Screen Shot 2013 07 20 at 13 21 34

The Chatter Feed section will then contain the following standard actions:

Screen Shot 2013 07 20 at 13 23 19

Next, select the Actions entry from the menu at the top left of the page layout editor:
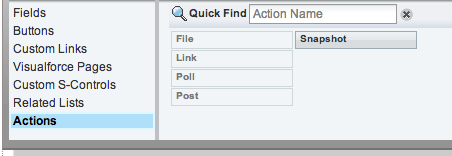
Screen Shot 2013 07 20 at 13 24 50

Drag the Snapshot entry from the right hand side to the Chatter Feed section - note that this can be placed anywhere in the list of actions:
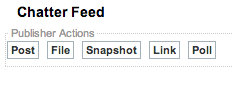
Screen Shot 2013 07 20 at 13 25 40

and finally save the page layout.


Now lets take a look at the Publisher Action in action:

Navigating to an account view page shows the new Snapshot action in the Chatter Publisher. Clicking the Snapshot button displays the Visualforce page with the case detais:

Screen Shot 2013 07 20 at 13 27 01

Clicking the Post to Feed button posts the information to the chatter feed and then refreshes the page to display the post to the user:

Screen Shot 2013 07 20 at 13 29 17