Saturday, 6 February 2016

London Called and the Community Answered

London Called and the Community Answered

Londonscalling

On 5th February 2016 the London’s Calling Salesforce community event took place in, no prizes for guessing, London. The first event of its kind here and the largest Salesforce community event to be held in EMEA. An event by the community for the community.

Not One but Two Keynotes

The day was bookended by keynotes from two Salesforce heavyweights. The day started with a talk by Erica Kuhl, Vice President, Community:

IMG 1535

and finished with one by Peter Coffee, VP for Strategic Research:

IMG 1538

These were different to talks I’ve attended from these speakers in the past - I’ve always seen them at events run by Salesforce, so the focus is very much on Salesforce. This time everybody in the audience was familiar with Salesforce to some degree, so there was no need to keep banging that particular drum. Erica’s talk was on the general aspects of building a community, while Peter’s covered a number of areas, but mainly with the theme that disruption is always coming so you need to be vigilant to keep ahead of the competition.

28 Community Led Sessions

Outside of the keynotes, the majority of sessions where community led training sessions, introducing new technology and techniques or refining existing best practice. There were a couple of things I really liked about the sessions.

  • it wasn’t the same old faces that we see at World Tour and Dreamforce events. While there were plenty of old stagers (like me, for example!) there were a number of people taking their first steps into the world of public speaking, and from what I saw and heard everyone did a great job.
  •  large number of speakers were presenting in their second language. Given how nervous most of us are when we start presenting in our native language, I can’t imagine what this feels like, but its certainly impressive.

As I said before the big day:

Screen Shot 2016 02 06 at 10 28 36

The good news is that all of the sessions were recorded, so we’ll all have access to everything once the editing is done in a couple of weeks. The slide decks will also be published on slide share, so make sure to keep an eye on social media for the latest information.

A Word from Our Sponsors

I was pleased to see people making good use of the Expo and a packed out keynote room for the demo jam - these kind of events are only possible with the support of sponsors.

Sold Out

Tickets sold out at such a pace, you could say that they were selling like hot cakes. The numbers were increased a couple of times, and each time they sold straight out again. Impressive, given that this was a paid event.

Awesome Organizers

The whole thing was put together by four sleep-deprived people who probably had no idea what was involved when they floated the idea at Dreamforce 15:

IMG 1541

So take a bow, Kerry Townsend, Simon Goodyear, Jodi Wagner and Francis Pindar. Hopefully it hasn’t put you off, as we’re looking forward to next year already!


Sunday, 31 January 2016

Freezing Users with Lightning Components

Freezing Users with Lightning Components

Freezer

Introduction

Back in November 2013 I wrote a blog post about a new feature in the Winter 14 release of Salesforce - freezing users. At the time this was only available via the API, so I came up with a Visualforce solution that leveraged the Ajax Toolkit. This post presents the Lightning Components equivalent.

Screen Shot 2016 01 31 at 08 29 11

One Does Not Simply Call the API

Not from a Lightning Component, at least. The docs make this quite clear: 

"Make API calls from an Apex controller. You can’t make API calls from JavaScript code."

Luckily the sObject that encapsulates the frozen status of a user, UserLogin, is now available and updatable in Apex, so the Lightning Component will be responsible for allowing an admin to choose which users to freeze/unfreeze, while the actual database changes will be handled by its Apex controller.

TL;DR

Boring

The full code is available at the following Gists:

The Lightning Component

The key part of the Lightning Component is the iterator that outputs user information and a checkbox so that the user’s frozen status can be updated. This makes use of a wrapper class that encapsulates the User and UserLogin sObjects for a specific user : 

<aura:iteration items="{!v.UserDetails}" var="ud">
  <tr>
    <td>{!ud.user.FirstName}</td>
    <td>{!ud.user.LastName}</td>
    <td>{!ud.user.Username}</td>
    <td id="{!ud.user.Id}">
      <ui:inputCheckbox change="{!c.frozenChanged}"
                        value="{!ud.userLogin.IsFrozen}" />
    </td>
  </tr>
</aura:iteration>

Note the input checkbox has a handler for when the value is changed - I found I couldn’t just bind the value from the underlying UserLogin field. I suspect this is because I am binding to a field from a complex object rather than directly to a primitive. This meant that I had to fire an event when the value changed, then figure out which user the checkbox was associated with. Ideally I’d have given the inputCheckboxComponent an aura Id that included the user id, but the aura Id for this component must be a string literal, so if I use something like aura:id=“{!’cb-‘ + ud.user.Id}”, then the aura id generated is exactly that - {!’cb-‘ + ud.user.Id}, which isn’t very useful.

Where I can use a dynamically generated id is in the containing element - the table cell in this case. My event handler that is invoked when the value is changed can then use the id of the parent element to determine the user id, and invert the current value of the IsFrozen field:

updateCheckbox : function(cmp, ev) {
    var value=ev.getSource().get('v.value');
    var userId=ev.getSource().getElement().parentElement.id;
    var userDetails=cmp.get('v.UserDetails');
        
    for (var idx=0; idx<userDetails.length; idx++) {
        if (userDetails[idx].user.Id==userId) {
            userDetails[idx].userLogin.IsFrozen=!value;
        }
    }
    cmp.set('v.UserDetails', userDetails);
}

The final line once again demonstrates the power of Lightning Components - by updating the component attribute containing the wrapper classes, the component rerenders the user information table with the latest details.

When the changes have been made on the client side, the collection of wrapper classes is then sent back to the server so that the UserLogin records can be updated. Even though I know there is a bug around sending an array as a parameter to the Apex controller, I still spent 15 minutes figuring out why doing exactly this threw an internal server error! Once I remembered I used the now familiar workaround, converting the collection of wrapper classes to a JSON string:

var userDetails=cmp.get('v.UserDetails');
var udAsJSON=JSON.stringify(userDetails);
var params={
          "toProcessAsJSON" : udAsJSON
};

 and turning this back into the wrapper class collection server side:

Type udArrType=Type.forName('List<UserFreezer.UserDetails>');
List<UserDetails> toProcess =
    (List<UserDetails>)JSON.deserialize(toProcessAsJSON, udArrType);

Related Posts


Sunday, 24 January 2016

Apex Test Suites in Spring 16

Apex Test Suites in Spring 16

(Note that this blog post refers to functionality that is intended to be made available in the Spring 16 release of Salesforce, but features may be removed prior to the Spring 16 go-live date, so you may never see this in the wild!)

Introduction

One of the features that I missed most when moving from Java to Apex was the ability to create test suites. A suite is a container for a group of related tests, and is typically used to test a specific area of functionality. A common use case for me is around integration - when I’m making wide ranging changes I’m always keen to make sure I haven’t affected any of the code that integrates with downstream systems. Without test suites its either a case of manually executing individual tests and hoping I remember all of the tests I need, or running all tests and in some cases (e.g. our BrightMedia product) waiting 45 minutes for then all to complete.

While it has been possible to do this outside of the Force.com UI, there were compromises.  Using the Force CLI or Force.com Migration Tool (ant) meant that I had to execute my test suite from my laptop, while using the ApexTestQueueItem object meant that I either had to write code to create a new suite or install a package that allowed me to manage suites through a custom Visualforce page.The one thing all of my solutions had in common was a lack of flexibility to allow me to create a test suite and execute it on  any org at any time from any machine.

This all changes with the Spring 16 release and the introduction of test suites on the Salesforce Platform.

Using Test Suites

The easiest way to use test suites is via the Developer Console. I’m not the biggest fan of this from the perspective of authoring code, but its pretty much my go to tool now for running unit tests, mainly because it runs in the browser so I can execute tests on any org regardless of which device I’m using. 

In Spring 16 there are some new options in the Test menu for suites:

Screen Shot 2016 01 24 at 15 19 16

New Suite, as the name suggests allows you to create a new test suite. After specifying the suite name, you can then choose which classes make up the suite:

Screen Shot 2016 01 24 at 15 23 31

Note that you can’t specify individual test methods in a suite, so all methods in the class will be run when the suite is executed.

Suite Manager also allows you to create a new suite, or to edit (change the classes) or delete an existing suite.

New Suite Run allows you to execute a suite of tests. A nice feature for this is that it doesn’t limit you to a single test suite - you can choose multiple suites to run, creating a suite of suites if you will:

Screen Shot 2016 01 24 at 15 32 19

Note the settings button - this gives you access to another new feature in Spring 16 - automatically terminating a test run after a certain amount of failures. Specify the maximum number of failures through the resulting dialog:

Screen Shot 2016 01 24 at 15 34 35

As the number of failures allowed is 5, if 6 test cases fail, then test run will be automatically terminated. A synchronous test run terminates immediately, while an asynchronous test run waits until the currently executing test cases have finished and terminates once that is the case.

Once the test suite completes, the results are displayed as usual:

Screen Shot 2016 01 24 at 15 45 26

You can also run test suites via the API or version 36 the Force.com IDE, although bear in mind that if you upgrade to this version of the IDE you won’t be able to use it to work on any org that hasn’t been upgraded to Spring 16.

In a perfect world I’d like to see the following added to test suites:

  • Nesting suites - this would allow me to use my suites as building blocks, to assemble a super-suite from a set of component suites, or to extend (but not replace) an existing suite with one or two classes
  • Specify methods to execute in a suite - a bit more of an edge case, but this would allow me to create suites for particular aspects of a group of test classes - e.g. just the processing triggered when various types of sobject are inserted

Neither of these are a big deal, but one thing is a constant in software development and that is that everyone is a critic!

Related Posts

Saturday, 16 January 2016

Board Anything with SLDS and Lightning Components

Board Anything with SLDS and Lightning Components

Ba meme

Introduction

One of the features I really like in the Lightning Experience is the Opportunity Board (or Opportunity Kanban as it will be known in Spring 16). Not so much the ability to drag and drop to change the stage of an individual opportunity, although that’s very useful for the BrightGen Sales team, but more the visualisation of which state a number of records are in.

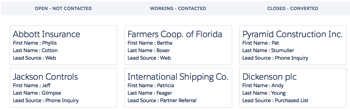
This seemed to me something that would useful for a wide range of records - anything with a status-like field really, which lead me to create Board Anything - a Lightning component that retrieves records for a particular SObject type, groups them by the value in a configurable status field and displays them as a table of Salesforce Lighting Design System board tiles - Leads for example:

Screen Shot 2016 01 16 at 17 10 36

Whatever, Where’s The Code

The Board Lightning Component

The board contents are displayed via a Lightning Component. In order for this component to be able to handle any type of sobject, there are a few attributes to configure its behaviour:

<aura:attribute name="SObjectType" type="String" default="Case" />
<aura:attribute name="StageValueField" type="String" default="Status" />
<aura:attribute name="StageConfigField" type="String" />
<aura:attribute name="FieldNames" type="String" default="CaseNumber,Subject" />
<aura:attribute name="ExcludeValues" type="String" default="Closed" />

These attributes influence the component as follows:

  • SObjectType - the type of SObject to display on the board
  • StageValueField - the field containing the stage (or status) values
  • StageConfigField - a picklist field containing the values to display on the board - use this if your StageValueField is a free text field to limit the stages that are displayed on the board
  • FieldNames - comma separated list of fields to display in each tile - the first is used as the title field for the tile
  • ExcludeValues - stage values that should be excluded from the board

Note that the defaults will result in a board of open cases being displayed as follows:

Screen Shot 2016 01 16 at 17 24 05

The component also defines design attributes for each of these attributes, so that you can configure a board via the Lightning Builder.

The component does most of its work on a list of wrapper classes. First it iterates the list  to output the stage headings, which will be in the order returned by the Schema Describe methods for the stage value field or stage config field, depending on which is defined:

 
<aura:iteration items="{!v.Stages}" var="stage">
  <th style="{!'width:' + v.ColumnWidth + '%'}">
     <h3 class="slds-section-title--divider slds-text-align--center">{!stage.stageName}</h3>
  </th>
</aura:iteration>

and then iterates the list again, displaying the tiles for each record in each stage:

<aura:iteration items="{!v.Stages}" var="stage">
  <td style="{!'width:' + v.ColumnWidth + '%; vertical-align:top'}">
    <aura:iteration items="{!stage.sobjects}" var="sobject">
      <ul class="slds-list--vertical slds-has-cards--space has-selections">
        <li class="slds-list__item slds-m-around--x-small">
          <div class="slds-tile slds-tile--board">
            <p class="slds-tile__title slds-truncate slds-text-heading--medium">{!sobject.titleField.fieldValue}</p>
            <div class="slds-tile__detail">
              <aura:iteration items="{!sobject.fields}" var="field">
                <p class="slds-truncate">{!field.fieldName} : {!field.fieldValue}</p>
              </aura:iteration>
            </div>
          </div>
        </li>
      </ul>
    </aura:iteration>
  </td>
</aura:iteration>

The Apex Controller

Most of the heavy lifting is done by the Apex controller, which gets the available stage values for the stage value field or stage config field:

if ( (null==stageConfigField))
{
  stageConfigField=stageValueField;
}
            
Map<String, String> excludeValuesMap=new Map<String, String>();
if (null!=excludeValues)
{
  for (String excludeValue : excludeValues.split(','))
  {
    excludeValuesMap.put(excludeValue, excludeValue);
  }
}
Map<String, BB_LTG_BoardStage> stagesByName=new Map<String, BB_LTG_BoardStage>();

Map<String, Schema.SObjectField> fieldMap =
             Schema.getGlobalDescribe().get(sobjectType).
		getDescribe().fields.getMap();
Schema.DescribeFieldResult fieldRes=
             fieldMap.get(stageConfigField).getDescribe();
            
List<Schema.PicklistEntry> ples = fieldRes.getPicklistValues();
for (Schema.PicklistEntry ple : ples)
{
  String stageName=ple.GetLabel();
  if (null==excludeValuesMap.get(stageName))
  {
    BB_LTG_BoardStage stg=new BB_LTG_BoardStage();
    stg.stageName=ple.GetLabel();
    stagesByName.put(stg.stageName, stg);
    stages.add(stg);
  }
}

Note that BB_LTG_BoardStage wrapper classes are created here - later these will be fleshed out with the records and their details.

It then generates a dynamic SOQL query to retrieve the named fields:

String queryStr='select Id,' + String.escapeSingleQuotes(stageValueField) + ', ' +
String.escapeSingleQuotes(fieldNames) +
                ' from ' + String.escapeSingleQuotes(sobjectType);
List<SObject> sobjects=Database.query(queryStr);

 and finally iterates the results of the query, grouping the records by stage and using dynamic DML to retrieve the field values: 

List<String> fieldNamesList=fieldNames.split(',');
for (SObject sobj : sobjects)
{
  String value=String.valueOf(sobj.get(stageValueField));
  BB_LTG_BoardStage stg=stagesByName.get(value);
  if (null!=stg)
  {
    BB_LTG_BoardStage.StageSObject sso=new
    BB_LTG_BoardStage.StageSObject();
    Integer idx=0;
    for (String fieldName : fieldNamesList)
    {
      fieldName=fieldName.trim();
      fieldRes= fieldMap.get(fieldName).getDescribe();
      BB_LTG_BoardStage.StageSObjectField ssoField=
                      new BB_LTG_BoardStage.StageSObjectField(fieldRes.getLabel(),
             sobj.get(fieldName));
      if (0==idx)
      {
        sso.titleField=ssoField;
      }
      else
      {
        sso.fields.add(ssoField);
      }
      idx++;
    }
    stg.sobjects.add(sso);
  }
}

What About the Example Leads Board?

The example Leads board is built using Lighting Out for Visualforce. As you may remember from my previous blog post on this, first I need to create an app that references the component, in this case BBSObjectBoardOutApp:

<aura:application access="GLOBAL" extends="ltng:outApp">
    <aura:dependency resource="c:BBSObjectBoard" />
</aura:application>

And then I have a Visualforce page (BBLeadBoard) that uses the app to instantiate the component and sets up the attributes to configure the board for leads:

<apex:page sidebar="false" showHeader="false" standardStylesheets="false">
    <apex:includeScript value="/lightning/lightning.out.js" />
    <div id="lightning"/>
 
    <script>
        $Lightning.use("c:BBSObjectBoardOutApp", function() {
            $Lightning.createComponent("c:BBSObjectBoard",
                                       {
					'SObjectType': 'Lead',
					'StageValueField' : 'Status',
					'FieldNames' : 'Company, FirstName, LastName, LeadSource',
					'ExcludeValues': 'Converted',
					},
                  "lightning",
                  function(cmp) {
                    // no further setup required - yet!
              });
        });
    </script>
</apex:page>

That’s All There Is?

No, there’s the wrapper class, a JavaScript controller and helper, but there’s nothing particularly exciting about those so they are available from my BBLDS samples repository at:

https://github.com/keirbowden/BBLDS

This also contains an unmanaged package so you can just install this into your dev org and try out the Visualforce page - check out the README for more information.

Anything Else I Need to Know

Yes.

  • As this is an unmanaged package there are test classes - you’re welcome.
  • The styling of the headings could be improved
  • Errors are written to the debug log and swallowed server side - I did this as otherwise the Lightning Builder displays exceptions all over the place when you try to update the attributes. Its not ideal, so feel free to change it!
  • No drag and drop support to change the stage/status value - while this makes sense for opportunities, it doesn’t for things like cases, so I used that as justification not to do it.

Related Posts


Sunday, 3 January 2016

Salesforce Spring 16 Release - CreatedDate and Apex Unit Tests

Createddate

(Note that this blog post refers to functionality that is intended to be made available in the Spring 16 release of Salesforce, but features may be removed prior to the Spring 16 go-live date, so you may never see this in the wild!)

Introduction

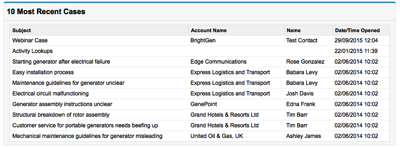
Anyone who has written a reasonable amount of Apex unit tests is likely to have butted up against the shortcoming that the CreatedDate is set when a record is inserted into the Salesforce database. While at first glance this may not seem to be such a huge issue, consider the scenario of a custom Visualforce page, maybe for use in a dashboard, that displays the 10 most recent cases:

Screen Shot 2016 01 03 at 14 58 50

The controller is about as straightforward as it can be - simply querying back the records from the Salesforce database:

public class RecentCasesController
{
    public List<Case> getRecentCases()
    {
        return [select id, CaseNumber, Subject, Account.Name, Contact.Name,
                CreatedDate
                from Case
                order by CreatedDate desc
                limit 10];
    }
}

while the page is equally straightforward, simply iterating the records in a pageblocktable:

<apex:page controller="RecentCasesController">
	<apex:pageBlock title="10 Most Recent Cases">
        <apex:pageBlockTable value="{!recentCases}" var="cs">
            <apex:column value="{!cs.subject}"/>
            <apex:column value="{!cs.Account.Name}" />
            <apex:column value="{!cs.Contact.Name}" />
            <apex:column value="{!cs.CreatedDate}" />
        </apex:pageBlockTable>
    </apex:pageBlock>
</apex:page>

A Testing Problem

Testing this in the Winter 16 release (and earlier), testing this functionality meant a compromise, such as:

  • Inserting a number of records and ensuring that only 10 of them were returned, but being unable to predict which 10 this would be. This is because the CreatedDate field has second granularity, and if there are a number of records inserted in the same second, there is no guarantee of the order they will be returned in when the query is ordered by the CreatedDate. The Salesforce database will do the least amount of work to execute the query, and there’s nothing you can do to affect it. From a unit testing perspective, unless you can 100% guarantee the order of the results, asserting for a particular order makes a test fragile.
  • Adding an autonumber field to the case sobject so that you can rely on that to guarantee the ordering. This is a classic example of changing your implementation to satisfy your unit tests, which if nothing else is annoying to have to resort to.
  • Trying to kill some time to allow the second to tick over in between record inserts, by looping a lot and generating debug statements for example. There are a couple of problems with this approach. First, it is fragile, as you have no control over how much time would be burned this way. All you can do is hope that the performance you have seen in the past continues, which can’t give much confidence. More importantly, it is evil, as you are consuming shared resources for no good reason.
  • Provide some form of dependency injection, probably via a @TestVisible private property, to allow your test to inject the list of cases that should be returned as a result. This mechanism means that all you are really testing is that the controller returns the list of cases you asked it to, bypassing the query that will be executed in production. Writing code that solely allows your tests to complete successfully is usually an indication that something is awry.

One DOES Simply Set the CreatedDate

In the Spring 16 release this is all set to change (although it may not - see the note at the top of this blog). The new Test.setCreatedDate(Id, DateTime) method allows you to change the CreatedDate once a record is inserted.

For my recent cases page, I can now write a test case to verify that only the 10 most recent cases are returned, by setting the CreatedDate for each case record after I’ve inserted them in the database:

@isTest
private class RecentCasesController_Test
{
    @isTest
    static void TestGetRecentCases()
    {
        /* setup */
        Account acc=new Account(Name='Unit Test');
        insert acc;
        
        Contact cont=new Contact(FirstName='Unit',
                                 LastName='Tester');
        insert cont;
        
        List<Case> cases=new List<Case>();
        for (Integer idx=1; idx<=20; idx++)
        {
            Case cs=new Case(Subject='Test Case ' + idx,
                             AccountId=acc.Id,
                             ContactId=cont.Id);
            cases.add(cs);
        }
                             
        insert cases;
        
        // now set the created date for each case - the first case
        // in the list will be the most recent, the second case the
        // second most recent, and so on
        for (Integer idx=1; idx<=20; idx++)
        {
            DateTime created=System.now().addDays(-(idx*10));
            Test.setCreatedDate(cases[idx-1].Id, created);
        }
	
        /* execute */
        RecentCasesController ctrl=new RecentCasesController();
        List<Case> recentCases=ctrl.getRecentCases();

        /* verify */
 
        // should be 10 cases
        System.assertEquals(10, recentCases.size());
        
        // should be the first 10 inserted, in that order
        for (Integer idx=0; idx<10; idx++)
        {
            System.assertEquals(recentCases[idx].Id, cases[idx].Id);
        }
    }
}

Final Thoughts

The ability to set the created date is a much needed addition to the Salesforce platform testing framework, and one that will allow production code to be properly tested, and allow some workarounds/terrible hacks to be retired. 

It would be cool to be able to set the CreatedDate when constructing the sObject, prior to insertion, but I’d imagine this would require a ton of changes to the Salesforce database layer and isn’t going to happen. I foresee thousands of test fixture classes that insert a record and then change its CreatedDate!

Its a shame that at the moment you can only set the CreatedDate of a single record per call, but hopefully we’ll get some bulk capability in the future. The Salesforce platform approach is typically to make things doably difficult, then add the bells and whistles.

Finally, the documentation doesn’t mention any effects on limits and my testing with the code above bears this out, which is always good.

Related Posts

Wednesday, 30 December 2015

New Year, New Trailhead Badges

Badges

Overview

The Trailhead juggernaut keeps rolling, with a new trail and 6 (count ‘em) new badges, taking the totals up to 13 trails and 70 badges (not counting the community badges which you get for earning a new badge on a particular date, such as halloween, which is always tricky for those of us who already have all the badges, but these are the first world problems I am cursed with).

So What’s New?

  • Advanced Formulas
    This strikes me as an excellent fit for Trailhead, as the challenges will be tightly focused on a single formula field which satisfies a well-defined set of requirements. I’d imagine there was some competition in the team that writes the code that checks the challenges for this one.
     
  • Apex Integration Services
    If you haven’t done much of this before, get cracking. Its a good grounding in the topic and gets you writing code that carries out real integrations, but in a much safer environment than a customer org! 
     
  • Lighting Experience Chatter Basics
    One aimed more at the newbies than the experienced administrator or developer, which is a good thing as we want new people using the platform.

  • Lightning Data Management
    Getting data in and out. Useful information if you are considering a career with a Salesforce partner, as I guarantee that any project you work on will have some form of data migration, and it always takes longer than you expect!

  • Application Lifecycle Management
    Okay, so this is a rewrite rather than a new module. If you’ve taken this in the past you won’t be able to retake it, but if you held off waiting for some different words your masterful inactivity has paid dividends.

    and saving the best until last
     
  •  Build a Battle Station App
    A themed project to coincide with a film that you might have heard about. This kind of thing is what makes Trailhead fun and keeps it interesting. This is one of the few badges that I have remembered to add to my LinkedIn profile, which shows how valuable it is

So What’s Next?

I wish I knew. Or maybe I do and those pesky NDAs stop me from telling you. Unfortunately I don’t. But is that what the NDA forces me to say. Its all so uncertain.

One prediction I will make is that the number of badges will break 100 in 2016, and I’d expect this to happen around July/August time.

New Year, New You

As I mentioned above, there are now 70 badges available, so if you haven’t made a dent in them by the start of 2016 you’ll struggle to catch up and be forever chasing those last x badges.

Make a New Year’s resolution that will have real impact (on your career, your reputation, your battle station building capabilities) and resolve to earn more badges!

Related Posts


Saturday, 12 December 2015

Lightning Component Wrapper Classes

Lightning Component Wrapper Classes

Wrapper

Introduction

Wrapper classes are a common feature of applications built on the Salesforce platform. The class wraps an sObject and some additional data, hence the name wrapper. Typically wrapper classes are used to temporarily associate prpoerties with an sObject that are specific to the current scenario, and that do not make sense to add as fields to the sObject and persist to the database.

In this post I’ll show how you can use wrapper classes in a Lightning component, to wrap an account and a boolean property. This wrapper class allows a user to select one or more account names to view more details of the accounts.

 

Showmecode

The Apex Controller

My Apex controller makes a couple of methods available to the Lightning component. The first is invoked when the component initialises, and returns a collection of up to 10 accounts, with only the name and Id fields populated:

@AuraEnabled
public static List<Account> GetAccountNames()
{
	return [select id, Name from Account limit 10];
}

 the second method receives a JSON string representing a list of account ids (the accounts that the user has selected) and retrieves more details for those accounts:

@AuraEnabled
public static List<Account> GetAccountDetails(String idListJSONStr)
{
	Type idArrType=Type.forName('List<Id>');
	List<Id> ids=(List<Id>) JSON.deserialize(idListJSONStr, idArrType);
		
	return [select id, Name, Industry, Website from Account where id in :ids];
}

 Ideally I’d pass the Ids through as an array to this method, but attempting to pass arrays as parameter to Apex controller methods from a Lightning component results in an internal server error. At the time of writing (December 2015) this has been acknowledged as a bug for over a year, so its clearly one that is taking a bit of fixing! For a collection of primitives, the JSON string version works well, but when I need to send an array of complex objects (or sObjects) I usually place these inside a containing Apex class.

The Wrapper Class

I want my wrapper class to be available for use in both my component and in Apex, so that I can use the same one for Lightning and Visualforce. As I’ve written about before, custom apex classes are automatically converted to JavaScript objects for use client side, so to achieve this all I have to do is make the class properties available to the Lightning component via the AuraEnabled annotation:

public with sharing class AccountWrapper
{
	@AuraEnabled
	public Account acc {get; set;}
	
	@AuraEnabled
	public Boolean selected {get; set;}
}

(If I didn’t need to make use of this server-side, I’d just use JavaScript objects, which would make this post considerably shorter!)

The Lightning Component

The Lightning component has two sections - the first displays a list of account names and checkboxes for the user to choose accounts, and the second to display details of the chosen accounts:

<aura:component controller="AccountController">
    <aura:handler name="init" value="{!this}" action="{!c.doInit}" />
    <aura:attribute name="wrappers" type="AccountWrapper" />
    <aura:attribute name="accounts" type="Account" />
    <span class="big">Choose Accounts</span>
    <table>
        <tr>
            <th class="head">Name</th>
            <th class="head">View?</th>
        </tr>
	<aura:iteration items="{!v.wrappers}" var="wrap">
            <tr>
                <td class="cell">
		    <ui:outputText value="{!wrap.acc.Name}" />
                </td>
                <td class="cell">
		    <ui:inputCheckbox value="{!wrap.selected}" />
                </td>
            </tr>
	</aura:iteration>
    </table>
    <button onclick="{!c.getAccounts}">Get Accounts</button>
    <br/>
    <br/>
    <br/>
    <span class="big">Selected Accounts</span>
    <table>
        <tr>
            <th class="head">Name</th>
            <th class="head">Industry</th>
            <th class="head">Website</th>
        </tr>
        <aura:iteration items="{!v.accounts}" var="acc">
            <tr>
                <td class="cell">
	    	    <ui:outputText value="{!acc.Name}" />
                </td>
                <td class="cell">
	    	    <ui:outputText value="{!acc.Industry}" />
                </td>
                <td class="cell">
	    	    <ui:outputText value="{!acc.Website}" />
                </td>
            </tr>
	</aura:iteration>
    </table>
</aura:component>

Note that the AccountWrapper custom class is defined as the type of the wrappers attribute that is used to display the accounts and their checkboxes. This allows me to supply the wrapper classes from the server in the future if for some reason I decide to go that route.

The Lightning Component JavaScript

The controller for the Lightning component contains a couple of methods that delegate to the helper and isn’t that exciting. For those that need the complete picture, its available at this gist.

The helper is much more interesting, but a bit large to drop into this post. It can be found at this gist, but the key aspects are covered below.

The wrapper class instances are created client side, which is really easy in JavaScript, mainly due to its loose typing. I can just define an object instance that contains an account and a selected property. In the snippet below, accs is the collection of accounts returned from the controller at initialisation:

var wrappers=new Array();
for (var idx=0; idx<accs.length; idx++) {
    var wrapper = { 'acc' : accs[idx],
			       'selected' : false
                            };
     wrappers.push(wrapper);
}
cmp.set('v.wrappers', wrappers);

Once the user selects the accounts and presses the getAccounts button, I can iterate the list of wrapper classes and pull the ids of the selected items, which I then turn into the JSON string: 

var wrappers=cmp.get('v.wrappers');
var ids=new Array();
for (var idx=0; idx<wrappers.length; idx++) {
    if (wrappers[idx].selected) {
        ids.push(wrappers[idx].acc.Id);
    }
}
var idListJSON=JSON.stringify(ids);

The Lightning Component Styling

In order to make the page a bit more readable, there’s some styling around the component. This is also not particularly interesting but can be found at this gist.

The Application

In order to use this component, I’ve created a simple Lightning application:

<aura:application >
    <c:AccountWrappers />
</aura:application>

Opening the application displays the first 10 accounts retrieved from the database, which I can check the associated box to select:
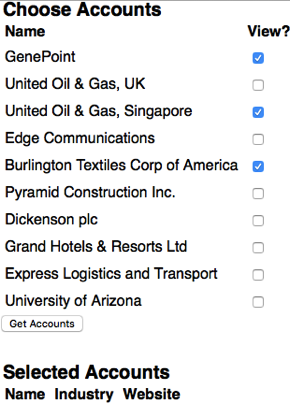
Screen Shot 2015 12 12 at 16 55 05

and clicking the Get Accounts button retrieves details of those accounts and displays them:
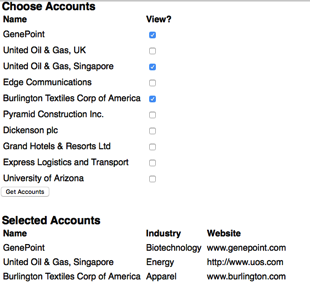
Screen Shot 2015 12 12 at 16 56 07

Related Posts