Showing posts with label gui. Show all posts

Saturday, 10 July 2021

The CLI GUI Decodes Command Strings

Introduction

Something I've been meaning to add to the CLI GUI for a while is the ability to enter a CLI command string and decode that into a command page with the appropriate parameters set. This would allow someone to understand more about a command without having to run a help command, match to the parameters, and the additional instructions etc defined in the GUI configuration file can be displayed.

I finally got around to adding that capability this week, which wasn't quite as clunky as I was expecting it to be, although to be fair it is still a little clunky.

The Solution

The decoder is offered as part of a new group named 'Built In' - this is so named because it is added to the configured set of commands in the code and will always be present.


Clicking this opens up the command window with a single input to capture the command string:

In this case it's the command I've used in the past to create an org depdendent package, and made sure to write it down for the next time I needed it,

Clicking the Decode Command changes the page to reflect this command, with any additional instructions. And the first clunky bit, in that I always use the short version of the flags so the command generated in this page doesn't match character for character the one pasted in, although it effectively is the same.


The other clunky part is excluding certain functionality from the page when the command is the decoder, but unless I created a whole new page just for that, I was always going to have to do something along those lines. My command configuration file also now knows about the long and short version of every flag, so that it can decode either. 

The Latest Code

I've pushed the latest code to the Github repository - at the moment it's only tested against MacOS as I won't have access to my Windows machine for a day or so. I can't think of any reason why these changes wouldn't work equally well, but if you hit problems before I get a chance to test, raise an issue in the repo.

One thing to bear in mind is that this can only decode the commands and parameters that it knows about. For example, I haven't configured any of the commands to extract data, so there will be no match found when decoding those. 

Related Posts


Saturday, 8 May 2021

The CLI GUI takes on Packages


Introduction

Second generation packaging via the Salesforce CLI is awesome, but it's the area I spend most of my time remembering what parameters it supports, as well as figuring out the ids or names of the packages I'm working with.

I've actually had this functionality in the GUI for a while now, but I hadn't been using it in anger across all the various package types, so I didn't publicise it. Since then I've used it to create managed, unlocked and org dependent packages, and base and extension packages, so I think it's good enough to unleash on the world. The examples below are based on the org-dependent package that I created for London's Calling 2021.

Commands

The updated commands configuration file in the repo adds support for five package commands in their own tab:


(I have them in the order that I typically use them on a day to day basis, but they can easily be reordered by updating the commands.js file).

Create Package


Typically only used when I start a project, the Create Package command will default to the configured dev hub if there is one, but I can change it if for some reason I want to use another. Only dev hub orgs appear in the select list. The Path parameter will be used to update the packageDirectories property from the sfdx-project.json file.

Create Version

This is probably the command I use most when developing packages - creating a new version in the hope that I've finally fixed that elusive bug, but expecting further disappointment! 


When I click the Get Packages button, the available packages managed by the dev hub are retrieved and the sfdx-project.json checked to see if there is already a package defined that it can default to. I can choose any other package if I need to.


The other parameter of note is Definition File - when you create a second generation package, there's no developer edition where the code lives, so something like a scratch org is created as part of the upload process, where the code is deployed, tests run etc. Most of the time I just specify my existing scratch org definition file (config/project-scratch-def.json), but very occasionally I'll have a different shape required for the upload and create a dedicated file.

I can specify a key (password) required to install the package, or bypass this. And I always specify a long wait, as if the command doesn't finish synchronously then the details of the version don't get written to the sfdx-project.json.

Promote Version

There's always a bit of Stockholm Syndrome about this command when developing a package. At the start, I'll do pretty much anything rather promote the version to fix the functionality and commit myself to the package contents, but after a few versions I'll be executing it without a second thought.


As before, the Get Packages button retrieves the packages being administered by the dev hub. Get Package Versions retrieves the versions for the selected package, saving me remembering names or ids. It also only shows my versions that haven't been promoted:


List Packages

A simple command - as it's name suggests it lists the packages currently being administered by the dev hub. 


The package information is shown in the log panel, which automatically opens when the command is executed:


List Package Versions

Again, does exactly what it says on the tin. 


Although this time I can reduce the results based on the when the version was created or modified, and limit it to released versions only. These parameters might seem unnecessary when you are starting out with a package, but after a few years and 100+ versions, you'll be glad of them.

Wrap Up

As usual, I've tested these commands on MacOS and Windows 10, but if you come across any issues feel free to raise them at the Github repository.

Related Posts


Sunday, 1 November 2020

Giving the CLI Scanner the GUI Treatment

Introduction

As I've written about in recent posts, I'm using the Salesforce CLI Scanner to perform static code analysis on a number of my projects. As it's clearly part of my day to day use of the Salesforce CLI, I decided to add it to my CLI GUI.  

TL;DR, pull the latest code from the Github repository, or clone it and follow the instructions to carry out the initial setup. When it starts up you'll have the Scanner command group.

Commands

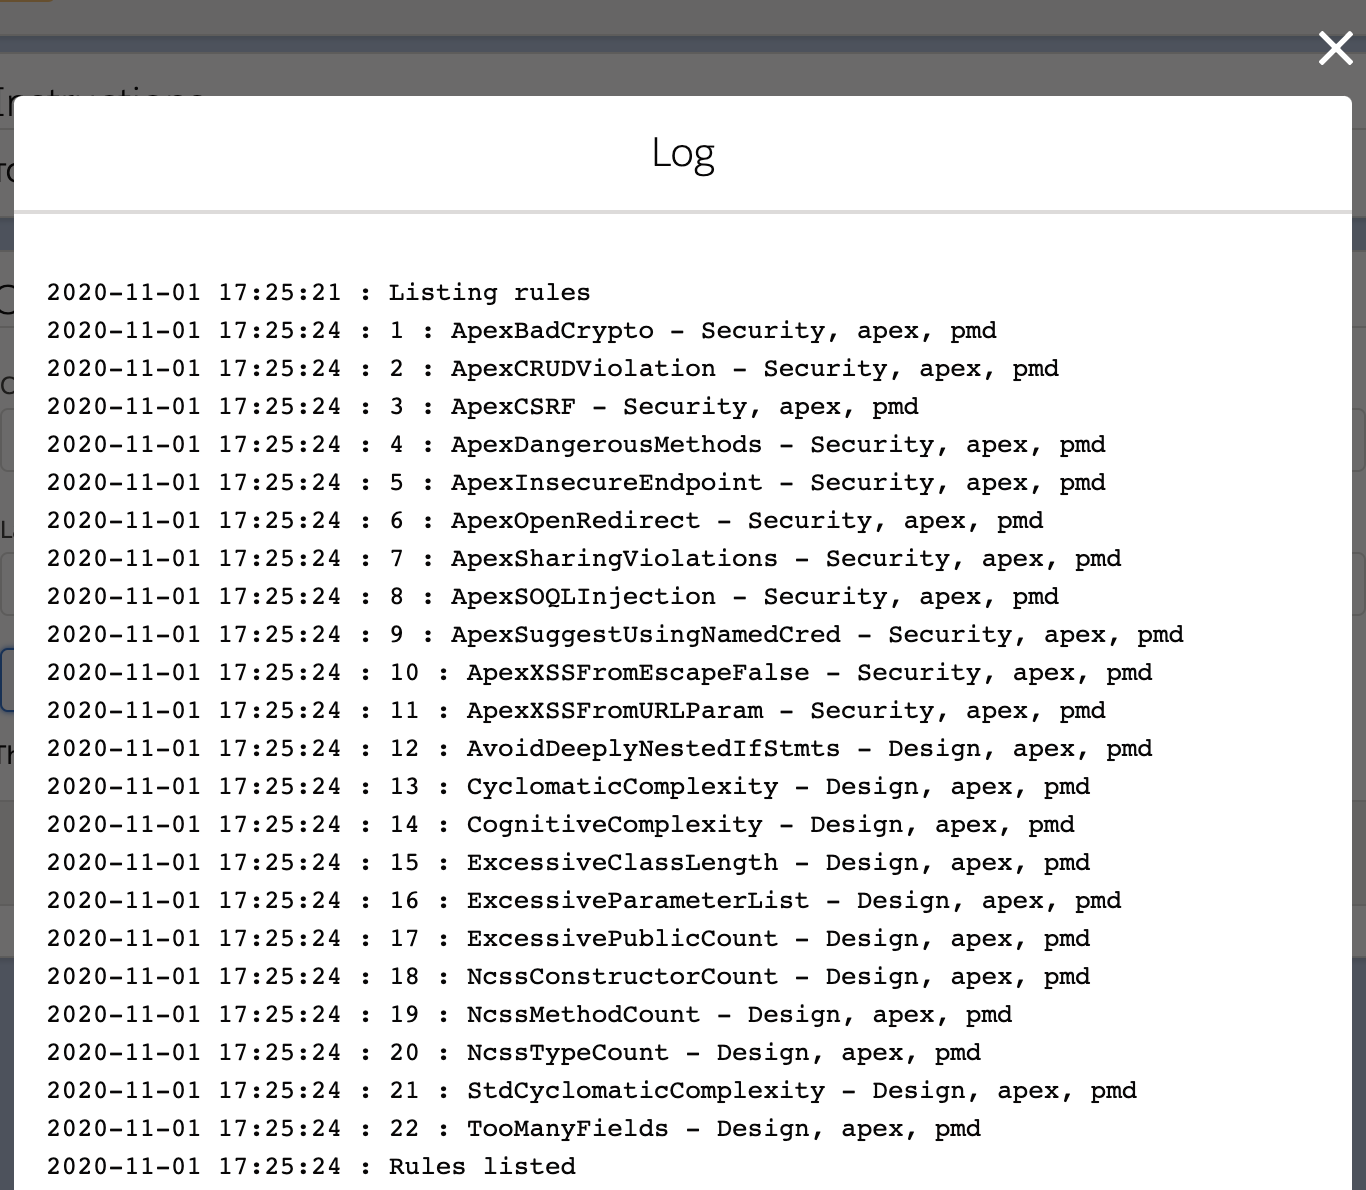
I added the scanner as a new command group, with a couple of commands - listing the rules and running the scanner.

Listing Rules

Listing the rules is fairly straightforward as I used existing parameter types to capture the categories and language, should the user wish to provide them:


and only needed to include a function to process the return JSON to extract the rule details and dump them to the log panel:


Running the Scanner


Running the scanner was a little more complex. First, I usually want to pick the categories but I don't want to have to remember the exact names, so I needed a mechanism to allow me to select from list of options. I've got a good start for this around allowing the user to choose which log file to retrieve from the Debugging command group. Under the hood I run the scanner:rule:list command, process the output to extract the unique category names, then build a select element using the categories as options. As I can choose multiple options I set the multiple attribute and give it a size of 7.  I don't always want to choose though, so I didn't want to have to wait every time for the command to run, so I gave myself a button to click:


I also typically want to open the file that the output is sent to, so I added this capability too:


Aside from this, most of my effort went into figuring out how to pass enquoted parameters to the scanner:run command (to define the targets, for example) on MacOS and Windows 10. I learned, for example, that Node's execFileSync will not spawn a shell to run the command thus any spaces I provide will be assumed to be different arguments to be passed to the command, regardless of any quotes that I might add in a futile attempt to influence it. execSync, on the other hand, will spawn a shell which will know that an enquoted string is a single parameter, allowing the command to succeed. I wouldn't be surprised if there is still the odd issue around this in there, so if you find one let me know by raising an issue at the Github repo.


Saturday, 23 May 2020

Going GUI over the Salesforce CLI Part 3

Introduction


In part 1 of this series I introduced my Salesforce CLI GUI with some basic commands.
In part 2 I covered some of the Electron specifics and added a couple of commands around listing and retrieving log files.
In this instalment I'll look at how a command is constructed - the configuration of the parameters and how these are specified by the user.

Command Configuration


As mentioned in part 1, the commands are configured via the app/shared/commands.js file. This defines the groupings and the commands that belong in those groupings, which are used to generate the tabs and tiles that allow the user to execute commands. For example, the debug commands added in the last update have the following configuration (detail reduced otherwise this post will be huge!) :

{
    name : 'debug',
    label: 'Debugging',
    commands : [
        {
            name: 'listlogs',
            label: 'List Logs',
            icon: 'file',
              ///////// detail removed //////////
        },
        {
            name: 'getlog',
            label: 'Get Log File',
            icon: 'file',
              ///////// detail removed //////////       
        }
    ]
}

which equates to a tab labelled Debugging and two command tiles - List Logs and Get Log File :


clicking on a command tile opens up a new window to allow the command to be defined, and here is where the rest of the configuration detail comes into play :


the screenshot above is from the List Logs command, which has the following configuration (in it's entirety) :

{
    name: 'listlogs',
    label: 'List Logs',
    icon: 'file',
    startMessage: 'Retrieving log file list',
    completeMessage: 'Log file list retrieved',
    command: 'sfdx',
    subcommand: 'force:apex:log:list',
    instructions: 'Choose the org that you wish to extract the log file details for and click the \'List\' button',
    executelabel: 'List',
    refreshConfig: false,
    refreshOrgs: false,
    json: true,
    type: 'brand',
    resultprocessor: 'loglist',
    polling: {
        supported: false
    },
    overview : 'Lists all the available log files for a specific org.',
    params : [
        {
            name : 'username',
            label: 'Username',
            type: 'org',
            default: false,
            variant: 'all',
            flag: '-u'
        }
    ]        
}

the attributes are used in the GUI as follows:

  • name - unique name for the command, used internally to generate ids and as a map key
  • label - the user friendly label displayed in the tile
  • icon - the SLDS icon displayed at the top left of the command page
  • startMessage - the message displayed in the log modal when the command starts
  • completeMessage - the message displayed in the log modal when the command successfully completes
  • command - the system command to be run to execute the command - all of the examples thus far use sfdx 
  • subcommand - the subcommand of the executable
  • instructions - the text displayed in the instructions panel below the header. This is specific to defining the command rather than providing help about the underlying sfdx command
  • executeLabel - the user friendly label on the button that executes the command
  • refreshConfig - should the cached configuration (default user, default dev hub user) be refreshed after running this command - this is set to true if the command changes configuration
  • refreshOrgs - should the cached organisations be updated after running this command - set to true if the command adds an org (create scratch org, login to org) or removes one (delete scratch org, logout of org)
  • json - does the command support JSON output
  • type - the type of styling to use on the command tile
  • resultProcessor - for commands that produce specific output that must be post-processed before displaying to the user, this defines the type of processor
  • polling - is there a mechanism for polling the status of the command while it is running
  • overview - text displayed in the overview panel of the help page for this command
  • params - the parameters supported by the command.

Parameters


In this case there is only one parameter, but it's a really important one - the username that will define which org to retrieve the list of logs from. This was a really important feature for me - I tend to work in multiple orgs on a daily (hourly!) basis, so I didn't want to have to keep running commands to switch between them. This parameter allows me to choose from my cached list of orgs to connect to, and has the following attributes:

  • name - unique name for the parameter
  • label  - the label for the input field that will capture the choice
  • type - the type of the parameter - in this case the username for the org connection
  • variant - which variant of orgs should be shown :
    •  hub - dev hubs only
    • scratch - scratch orgs only
    • all - all orgs
  • default - should the default username or devhubusername be selected by default
  • flag - the flag that will be passed to the sfdx command with the selected value

Constructing the Parameter Input


As I work across a large number of orgs, and typically a number of personas within those orgs, the username input is implemented as a datalist - a dropdown that I can also type in to reduce the available options - here's what happens if I limit to my logins :


as the page is constructed, the parameter is converted to an input by generating the datalist entry and then adding the scratch/hub org options as required:

const datalist=document.createElement('datalist');
datalist.id=param.name+'-list';

for (let org of orgs.nonScratchOrgs) {
    if ( (('hub'!=param.variant) || (org.isDevHub)) && ('scratch' != param.variant) ) {
        addOrgOption(datalist, org, false);
    }
}

if ('hub' != param.variant) {
    for (let org of orgs.scratchOrgs) {
         addOrgOption(datalist, org, true);
    }                    
}

formEles.contEle.appendChild(datalist);

The code that generates the option pulls the appropriate information from the cached org details to generate a label that will be useful:

let label;
if (org.alias) {
    label=org.alias + ' (' + org.username + ')';
}
else {
    label=org.username;
}

if (scratch) {
    label += ' [SCRATCH]';
}

and this feels like a reasonable place to end this post - in the next part I'll show how the command gets executed and the results processed.

Related Posts