In previous posts about
documenting my org with a Salesforce CLI plugin
the focus has been on extracting and processing the object metadata. Now that
area has been well and truly covered, it's time to move on. The next target in
my sights is triggers - not for any particular reason, just that the real
projects that I use this on have triggers that I want to show in my docs!
Trigger Metadata
Trigger metadata is split across two files - the
.trigger file, which contains the actual Apex
trigger code, and the .trigger-meta.xml file,
which contains the supporting information - whether it is active, it's API
version. The .trigger file itself contains the
object that it is acting on and the action(s) that will cause it to fire:
trigger Book_ai on Book__c (before insert) {

}
Luckily the syntax is rigid - the object comes after the on keyword and the
actions appear in brackets after that, so just using standard JavaScript
string methods I can locate the boundaries and pull out the information that I
want, but not just to display it.
Checking for Duplicates
As we all know, when there is more than one trigger for an object and action,
the order they will fire in is not guaranteed. If you are a gambling
aficionado then you may find this enjoyable, but most of us prefer a dull,
predictable life when it comes to our business automation.
Once I've processed the trigger bodies and extracted the object names and
actions, one of the really nice side-effects is that I can easily figure out
if there are any duplicates and I can call these out on the triggers page
(I've updated the sample metadata to add duplicate triggers - they don't
actually do anything so wouldn't really be an issue anyway!) :
Bootstrap
Those that have been following this series of posts may notice that the
styling looks a little better now than in earlier versions - this is because
I've moved over to the Bootstrap library, pulled in via the CDN so I don't
need to worry about including it in my plug-in.
I've also updated the main page to use cards with badges to make it clear if
there are any problems with the processed metadata :
I've also moved some
duplicated markup out to an EJS include, which is as easy as I hoped it would
be. The markup goes into a file with a .ejs suffix
like any other - here's the footer from my pages:
And I can include this just by specifying the path:
<%- include ('../common/footer') %>
Note that I've put the footer in a common subdirectory that is a sibling of
where the template is stored.
Note also that I've used the <%- tag which
says to include the raw html output from the include. Finally, note that I
don't pass anything to the footer - it has access to exactly the same
properties as the page that includes it.
As usual, I've tested the plug-in against the sample metadata repo on MacOS and Windows 10. You can find the latest version (3.3.1) on NPMJS at the link shown below.
In part 1 of this series I introduced my Salesforce CLI GUI with some basic commands.
In part 2 I covered some of the Electron specifics and added a couple of commands around listing and retrieving log files.
In this instalment I'll look at how a command is constructed - the configuration of the parameters and how these are specified by the user.
Command Configuration
As mentioned in part 1, the commands are configured via the app/shared/commands.js file. This defines the groupings and the commands that belong in those groupings, which are used to generate the tabs and tiles that allow the user to execute commands. For example, the debug commands added in the last update have the following configuration (detail reduced otherwise this post will be huge!) :
which equates to a tab labelled Debugging and two command tiles - List Logs and Get Log File :
clicking on a command tile opens up a new window to allow the command to be defined, and here is where the rest of the configuration detail comes into play :
the screenshot above is from the List Logs command, which has the following configuration (in it's entirety) :
{
    name: 'listlogs',
    label: 'List Logs',
    icon: 'file',
    startMessage: 'Retrieving log file list',
    completeMessage: 'Log file list retrieved',
    command: 'sfdx',
    subcommand: 'force:apex:log:list',
    instructions: 'Choose the org that you wish to extract the log file details for and click the \'List\' button',
    executelabel: 'List',
    refreshConfig: false,
    refreshOrgs: false,
    json: true,
    type: 'brand',
    resultprocessor: 'loglist',
    polling: {
        supported: false
    },
    overview : 'Lists all the available log files for a specific org.',
    params : [
        {
            name : 'username',
            label: 'Username',
            type: 'org',
            default: false,
            variant: 'all',
            flag: '-u'
        }
    ]
}
the attributes are used in the GUI as follows:
name - unique name for the command, used internally to generate ids and as a map key
label - the user friendly label displayed in the tile
icon - the SLDS icon displayed at the top left of the command page
startMessage - the message displayed in the log modal when the command starts
completeMessage - the message displayed in the log modal when the command successfully completes
command - the system command to be run to execute the command - all of the examples thus far use sfdx
subcommand - the subcommand of the executable
instructions - the text displayed in the instructions panel below the header. This is specific to defining the command rather than providing help about the underlying sfdx command
executeLabel - the user friendly label on the button that executes the command
refreshConfig - should the cached configuration (default user, default dev hub user) be refreshed after running this command - this is set to true if the command changes configuration
refreshOrgs - should the cached organisations be updated after running this command - set to true if the command adds an org (create scratch org, login to org) or removes one (delete scratch org, logout of org)
json - does the command support JSON output
type - the type of styling to use on the command tile
resultProcessor - for commands that produce specific output that must be post-processed before displaying to the user, this defines the type of processor
polling - is there a mechanism for polling the status of the command while it is running
overview - text displayed in the overview panel of the help page for this command
params - the parameters supported by the command.
Parameters
In this case there is only one parameter, but it's a really important one - the username that will define which org to retrieve the list of logs from. This was a really important feature for me - I tend to work in multiple orgs on a daily (hourly!) basis, so I didn't want to have to keep running commands to switch between them. This parameter allows me to choose from my cached list of orgs to connect to, and has the following attributes:
name - unique name for the parameter
label - the label for the input field that will capture the choice
type - the type of the parameter - in this case the username for the org connection
variant - which variant of orgs should be shown :
hub - dev hubs only
scratch - scratch orgs only
all - all orgs
default - should the default username or devhubusername be selected by default
flag - the flag that will be passed to the sfdx command with the selected value
Constructing the Parameter Input
As I work across a large number of orgs, and typically a number of personas within those orgs, the username input is implemented as a datalist - a dropdown that I can also type in to reduce the available options - here's what happens if I limit to my logins :
as the page is constructed, the parameter is converted to an input by generating the datalist entry and then adding the scratch/hub org options as required:
const datalist=document.createElement('datalist');
datalist.id=param.name+'-list';

for (let org of orgs.nonScratchOrgs) {
    if ( (('hub'!=param.variant) || (org.isDevHub)) && ('scratch' != param.variant) ) {
        addOrgOption(datalist, org, false);
    }
}

if ('hub' != param.variant) {
    for (let org of orgs.scratchOrgs) {
         addOrgOption(datalist, org, true);
    }
}

formEles.contEle.appendChild(datalist);
The code that generates the option pulls the appropriate information from the cached org details to generate a label that will be useful:
let label;
if (org.alias) {
    label=org.alias + ' (' + org.username + ')';
}
else {
    label=org.username;
}

if (scratch) {
    label += ' [SCRATCH]';
}
and this feels like a reasonable place to end this post - in the next part I'll show how the command gets executed and the results processed.
In Part 1 of this series, I explained how to generate a plugin and clone the
example command. In Part 2 I covered finding and loading the package.json manifest and my custom configuration file. In Part 3, I explained how to load and process source format metadata files.
In
Part 4, I showed how to enrich fields by pulling in information stored outside of
the field definition file.
In this week's exciting episode, I'll put it all together and generate the
HTML output. This has been through several iterations :
When I first came up with the idea, I did what I usually do which is
hardcode some very basic HTML in the source code, as at this point I'm
rarely sure things are going to work.
Prior to my first presentation of the plug-in, I decided to move the HTML
out to files that were easily changed, but still as fragments. This made
showing the code easier, but meant I had to write a fair bit of
boilerplate code, but was all I really had time for.
Once I'd done the first round of talks, I had the time to revisit and move
over to a template framework, which was always going to be the correct
solution. This was the major update to the plug-in I referred to in the
last post.
Template Framework
I'd been using EJS in YASP
(Yet Another Side Project) and liked how easy it was to integrate. EJS
stands for Easy JavaScript templates, and it's well named. You embed plain
old JavaScript into HTML markup and call a function passing the template and
the data that needs to be processed by the JavaScript. If you've written
Visualforce pages or email templates in the past, this pattern is very
familiar (although you have to set up all of the data that you need prior to
passing it to the generator function - it won't figure out what is needed
based on what you've used like Visualforce will!).
A snippet from my HTML page that lists the groups of objects:
and as long as I pass the function that generates the HTML an object
with a property of content, that matches the expected structure, I'm golden.
To use EJS in my plug-in, I install the node module, :
npm install --save ejs
(Note that I'm using the --save option, as
otherwise this won't be identified as a dependency and thus won't be added to
the plug-in. Exactly what happened when I created the initial version and
installed it on my Windows machine!)
I add the following line to my Typescript file to import the function that
renders the HTML from the template:
import { renderFile } from 'ejs';
and I can then call renderFile(template, data) to
asynchronously generate the HTML.
Preparing the Data
As Salesforce CLI plug-ins are written in
Typescript by
default, it's straightforward to keep track of the structure of your objects
as you can strongly type them. Continuing with the example of my groups, the
data for these is stored in an object with the following structure:
Rather than pass this directly, I store this as the content of a more generic
object that includes some standard information, like the plug-in version and
the date the pages were generated:
let data={
             content: content,
             footer:
             {
                 generatedDate : this.generatedDate,
                 version : this.config.version
             }
         };
Rendering the HTML
Once I have the data in the format I need, I execute the rendering function passing the template filename -
note that as this is asynchronous I have to return a promise to my calling
function:
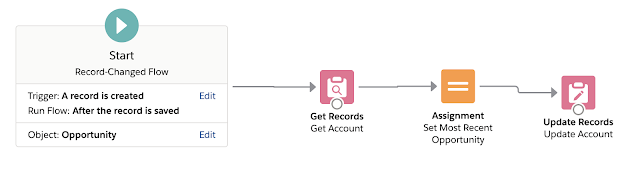
Summer 20 sees more #LowCodeLove with the introduction of flows that run after records are saved. After the fun and games when I wrote a post comparing before save flow and apex trigger performance, and then a follow up detailing what I thought was actually happening, I was keen to get my hands on this to see if anything was different. Because I love arguing with people on twitter. It seriously went on for days last time.
Example Flow
My example flow was once again refreshingly simple - when an opportunity is inserted, update a field on the associated account called Most Recent Opportunity with the ID of the new record - thus it had to be an after save flow as the record ID needed to be populated. For the purposes of the testing I also assumed the account lookup would always be populated on the opportunity.
As before, I turned the log level way down, ran my anonymous apex to insert one thousand opportunities spread across five accounts and then delete them, and checked the log file.
If what I was looking for was more confusion and perhaps controversy, I wasn't disappointed:
As this wasn't my first rodeo, I then put the insert/delete of the thousand records inside a loop and kept increasing the iterations - starting with 1, just in case that changed things.
No loop (scenario above) - 0
1 x - 0
2 x - 6869
3 x - CPU limit exceeded - 19696
So unless we get a free thousand or so iterations, then the next thousand are expensive, and when the next thousand hugely expensive, I'd say the CPU logging is equally off for after save flows.
I then added a single line of apex to the end of the anonymously executed code:
Long newTime=Limits.getCPUTime();
This changed things quite dramatically:
No loop - 6865
1 x - 7115
2 x - CPU time exceeded - 15779
Now this could be interpreted that getting the CPU time consumed to date via the Limits.getCPUTime method is incredibly expensive, but adding these inside the various loops I had to insert the data gave an increase of a couple of milliseconds, so that can be safely excluded.
Conclusion
Nothing I've seen in this latest experiment has changed my view that CPU is being consumed in flow automation, but it only gets tracked when the it is accessed. There is an additional wrinkle though, in that I do appear to be able to squeeze more work in if I don't cause the CPU to be tracked - I can successfully complete the two thousand inserts in this scenario, rather than breaching the CPU time quite spectacularly when I do track it.
This makes sense to me, as CPU isn't a hard limit - you can spike past it as long as the Salesforce infrastructure has capacity to handle it, so there is some checking around the CPU used and if this is awry the transaction will be allowed to proceed a little further than it otherwise might. It could also be coincidence, as the size of spikes allowed varies constantly, and I may be very close to succeeding in the cases where I breach, but I reran my tests a few times with much the same results.
Of course I don't really think I'm squeezing more work in, I'm taking advantage of what looks like a gap in the CPU tracking under certain circumstances. It would be a courageous decision (from Yes, Minister - a brave decision will cost you a few votes, a courageous decision will lose you the election!) to put something into production that relied on it - a single line of Apex added somewhere in the transaction would blow it out of the water, and I'm sure that at some point Salesforce will rectify this, and hopefully some of the others around CPU monitoring!
I'd also really love to see some of the logging that Salesforce captures internally - conjecture is good fun, but it would be nice to understand what is really happening.
This week (8th May 2020, for anyone reading this in a different week!) saw the Salesforce Low Code Love online event, showcasing low code tools and customer stories. This was very timely for me, as I'd finally found some time to try out embedding Lightning Web Components in Lightning Flows.
I don't spend a lot of time writing flows - not because I don't want to, but because it's not particularly good use of my time, which is better spent on architecture, design and writing JavaScript or Apex code. Some developers don't like working on flows, and I suspect there are a couple of reasons:
It slows them down - they find that expressing complex logic in a visual tool requires a lot of small steps that could be expressed far more efficiently in code. In this case I'd suggest that a step backwards is required to decide if flow is the best tool to write that particular piece of logic in - which is not saying the whole flow should be discarded, but maybe this aspect should be treated as a micro-service and moved to another technology. In much the same way that Evergreen will allow us to move processing this is better suited to another platform outside of Salesforce - dip out of flow for the complex work that is unlikely to change, leaving the simpler steps that need regular tweaking.
They can't be unit tested in isolation. This is probably my biggest peeve - if I write some Apex code to automate a business process, I can unit test it with a multitude of different inputs and configuration, and easily repeat those tests when I make a change. While I can include auto-launched flows in my unit test, they are mixed in with the other automation that is present and so may experience side effects, while screen flows are entirely manual so I'd need to use a tool like ProVar to create automated UI tests. I get that it's tricky, as screen flows span multiple transactions, but it feels like something that needs to be solved if low-code tools are to gain real currency with IT departments. The old maxim that the further away from the developer you find a bug, the more expensive it is to fix still holds true.
Scenario
The first thing I should say is that Lightning Web Components can only be embedded in screen flows, so for headless flows you'll be using Apex actions. In my example my web component simply displays a message and automatically navigates without any user interaction, so would be a candidate for an Apex action, but I quite like the idea of being able to interact with the user if I need to, and I was also curious if there were any issues with my approach.
Drawing on my Building my own Learning System work, I decided to implement a simple quiz where the user is presented with a number of questions that need to be answered via a radio button, for single answer, or checkbox group, where multiple selections are required. Once the user has made their selection(s), this is compared with the correct answers and their score updated accordingly. Once all questions have been answered, the user is told how they got on.
The Flow
Building the flow was very straightforward to begin with - getting the questions from the database, looping through them, updating a counter so I could show the question and a screen to ask the question, with conditionally rendered inputs depending on the question type:
There was some behind the scenes work with variables to create the choices for the radiobutton/checkbox groups, but nothing untoward. When marking the answers however, things got a lot more tricky. I had to retrieve and iterate the answers, identify the type of the user's selection (which could be the radio button or checkbox output from the screen), check the answer against their selection and then update their score appropriately. There's probably a few minor variations on this, but expressing all of those steps visually ended up with quite a complex looking flow:
Once you have multiple decisions inside a loop, the sheer number of connectors makes it difficult to lay out the flow nicely, and adding custom boolean logic to a decision quickly gets ugly - in this case I'm checking if the user failed on this answer by not choosing an answer that is correct or choosing an answer that is incorrect:
One of the advantages of building functionality in flow is that it is easier to change, but understanding what is going on here and making changes would not be simple and there would be a fair amount of retesting required. This kind of thing is the worst of both worlds - it slows development, limits the capabilities but isn't easy to rework.
With this many small moving parts to carry out some processing that is highly unlikely to change that often, flow seems like the wrong tool to create the marking functionality in. I could move some of it into a sub-flow, but that feels like trying to hide how much the flow is doing rather than genuine functional decomposition.
Embedded Lightning Component
So I decided to replace the marking aspect with a Lightning Web Component - this will take the question and the various inputs that a user can supply and figure out whether they answered correctly. It will return true or false into an output variable.
To embed a Lightning Web Component in a flow, it needs to specify lightning__FlowScreen as a target in the -meta.xml file:
questionId - the id of the question that has been answered
radioChosen - the selected value for a radio button question
selectChosen - the selected value for a checkbox group question
And one output property:
correct - did the user answer the question correctly
As well as detailing the properties in the metadata file, I need appropriate public functions in the component JavaScript class. For input properties I need a public getter:
@api
get questionId()
{
    return this._questionId;
}
while for output properties I need a public setter:
@api
set correct(value)
{
    this._correct=value;
}
I also need to fire an event to tell flow that the value of the output parameter has changed, which I'll cover in a moment.
When my input properties are set, I need to mark the question, but I have no control over the order that they are set in. I'm marking via an Apex method so I don't want to call that when I've only received the question id. Each of my setters calls the function to mark the question, but before doing anything this checks that I've received the question id and one of the checkbox or radio button option sets:
@AuraEnabled
public static Boolean MarkQuestion(String questionId, String answers)
{
    Question__c question=[select id,
                           (select id, Name, Correct__c from Answers__r)
                          from Question__c
                          where id=:questionId];

    Boolean correct=true;
    for (Answer__c answer : question.Answers__r)
    {
        if ( ((!answer.Correct__c) && (answers.contains(answer.Name))) ||
             ((answer.Correct__c) && (!answers.contains(answer.Name))) )
        {
            correct=false;
        }
    }

    return correct;
}
Now I know I'm biased as I like writing code, but this seems a lot easier to understand - small things like retrieving the question and it's related answers in a single operation. writing boolean login in a single expression rather than combining conditions defined elsewhere make a big difference. I can also write unit tests for this method and give it a thorough workout before committing any changes.
My function from my Lightning Web Component receives the result via a promise and fires the event to tell flow that the value of the correct property has been changed:
It also fires the event to navigate to the next event (the next question or the done screen) as I don't need anything from the user.
I add this to my flow and wire up the properties via a screen component - my markQuestion component appears in the custom list, and I specify the inputs and outputs as I would for any other flow component:
Embedding this in my flow simplifies things quite a bit:
Now any admin coming to customise this flow can easily see what is going on - the question marking that doesn't change is encapsulated in a single screen component and they can easily add more screens - to display the running total for example, or cut the test short if they user gets too many questions wrong. Note that as this is another screen, the user will be taken to it when they click 'Next' - I display a 'Marking question' message, but if you don't want this then an Apex Action would be a better choice.
You can find the metadata components at my Low Code Github repository, but if you want to see the two flows in action, here's a video:
A few years ago, Jodi Wagner and I started up a community effort called Speaker Academy, after we noticed that most of the events that we attended had the same faces speaking each time. As I was one of those faces I didn't necessarily see it as a bad thing, but I know it's possible to have too much of a good thing!
We figured that a lot of people liked the general idea of raising their profile and sharing their experience, but hated the thought of being up on stage in front of an audience. That's pretty much how I felt about it when I started public speaking many years ago - I could see all the upsides and very much wanted those, but the potential pitfalls seemed overwhelming. I got past this by forcing myself to speak whenever the opportunity arose, and reading lots of articles about conquering your fear of failure, but it wasn't the smoothest road to travel.
So we offered candidates the chance to take advantage of our experience through a multi-week course, with a mix of presentations, hands on exercises, and dry runs of real talks with feedback. Our candidates used to graduate by presenting at a special meetup of the London Salesforce Developers, but since we went online and are pulling in people from Europe and beyond, we now ask candidates to speak at an event of their choosing and send us some pictures to prove it happened!
We've run a couple of iterations online, and each time had to rework the curriculum a little. It turns out people are much more comfortable sat in their own home in front of a screen, so we had to figure out new ways to take them out of their comfort zone. The expectations of event organisers also changed, so we had to increase our focus on things like writing an abstract.
Double Trouble!
We also ended up on different continents when Jodi moved back to the US, which made the logistics more challenging. For the last round, Jodi very kindly gave up an hour of her morning to fit around us starting just after work in the UK, but it was clear to us both that this was a short term solution.
We decided to split our teaching efforts up - we'd each find new co-hosts and run the program in parallel in Europe and the US, and I'm very pleased to announce that my co-host for the next iteration run out of the UK is Julia Doctoroff. Julia is well known in the Salesforce community and is a graduate of the very first round of Speaker Academy, and I'm excited to be facilitating with her.
The Next Round
Our next iteration of Speaker Academy Europe will be starting in the next couple of weeks - if you are interested in being a part of it, fill out the interest form to let us know. This requires a commitment to attend a weekly class of an hour or so and involves homework, so please don't sign up if you can't commit. If you drop out half way through you don't get to graduate, you've blocked someone else who could have made better use of the opportunity, and it's unlikely we'll let you back in to a future iteration.
As we give 1-1 feedback and mentoring, we are limited in terms of the number that we can accept per iteration, but if you don't make this one you will move up the list for future iterations and eventually you will get lucky!