Saturday 17 December 2022

The Org Documentor and the Order of Execution Diagram

Introduction

Earlier this year (2022) Salesforce Architects introduced a diagrammatic representation of the order of execution, which was a game changer in terms of easing understanding. I've had a task on my todo list since then to figure out how I could incorporate it into the Org Documentor, and thanks to using up some annual leave in a freezing December, I've finally had time to work on it.

Click to View

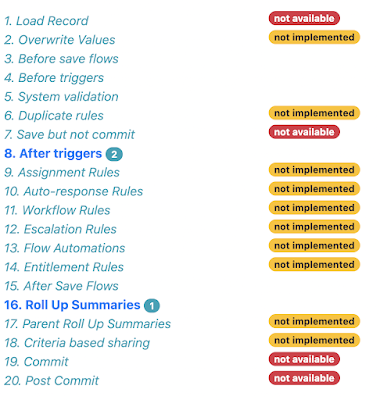
I already have information about the configured automation organised by the order of execution step, but currently in a text format:


so it made sense to try to repurpose this. I really liked the idea of making the diagram clickable, via an image map, but I wasn't overly keen on adding JavaScript to display popups with the details of the configured automation, so I went hunting for a CSS/HTML only solution. 

I found it at Mate Marschalko's Medium post, which showed how to use the :target pseudo-class to show or hide overlay divs without a single line of JavaScript, so set about applying this technique to the Org Documentor via a new EJS template, heavily based on my existing order of execution template. I also needed to generate the image map element based on selected areas of the Salesforce diagram, for which I used <img-map> - I did find that it all went awry after I selected 4-5 areas, so I did them one at a time and copied the coordinates over to my new template. 

After a few hours work I had a reference to the Salesforce diagram in the generated documentation for each object, via the new Image Detail column:


but with elements that could be clicked on:


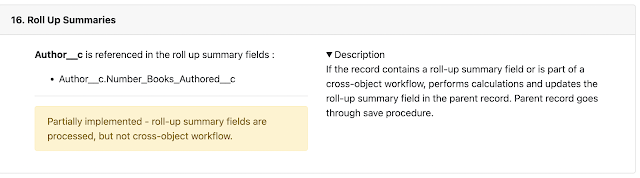
which would display the automation configured for the object for that specific step and a description if the user cared to read more.


Albeit with a couple of caveats:
  • Because the red line around the clickable element is applied to an <area> element, these only display when the element is clicked. This means that to find what is clickable you need to mouse around looking for the change in the pointer (or look at the text version of the order of execution for the object and identify what is supported there)

  • The page jumps around a bit under you. This is due to the nature of the :target psueudo class - when you click on an element, the URL is updated with a fragment identifying the popup required, which transforms from zero size to it's configured size in the centre of the page. This causes the browser to scroll down to show it correctly. When you close the popup, the URL is changed to remove the fragment, which makes the browser jump to the top of the page. This could be obviated by using a smaller image, but my view is it's better to live with this and have an image that you can read.

Try it Yourself


Version 4.1. 0 of the plugin includes this functionality and is available from NPM.

The sample output has been regenerated on Render,com, so if you access:


and click element 3 - Executes "Before Save" record triggered flows, you can see it in action.

Related Posts


Sunday 4 December 2022

The Latest from the Org Documentor

Migrated Sample Output

November 28th 2022 marked a sad day in the Salesforce ecosystem, as Heroku free plans ended. From the learning perspective it's a real shame, as I'd used the free plans many times in the past to learn more about Node and other web technologies. From the live apps perspective it wasn't a huge impact, as the only work that I wanted to keep was a few static sties. Now we are into December it's happened, so time to find another home for my sites.

I ended up going for render, as it has a well regarded free tier and was very straightforward to set up. Going forward you'll find the sample output at:

    https://bbdoc-sample-output.onrender.com/

I've updated some of the references in this blog and elsewhere, but I'm sure I'll have missed some, so if you come across a broken Heroku link then let me know and I'll fix it up.

Version 4.0.6

There's also a new version of the documentor plug-in available from NPM - this is a community contribution from Carl Vescovi that fixes a couple of bugs in the flow handling and adds the flow type to the output. 

The Documentation Site

In case you haven't come across it before, the Documentor is documented (meta eh?) at:

     https://orgdoc.bobbuzzard.org/home

This has details of how to setup and configure the Documentor, as well as release information.

Related Posts


Sunday 20 November 2022

LWC Alerts in Winter 23


Introduction

The Winter 23 release of Salesforce provided something that, in my view, we've been desperately seeking since the original (Aura) Lightning Components broke cover in 2014 - modal alerts provided by the platform. I'd imagine there are hundreds if not thousands of modal implementations out there, mostly based on the Lightning Design System styling, and all being maintained separately. Some in Aura, some in LWC, but all duplicating effort.

I feel like we have cross-origin alert blocking in Chrome to thank for this - if that wasn't breaking things then I can't see Salesforce would suddenly have prioritised it after all these years - but it doesn't matter how we got them, we have them!

Show Me The Code!

The alerts are refreshingly simple to use too - simply import LightningAlert:

import LightningAlert from 'lightning/alert';

and then execute the LightningAlert.open() function:

    async showAlert() {
        await LightningAlert.open({
            message: 'Here is the alert that will be shown to the user',
            theme: 'warning',
            label: 'Alerted',
            variant: 'header'
        });
    }

and the user sees the alert


The LightningAlert.open() function returns a promise that is resolved when the alert is closed. Note that I've used an async function and the await keyword - I don't have any further processing to carry out while the alert is open, so I use await to stop my function until the user closes the alert. 

Demo Site


When there's a component like this with a number of themes and variants, I typically like to create myself a demo page so I can easily try them all out when I need to. In this case I have a simple form that allows the user to choose the theme and variant, then displays the alert with the selected configuration. 


In the past I'd have exposed this through one of my Free Force sites, but those all disappeared a few months ago so I needed to start again. The new location is https://demo.bobbuzzard.org, which is a Google Site with a custom domain. This particular demo can be found at: https://demo.bobbuzzard.org/lwc/alerts  - it's a Lightning Web Component inside a Visualforce Page using Lightning Out, so with the various layers involved it may take a couple of seconds to render the first time. It does allow guest access though, so worth the trade off in my view. 

Related Posts


Saturday 12 November 2022

Flow Tests in Winter 23

Flow Tests in Winter 23


Introduction 

Low code flow testing became Generally Available in the Winter 23 release of Salesforce. Currently limited to record triggered flows, and excluding record deletes, we now have a mechanism to test flows without having to manually execute them every time.

Of course we've always been able to include flow processing in Apex tests - in fact we had no choice. If a record was saved to the database, then all the configured automation happened whether we liked it or not. What we couldn't accurately test was whether the state of the system after the test completed was down to the flow, or something else that happened as part of the transaction. (Incidentally, this is why you shouldn't put logic in triggers - you can only test that by committing a transaction, which brings in all the other automation that has the potential to break your test). Now we can isolate the flow - although not as much as you might want to it turns out.

In this post I'm mainly focusing on what is missing from flow testing, as I'm comparing it to Apex unit testing which is obviously far more mature. While this might read as negative, it really isn't - I think it's great that flows are getting their own testing mechanism - something I've been demanding for a while!

To try this out, I've created a few tests against the Book Order Count flow from the process automation superset - this runs when a new order is received from a contact, iterating the contents of all of their orders and calculating the total number of books bought over their customer lifetime. 

Lack of Isolation

While record triggered flow tests are isolated from the need to write records to the database, they aren't isolated from the contents of the database. In one way this is a good thing - if I want to execute my flow with an order containing line items, I need to use an existing record as the test only allows me to supply fields for a test parent record, not create child records. In every other way, this is not a good thing. If I go this route my test relies on specific records being present in the database, so they'll fail if executed in a brand new org. It also relies on the specific records not changing, which is entirely out of my control and thus makes my test very fragile. 

Even when I'm not using line items, I find myself relying on existing data - to create an empty book order I need to identify a contact that exists in the system, instead of creating a contact as part of the test that is then discarded. This also leads to fragility - for example, I created a new contact named Testy McTest and used this in a test to confirm that if there are no orders for the contact the flow correctly identifies this. Here's a screenshot of my test passing - job done!


However, at some point in time another user running a manual test (or possibly my Evil Co-Worker, who has realised that randomly adding new data can mess up lots of tests) creates an order for Testy with a single book:


I'm blissfully ignorant of this, right up until I run my test again - knowing my luck in front of the steering committee to show the investment was worthwhile, and it no longer works:


Nothing in the flow has changed, but the data in the system that it relied on has, and that is entirely out of my control. 

For anything other than simple flows, I think right now you'd have to be looking at running flow tests in a dedicated scratch org or sandbox that you control the contents of and access to. 

Open the Box

Flow testing has the interesting concept of asserting that a node was visited rather than verifying the outputs are consistent with the node being visited. I can understand where this comes from - in Apex you can unit test the fine detail logic quite easily, as long as you've followed best practice around separation of concerns and functional decomposition, but in flows it's a lot more difficult as the UI doesn't really help you identify the relationships between subflows and parents. Understanding it doesn't mean I like it though - this is an example of Open Box Testing, where the test knows the intimate details of the implementation that it is testing. Open Box Testing does have some advantages, but the big disadvantage is that it tightly couples the test to the item being tested. If the logic needs to change and that involves removing nodes, you are likely to have to revisit your tests and remove your asserts around those nodes, whereas if you've used closed box techniques and are simply asserting the outcome, the entire implementation can change and your tests don't care.

Asserting 

Checking the contents of complex variables managed by the flow, collections for example,  also seems a little tricky. Right now I think I'd have to add variables to the flow to represent things like an empty collection, a record that I want to look for in the collection, or to store the length so that I can verify how many records I have. This is something that I really don't like to do - change my implementation purely for the benefit of the testing framework.

This is pretty much for the same reason as the lack of isolation I mentioned above - I don't have the ability to create variables in the test, so I have to compare against items that already exist. 

Launching from External Tools

I've scoured the docs around flow tests and the APIs, and I can't find any way to launch a flow test from an external tool like the Salesforce CLI. In my view this is something that will hold back adoption - if the only way include this in our CI/CD processes is something like Selenium driving the UI, it all becomes a bit too clunky and we'll likely continue with the Apex testing approach, in spite of the limitations. I'd love to have missed this, so if that is the case please let me know and I'll gladly add a mea culpa update.

Conclusion

As I said earlier, this post has mainly been calling out what I can't do in flow testing, based on what I'm used to doing with test frameworks for programming languages like Apex, Java and JavaScript. I'm sure that flow testing will continue to receive significant investment and will become much more powerful as the releases roll by. Even though it is of limited benefit right now, the benefit is still tangible and you'll be much better off with flow tests and without them. 

Related Posts


Saturday 5 November 2022

System.Assert Class in Winter 23

System.Assert

The Winter 23 release of Salesforce introduces a new Apex class in the System namespace - the Assert class. This contains methods to assert (or check) that the results of the code under test are as expected. 

We already have a collection of assert methods in the System class itself, so why do we need more? The surprising answer is that we don't! The existing assert methods can be purposed to confirm any condition you care to think of:

  • assert - confirm that a parameter evaluates to true
  • assertEquals - confirm two parameters evaluate to the same value
  • assertNotEquals - confirm that two parameters do not evaluate to the same value
In fact you could argue that we don't need all the methods that we have - the assert method alone with an appropriately constructed expression can confirm any behaviour.

The reason we have the new System.Assert class is the same as the reason that we were originally given the assertEquals and assertNotEquals - to provide clarity around the intent of our code. If we are interested in testing the equality of two variables then it's much easier to understand the intent using:
   System.assertEquals(firstValue, secondValue);
than
   System.assert(firstValue==secondValue);
The System.Assert class provides a number of new methods that allow you to write clearer unit tests, helping those that come after you get to grips with your code quicker

areEqual, areNotEqual 


These mirror the functionality of the existing System.assertEquals/assertNotEquals, but with more clarity - your code is verifying that the two parameters are equal or are not equal to each other.

isTrue/isFalse


Verify that the parameter evaluates to false or true. You could achieve the same thing using the existing methods, for example to check that the found variable is false:
          System.assert(!found);
          System.assertEquals(found, false);
          System.assertNotEquals(found, true);
      
but in each of these you hafe to look at the expressions that are used to generate the parameters, whereas with:
          System.Assert.isFalse(!found);
it's obvious what I'm trying to do

isNull/isNotNull


Verify the parameter passed is null or isn't null - this is more powerful than it might appear at first glance. Consider the following assertion:
          System.assertEquals(searchResults, 'null');
This looks reasonable, but only useful if you want to confirm that searchResults is a String with the 
contents 'null', rather than a null value. Sadly there's no way for me to determine which one the original author intended - instead I have to examine the code under test and figure out what the result should be Compare (see what I did there!) this with:
          System.Assert.isNull(searchResults);
and there's no room for doubt.

isInstanceOfType/isNotInstanceOfType


A slightly less obvious method, but one that you'll find very useful if you regularly find your unit tests catching exceptions and checking the correct one was thrown, handling collections of generic sObjects, or, like me, you've written a few classes that parse field history tracking tables and turn the old/new values back into their original data types.

Using the exception as an example, there's a few ways you can verify this with the old methods:
  • Only catch the specific type of exception you are expecting and let anything else cause the test to fail - not the greatest experience.
  • Catch the Exception superclass and use the instanceof operator to determine the actual type:
         System.assert(caughtException instanceof DMLException);
                
  • Catch the Exception superclass and use the getTypeName method to determine the actual type
         System.assertEquals(caughtException.getTypeName(), 'System.NullPointerException');
or use the new Assert class and make it very clear you are interested in the type of the parameter using:
          System.Assert.isInstanceOfType(caughtException, DMLException.class);

fail


Another method I'm particularly pleased to see. Often I'll be testing some code that should throw an exception, but I need a way to mark the test as a failure if it doesn't:

       try {
              // execute method
              System.assert(false, 'Should have thrown exception');
       }
       catch (Exception exc) {
           // expected behaviour - nothing to do
       }
    
To the casual browser, this looks like I'm verifying some behaviour after the method executes, and swallowing any exceptions that might be thrown - not a great test at all. The fail method gives me a mechanism to clearly indicate that if the code doesn't throw an exception then something is awry:
       try {
              // execute method
              System.Assert.fail('Should have thrown exception');
       }
       catch (Exception exc) {
           // expected behaviour - nothing to do
       }
    

Always Use Assert Messages


I'm guessing that we might have a few readers who are relatively new to Apex testing - the best piece of advice I can give you is to always use the variant of an assert method that takes a message parameter, and make that message useful. 

<comic-aside>
There's an old joke about a pilot flying a passenger in a small plane around a Seattle who experiences a navigation and comms outage . The pilot heads for a tall building with lit up offices, while the passenger writes "Where am I?" on a piece of paper and holds it up for the occupants to see. One grabs a piece of paper, writes on it and holds up the message "You are in a plane". The pilot immediately sets a course and lands safely a couple of minutes later. The passenger asks how the message made a difference, and the pilot replies "The information was 100% accurate and no help at all, so I knew that was the Microsoft support building".

</comic-aside> 


Consider the following test :
      Integer pos=2;
      System.Assert.areEqual(3, pos);
Upon running this, you'll get the following output:

System.AssertException: Assertion Failed: Expected: 3, Actual: 2

Much like 'You are in a plane', this is 100% accurate and no help at all to someone who isn't intimately familiar with the codebase. The message parameter gives you an opportunity to provide some accurate and helpful information, for example:
    Integer pos=2;
       System.Assert.areEqual(3, pos, 
                        'The matching record should be found at position 3 of the list');
  
Which gives the output:

System.AssertException: Assertion Failed: The matching record should be found at position 3 of the list: Expected: 3, Actual: 2
One final word of advice - always remember the message is describing the error, not the successful outcome. You'd be surprised how many times I've seen something like the following:
System.AssertException: Assertion Failed: The matching record is at position 3 of the list: Expected: 3, Actual: 2
when it really isn't, that would be the case if the test passed!

Related Information


Monday 1 August 2022

Winter! In August?

It's odd to be writing this post while here in the UK we are just coming off record temperatures, but in Salesforce terms it will soon be Winter. <Feel free to insert a variant on Winter is Coming here - I feel like I've done enough of that>. 

Winter 23 hits sandboxes on August 26th 2022 - like Christmas I'm sure it gets earlier each year, but more likely it's because this is the 14th Winter release I've experienced! 

If you want to try out the new release on your existing setup, then you'll have a couple of options

  • Check the location of your existing sandboxes and hope to find one that is part of the preview group.
    Not my preferred option, as I've usually cut sandboxes for a specific reason and carrying out regression testing on top of new work is a recipe for not doing either of them well.
  • Create a new sandbox, or refresh one that you don't need any longer, before August 25th, leaving enough time for the request to complete.  That way there is no need to rely on someone correctly identifying the preview groups and you have a shiny new sandbox purely to confirm that the release doesn't break your existing production setup - no human contact required.
You can find the full sandbox preview instructions here, including the preview groups if you want to do it the hard way. 

If you find a lengthy set of written instructions a bit dull, the Sandbox Preview Guide could be just what you are looking for. Simply enter the sandbox instance, choose what version of Salesforce you want on it - preview or stay on current release, and it will give you simple instructions as to what to do next. It's a beta app, so caveat emptor, but the possibility for serious damage looks limited.

There are other useful dates to be aware of for Winter 23

Pre-release orgs available August 11th


A couple of points to note about these:
  • If you signed up for a pre-release org in the past, chances are it's still there - I've been using my Summer '14 pre-release org for over 8 years now and it gets upgraded at the same time as the new ones become available
  • They are of limited use. Yes you'll get access to some new functionality before the sandbox preview, and they will get a bit of maintenance, but if you want to properly test your existing applications and configuration then sandboxes are a much better option. In my experience bug fixes come much later in pre-release orgs, if they come at all. Just use them as a chance to get a jump on the release treasure hunt.

Preview Release Notes August 17th


The key word here is preview - there's no guarantee that any of the features in the preview release notes will go live. Most of them do, but I've had more than a few last minute reworks of my release webinars when something has disappeared at the last minute. Keep checking the change log!

Production Goes live the weekends of September 9th, October 7th and October 14th


Don't get too excited about the first weekend - that is for Salesforce only, to give it a workout in the real world and hopefully pick up a few more issues that were will hidden. The rest of us will be in October, which will be on us before we know it.

If you prefer a pictorial representation of the timeline, check out the official Salesforce infographic, with lots more dates for their training events etc. It even mentions Spring '23, which is rather wishing your life away in my view. 

Life may be short, but it feels even shorter measured in Salesforce releases.


Saturday 30 July 2022

Bob the Code Builder - Part 1

 Introduction

After rather long wait for those of us that were keen to get our hands on it, Salesforce Code Builder went into open beta on July 13th 2022. I was particularly interested in this as I'd been on the beta of the underlying technology - Visual Studio Codespaces back in 2020 and the beta of Github Codespaces in 2021. I couldn't get on the Code Builder pilot, in spite of twisting every Salesforce arm I knew of, so I had to replicate as best I could using those. If you are interested in seeing my attempts at this, check out this video on the London Salesforce Developers' Youtube channel - and why not subscribe while you are there? If you prefer the written word, check out my blog post on this topic.

Joining the Open Beta

The Salesforce blog post makes it sound like you just follow some instructions and you are in - that's not quite the case as you join a waitlist. I never heard back after joining, but when I checked the org I was using for the beta, I found I was good to go, so my advice is check early and often if you can create you environment.

The rest of it is pretty self-service - you install a managed package, authorise some third party sites and assign yourself the Code Builder permission set.  Then you try to create an environment and find out you need to join a waitlist as mentioned above, so you find something else to do for a day or two.

The managed package did complain that it didn't support my version of Salesforce, which is a developer edition, but thus far I haven't seen any issues.

Connecting to Salesforce

When I was attempting to replicate Code Builder using Codespaces, this required setting up JWT authentication for each Salesforce org I wanted to use. While this is more repetitive than difficult, it quickly becomes boring and was probably the main reason I didn't go a lot further.

With the advent of the Code Builder beta, I could forget all about that side of things - when I created my environment I was asked to login to the org that I wanted to work in, and connecting to another org is also very straightforward, although it did take me a few goes to get it to stop defaulting to my Code Builder beta org.

The Developer Experience


VS Code in the browser

It's still early days for me with the beta, but the developer experience thus far is pretty good. I connected up my dev hub, created a scratch org, pushed the code that I'm testing and everything went smoothly. There is a wrinkle around creating new Lightning Web Components, in that I get error output that the command failed to run, even though the component did get created. I can push it to a scratch org which means it's being picked up by the tracking, so I'm guessing it's an issue for the extension talking to the CLI in this architecture.

As Code Builder really is a virtual machine in the cloud, in this case AWS, it will be costing real money to provide workspaces, so the beta is limited to 20 hours over 30 days. This sounds like quite a lot of time for essentially a side gig, but try not to get distracted - I lost the best part of 30 minutes of my alloted time after opening the workspace and then getting caught up in something elsewhere. Shut it down when you aren't using it!

Related Posts


Sunday 15 May 2022

The CPU Effects of Sorting


Introduction

Regular readers of this blog will know that I'm curious about the CPU time consumed by various developer activities on the Salesforce platform - as I've written before, developing at enterprise scale often turns into a Man Vs CPU battle. One area I've been meaning to look into for a while is list sorting, and it's been an interesting investigation.

Sorting Lists

Sorting sounds quite simple - if it's a list of primitives then you can probably use the built-in List.sort() method. If not then you'll likely want to implement the Comparable interface, which requires a single method:

    Integer compareTo(Object compareTo)

This method compares the current object instance to the compareTo object instance and returns +1 if this instance is the larger, -1 if it is the smaller and 0 if both instances are the same. How you determine the result depends on your specific business logic, but can also have a significant effect on your request's CPU consumption, as the following scenarios will show. To capture the CPU consumed, in each scenario I created a list with 10,000 elements using Math.random() to ensure as little ordering as possible in the initial creation. I then sorted this list, capturing the CPU consumed before and afterwards, with the log level turned right down. I wouldn't take too much notice of the exact values, but the key point is the difference between them.  If you are interested in the exact implementation, click the link under each scenario title to see the code in the Github repository.

Primitive Sort

PrimitiveSort.cls 

The baseline to compare against - this consumed 20 milliseconds of CPU.

Single Property

SimpleComparableSort.cls

A custom object containing a single Integer property and a compareTo method that accessed this property directly on both instances. This consumed 336 milliseconds of CPU - a significant increase to access a single property.

Multiple Properties Combined

MultiComparableSort.cls

A custom object containing two Integer properties and a compareTo method that accesses the properties directly, and multiplies them together before comparing.  This consumed 865 milliseconds of CPU - another significant increase.

Multiple Properties Combined and Calculated in Advance

MultiComparableCalcSort.cls

A custom object containing two Integer properties that multiplies them together and stores them in a third property which is used directly in the compareTo method. This is an iteration on the MultiComparableSort custom object scenario, and consumed 352 milliseconds, showing that it can be worth doing some additional work in advance on the objects you are going to sort.

Method Call

MethodComparableSort.cls

A custom object containing an Integer property that is not public, requiring a method to be executed to retrieve the value for the instance being compared to. This consumed 773 milliseconds of CPU time, an increase of over 100% from accessing the property directly. 

Creating a public property containing a read only copy of the value for sorting purposes would change this back to the performance of the SimpleComparableSort class, bringing it back to 336 milliseconds. A slight change to the object, but a big saving.

Multiple Methods Called and the Results Combined

MultiMethodComparableSort.cls

A custom object containing two private properties which must be multiplied together to use in the compareTo method. In this case there are two methods called every time compareTo is executed, pushing the CPU up to 1081 milliseconds Again, this could be improved by creating public read-only properties exposing the values, or calculating them in advance and storing them in a single public property.

SObject Comparing Two Fields

SObjectComparableSort.cls

A more complex scenario - a list of custom objects containing an Opportunity sObject that require a two step comparison - first the stages are compared and if they are identical, the amounts are then checked. The stage names are stored in a list and the position in the list for each object determined using the indexOf method. This consumed 3428 milliseconds of CPU - over 1/3 of that available to the entire transaction.

SObject Comparing Two Fields - Calculate Stage Value

SObjectComparableIndexSort.cls

An iteration on the previous scenario - calculating the index for the stage when the custom object is constructed, rather than determining it on the fly in the compareTo method. This consumed 1911 milliseconds of CPU time. An improvement of just under 50% for very little effort.

SObject Comparing Two Fields - Calculate Value for Sorting

SObjectComparableCalcSort.cls

A further iteration on the previous scenario - calculating a unique value to represent the stage and the amount. This might not be a practical approach in many real world cases, but it's something to think about if you encounter problems. I've decided that my maximum opportunity value is five million, so I get the stage index and multiply it by one billion, then add on the opportunity amount. This allows me to revert back to sorting on a single property, and unsurprisingly brings the CPU consumed down to 349 milliseconds.


Understanding and Mitigating the CPU Impact

The reason for the significant increases with what feels like small increases in complexity is down to the sheer number of times that the compareTo method will be invoked on a decent sized list. It's easy to get into a mindset that this method is called once per object, or maybe a couple of times, but the truth is very different. In the scenarios above with a 10,000 item list, compareTo was called over 120,000 times, so the impact of adding a method call, accessing another property, or checking against multiple properties scales up really fast. If you are interested in reading more about why this is, check out Insertion sort or Selection sort for some walkthroughs of what actually happens during a sort.

The simplest way to mitigate this is to move as much work out of the compareTo method and do it up front, either at construction time or as a pre-sort activity. As an example from my scenarios above, replacing a method call with a public property requires 10,000 executions of the code to set up the property, rather than 120,000 executions of the method to access the private value. The real sweet spot is if you can generate a primitive that represents the ordinal value of the object, as sorting on that is far more efficient than comparing various aspects of the object.

Conclusion

The key takeaway here, as usual, is to think about the effect of the code that you are writing. If you are implementing Comparable, take a few minutes to profile the code with lists of reasonable size and see if you can do anything to reduce the impact. Most Salesforce instances start out simple with small data volumes, but it's remarkable how quickly the amount of data will scale and you need to make sure your code scales with it.

Related


Saturday 2 April 2022

The Org Documentor Keeps On Executing


Introduction

Back in February I added support for some of the steps of the order of execution, mostly because of the flow ordering support added in Spring 22. This has created a nice backlog of work to support more of the steps, starting with duplicate rules which I added in today. 

Duplicate Rules

This is a slight departure from earlier releases of the documentor, in that I haven't added processing of duplicate rules to generate a dedicated page, I've just added them to the order of execution page. If you think they need their own page, or more likely their own section in the object detail pages, please raise a request in the Github repository and I'll see what I can do.


The order of execution page lists the active duplicate rules and the matching rules that they depend on. I'm undecided as to whether any more information is needed, but again if you think there is, please feel free to raise an issue in the repo.


As always, you can see an updated example of the order of execution, and the other pages, generated from the sample metadata at the Heroku site.

Updated Plug-in


Version 4.0.5 of the plug-in has this new functionality and can be found on NPM

If you already have the plug-in installed, just run sfdx plugins:update to upgrade to 4.0.5 - run sfdx plugins once you have done that to check the version.

The source code for the plug-in can be found in the Github repository.

Columbo Close


Just one more thing, not related to the Documentor itself but the Google site that I use to document it. This now has it's own custom domain - orgdoc.bobbuzzard.org. With a small amount of DNS changes to apply the custom domain to the site, Google provides the SSL certificate for me, which is nice.

Related Posts


Sunday 27 February 2022

Org Documentor - (Some of) The Order of Execution

Introduction

It's been a while since I made any changes to the Org Documentor, partly because I've been focused in other areas, and partly because I didn't need anything else documented. This changed with the Spring 22 release of Salesforce and the Flow Trigger Explorer

I really liked the idea of the explorer, but was disappointed that it showed inactive flows and didn't reflect the new ordering capabilities. Why didn't they add that, I wondered. How hard could it be? Then it occurred to me that I could handle this myself through the Org Documentor. It turns out I couldn't handle all aspects, but still enough to be useful. More on that later.

Flow Support

Up until now I hadn't got around to including flows in the generated documentation, and this clearly needed to change if I wanted to output the order they were executed in. 

As long as API version 54 is used, the execution order information comes back as expected, and getting these in the right order and handling collisions based on names is straightforward with a custom comparator function. Sadly I can't figure out the order when there is no execution information defined, as CreatedDate isn't available in the metadata. Two out of three ain't bad.

Order of Execution

As there are multiple steps in the order of execution, and most of those steps require different metadata, I couldn't handle it like I do other metadata. Simply processing the contents of a directory might help for one or two steps, but I wanted the consolidated view. To deal with this I create an order of execution data structure for each object that appears in the metadata, and gradually flesh this out as I process the various other types of metadata. So the objects add the validation rule information, triggers populate the before and after steps, as do flows. 

As everyone knows, there's a lot of steps in the order of execution, and I'm not attempting to support all of them right now. Especially as some of them (write to database but don't commit) don't have anything that metadata influences! Rather than trying to detail this in a blog post that I'd have to update every time I change anything, the order of execution page contains all the steps and adds badges to show which are possible to support, and which are supported:


As you can see, at the time of writing it's triggers and flows plus validation rules and roll up summaries. 

Steps where there is metadata that influences the behaviour appear in bold with a badge to indicate how many items there are. Clicking on the step takes you to the section that details the metadata:


You can see an example of the order of execution generated from the sample metadata at the Heroku site.

Updated Plug-in


Version 4.0.1 of the plug-in has this new functionality and can be found on NPM

If you already have the plug-in installed, just run sfdx plugins:update to upgrade to 4.0.1 - run sfdx plugins once you have done that to check the version.

The source code for the plug-in can be found in the Github repository.

Related Posts


Saturday 19 February 2022

Lightning Web Component Getters

Introduction

When Lightning Web Components were released, one feature gap to Aura components I was pleased to see was the lack of support for expressions in the HTML template. 

Aura followed the trail blazed by Visualforce in allowing this, but if not used cautiously the expressions end up polluting the HTML making it difficult to understand. Especially for those that only write HTML, or even worse are learning it. Here's a somewhat redacted version from one of my personal projects from a few years ago:

Even leaving aside the use of i and j for iterator variables, it isn't enormously clear what name and lastrow will evaluate to.

Handling Expressions in LWC

One way to handle expressions is to enhance the properties that are being used in the HTML. In the example above, I'd process the ccs elements returned from the server and wrap them in an object that provides the name and lastrow properties, then change the HTML to iterate the wrappers and bind directly to those properties. All the logic sits where it belongs, server side. 

This technique also works for non-collection properties, but I tend to avoid that where possible. As components get more complex you end up with a bunch of properties whose sole purpose is to surface some information in the HTML and a fair bit of code to manage them, blurring the actual state of the component. 

The Power of the Getter

For single property values, getters are a better solution in many cases. With a getter you don't store a value, but calculate it on demand when a method is invoked, much like properties in Apex. The template can bind to a getter in the same way it can to a property, so there's no additional connecting up required.

The real magic with getters in LWC is they react to changes in the properties that they use to calculate their value. Rather than your code having to detect a change to a genuine state property and update avalue that is bound from the HTML, when a property that is used inside a getter changes, the getter is automatically re-run and the new value calculated and used in the template.

Here's a simple example of this - I have three inputs for title, firstname and lastname, and I calculate the fullname based on those values. My JavaScript maintains the three state properties and provides a getter that creates the fullname by concatenating the values:

export default class GetterExample extends LightningElement {
    title='';
    firstname='';
    lastname='';

    titleChanged(event) {
        this.title=event.detail.value;
    }

    firstnameChanged(event) {
        this.firstname=event.detail.value;
    }

    lastnameChanged(event) {
        this.lastname=event.detail.value;
    }
    
    get fullname() {
        return this.title + ' ' + this.firstname + ' ' + this.lastname;
    }
}

and this is used in my HTML as follows:

<template>
    <lightning-card title="Getter - Concatenate Values">
        <div class="slds-var-p-around_small">
            <div>
                <lightning-input label="Title" type="text" value={title} onchange={titleChanged}></lightning-input>
            </div>
            <div>
                <lightning-input label="First Name" type="text" value={firstname} onchange={firstnameChanged}></lightning-input>
            </div>
            <div>
                <lightning-input label="Last Name" type="text" value={lastname} onchange={lastnameChanged}></lightning-input>
            </div>
            <div class="slds-var-p-top_small">
                Full name : {fullname}
            </div>
        </div>
    </lightning-card>
</template>

Note that I don't have to do anything to cause the fullname to rerender when the user supplies a title, firstname or lastname. The platform detects that those properties are used in my getter and automatically calls it when they change. This saves me loads of code compared to aura.

You can also have getters that rely on each other and the whole chain gets re-evaluated when a referenced property changes. Extending my example above to use the fullname in a sentence:

get sentence() {
    return this.fullname + ' built a lightning component';
}

and binding directly to the setter:

<div class="slds-var-p-top_small">
    Use it in a sentence : {sentence}
</div>

and as I complete the full name, the sentence is automatically calculated and rendered, even though I'm only referencing another getter that was re-evaluated:


You can find the component in my lwc-blogs repository at : https://github.com/keirbowden/lwc-blogs/tree/main/force-app/main/default/lwc/getterExample

Another area that Lightning Web Components score in is they are built on top of web standards, so if I want to change values that impact getters outside of the user interactions, I can use a regular setinterval  rather than having to wrap it inside a $A.getCallback function call, as my next sample shows:


In this case there is a countdown property that is calculated based on the timer having been started and not expiring, and an interval timer that counts down to zero and then cancels itself:

timer=30;
interval=null;

startCountdown() {
    this.interval=setInterval(() => {
        this.timer--;
        if (this.timer==0) {
           clearInterval(this.interval);
        }
    }, 1000);
}

get countdown() {
    let result='Timer expired';
    if (null==this.interval) {
        result='Timer not started';
    }
    else if (this.timer>0) {
        result=this.timer + ' seconds to go!';
    }

    return result;
}
and once again, I can just bind directly to the getter in the certainty that if the interval is populated or the timer changes, the UI will change with no further involvement from me.
<div class="slds-var-p-top_medium">
    <div class={countdownClass}>{countdown}</div>
</div>

Note that I'm also using a getter to determine the colour that the countdown information should be displayed in, removing more logic that would probably be in the view if using Aura:


You can also find this sample in the lwc-blogs repo at : https://github.com/keirbowden/lwc-blogs/tree/main/force-app/main/default/lwc/getterCountdown

Related Posts