Saturday, 12 January 2013

Send SMS Messages from Force.com

One of the app exchange offerings of my company, BrightGen, is BrightSMS. This is a free app that allows the sending of single or bulk SMS messages to UK or international numbers - you only pay for the messages that you send.

Earlier versions of BrightSMS provided functionality to send SMS messages from Visualforce pages, based on the user typing the message in and selecting a mobile number/contact/lead as the message recipient.   Version 3.0 introduces support for sending SMS from @future methods, which means that messages can be sent from triggers when record details change.

Getting Started

Installation and setup is covered in the Installation Guide.  Once you have installed the package, follow the User Guide to register an account.  The first account you register in your Salesforce org gets 10 free messages.  Note that the account is tied to a mobile phone number and you can only register a number once - so the 10 free messages is a single shot deal.  Once I've been through the installation I usually send myself an SMS through the packaged pages to confirm its all working.

The Code

My example trigger is on the case sobject, and sends an SMS to the contact associated with the case when the status changes, as long as the contact has supplied a mobile phone number. 

trigger Case_au on Case (after update)
{
	List<Id> caseIdsToSMS=new List<Id>();

	// get the contact ids
	Set<Id> contactIds=new Set<Id>();
	for (Case cs : trigger.new)
	{
		if (null!=cs.contactId)
		{
			contactIds.add(cs.contactId);
		}
	}
	
	Map<Id, Contact> contsById=new Map<Id, Contact>();
	contsById.putAll([select id, MobilePhone from Contact where id in:contactIds]);

	// pull back the contact and check the mobile number is supplied
	
	for (Case cs : trigger.new)
	{
		if (null!=cs.ContactId)
		{
			Contact cnt=contsById.get(cs.ContactId);
			if ( (cs.Status != trigger.oldMap.get(cs.id).Status) &&
		    	 ( (null!=cnt.MobilePhone) && (cnt.MobilePhone.length()>0) )
		   	)
			{
				caseIdsToSMS.add(cs.id);
			}
		}
	}
	
        // delegate to a future method, as callouts aren't allowed in triggers
	CaseUtils.SendCaseUpdatedSMS(caseIdsToSMS);
}

and the future method that sends the SMS:

public with sharing class CaseUtils
{
    @Future(callout=true)
    public static void SendCaseUpdatedSMS(list<Id> csIds)
    {
	for (Case cs : [Select CaseNumber, Contact.MobilePhone, Contact.FirstName, Contact.LastName, Status from Case where Id IN : csIds] )
	{
	BG_SMS.BrightSMSSubmitSMSMessage bsms = new BG_SMS.BrightSMSSubmitSMSMessage();
		bsms.brightSmsAccountId = 'AccountIdGoesHere';
		bsms.rateCode = '1';
		bsms.senderID = 'BrightGen';
		bsms.mobileNumber = cs.Contact.MobilePhone.trim();
		bsms.smsMessage = 'Hi ' + cs.Contact.FirstName +
				  ', Just to let you know the status of your case {' +
				  cs.CaseNumber +
				  '} has been changed to ' +
				  cs.Status;
		bsms.submitSMSMessage();
   	}
    }
}

Replace AccountIdGoesHere with the id of the SMS account that you registered in the Getting Started session.  The senderId will be displayed as the sender of the SMS, so replace this with something specific to you or your company.  Finally, the smsMessage contains the message text that will be sent.  BrightSMS allows you to send up to a maximum of 459 characters, but these will be sent as 3 individual SMS messages, as the maximum individual SMS message size is 153 characters.

Note that as there are a limit of 10 callouts per transaction, if there are more than 10 case updates to be sent, this code will produce an error.  If you have a large amount of messages to send on a regular basis, its better to use Batch Apex and split the processing up into multiple transactions.

Sending Messages

First up, I create a contact in my org and supply a mobile number (note, this is not my real mobile number):


Screen Shot 2013 01 12 at 11 14 16


I then create a case and associate my contact record with it:

Screen Shot 2013 01 12 at 11 18 23


If the status of the case is then changed from New to Working, I automatically receive an SMS informing me of the change:

IMG 0705


Sunday, 23 December 2012

Mobile Quiz Pages

A few months ago, around the time of Dreamforce, I built a Force.com online quiz application.  One of the items on my todo list has been to provide a mechanism to take a quiz via a mobile device.  As I had some spare time in the run up to Christmas this weekend, I've built the first version of this.

I've taken a simplistic approach to this and simply created mobile versions of the various site pages using JQuery Mobile, using the techniques described in one of my earlier blog posts.

Signing up for a test using the latest version of the app at http://tests.bobbuzzard.org will include a QR code in the confirmation page and email, and also a direct link in the email, as shown below:


Screen Shot 2012 12 23 at 16 26 49

scanning the QR code takes you to the mobile start page:

Screen Shot 2012 12 23 at 16 31 49

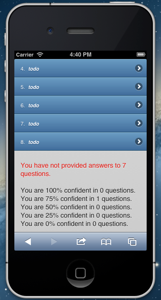
Navigation is much the same as the full site, with the slight change that the buttons appear at the top of the page.  The question pages have the same functionality as the full sight, allowing percentage confidence and notes/feedback to be provided:

Screen Shot 2012 12 23 at 16 32 43  Screen Shot 2012 12 23 at 16 33 28

The View All page displays a list of the actual answers selected, rather than the a,b,c question indices.  The percentage confidence and lack of answers are flagged as before:

Screen Shot 2012 12 23 at 16 33 59Screen Shot 2012 12 23 at 16 40 10

and clicking on any of the list entries takes you back to the question, with the percentage confidence header:

Screen Shot 2012 12 23 at 16 34 11

As I mentioned earlier, this is a simplistic solution.  Its quite slow, as the view state is being transferred backwards and forwards to the server, and the JQuery Mobile transitions can't be used as the mobile browser is being redirected between pages rather than using Ajax.  Javascript Remoting is a better solution for the server side interaction than using Visualforce forms, in my opinion, but that's a topic for another post.

Happy Christmas to all my readers - hope you find the mobile pages useful and be sure to let me know if you hit any problems. 

Saturday, 15 December 2012

Building a Templated Web Site with Force.com - Part 4

In Part 1 of this series, I looked at how to turn an HTML page into a Visualforce page in order to use it as a template for a Force.com site. Part 2 covered how to turn the page into a template and create a home page that used the template to provide the common content.  Part 3 explained how to expose the pages to the world via an unauthenticated Force.com site.

Thus far I've focused on a single page, but the site has a number of tabs that are supplied by default in the template - Blogs, Photos, About, Links and Contacts.  For the purposes of this blog post, I'm going to create two additional pages - About and Contacts.

As I already have a home page that uses the template, I've cloned this to create new visualforce pages named 'about' and 'contact'.  These contain minimal content.

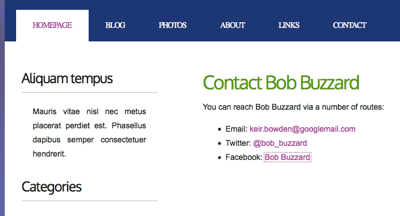
The contact page:

Screen Shot 2012 12 15 at 11 53 30

and the about page:

Screen Shot 2012 12 15 at 11 53 44

Next I need to create a way to navigate to the pages.  While the tabs contain links, these are empty anchor tags, as can be seen from the template markup:

<div id="menu">
	<ul>
		<li class="current_page_item"><a href="#">Homepage</a></li>
		<li><a href="#">Blog</a></li>
		<li><a href="#">Photos</a></li>
		<li><a href="#">About</a></li>
		<li><a href="#">Links</a></li>
		<li><a href="#">Contact</a></li>
	</ul>
</div>

Changing the links to point to my Visualforce pages might seem as simple as replacing the '#' with the Visualforce page link.  Unfortunately, Force.com sites need the page to be specified as '/contact', while if the pages are accessed from the Salesforce UI it needs to be specified as '/apex/contact'.  For this reason, its best practice to use the $Page global variable - this will generate the appropriate link based on the user's context.  As I've created pages for the Homepage, About and Contact tabs, the new markup is:

<div id="menu">
	<ul>
		<li class="current_page_item"><a href="{!$Page.Home}">Homepage</a></li>
		<li><a href="#">Blog</a></li>
		<li><a href="#">Photos</a></li>
		<li><a href="{!$Page.about}">About</a></li>
		<li><a href="#">Links</a></li>
		<li><a href="{!$Page.Contact}">Contact</a></li>
	</ul>
</div>

The links now work correctly, but the Homepage tab is always the one highlighted due to the class="current_page_item" attribute. This markup exists in the template, so I need find a way to identify the actual page and set the attribute on the appropriate tab.  

I could write a Visualforce controller for the page, but I'm trying to avoid that at this point and build the site entirely in Visualforce.  I could also add some markup to determine the name of the current URL, and highlight the tab that matches.  The downside to that is if I change the purpose of a page, I have to update the template.  Ideally I'd like to define the tab that should be highlighted in the underlying page, and make the template responsible for the rendering only.

The way that I've handed this is to set the tab name into a variable using the <apex:variable/> component, and then conditionally render the class name based on this variable.

In the underlying pages, its simply another define component - here's the markup from the about page:

<apex:define name="tabdef">
	<apex:variable var="tab" value="about"/>
</apex:define>

there's a little more to do in the template page - I have to define an initial value for the 'tab' variable, otherwise I can't use it elsewhere in the page - I've defaulted to the Homepage tab - that way if I have pages that don't belong to a particular tab, the leftmost will be highlighted.  Then I have to include the value from the underlying page (if this isn't present the default will be used) and finally check the value of tab variable when rendering each tab element.

<div id="menu">
	<apex:variable var="tab" value="home" />
	<apex:insert name="tabdef" />
	<ul>
		<li class="{!IF(tab=='home', 'current_page_item', '')}"><a href="{!$Page.Home}">Homepage</a></li>
		<li><a href="#">Blog</a></li>
		<li><a href="#">Photos</a></li>
		<li class="{!IF(tab=='about', 'current_page_item', '')}"><a href="{!$Page.about}">About</a></li>
		<li><a href="#">Links</a></li>
		<li class="{!IF(tab=='contact', 'current_page_item', '')}"><a href="{!$Page.Contact}">Contact</a></li>
	</ul>
</div>

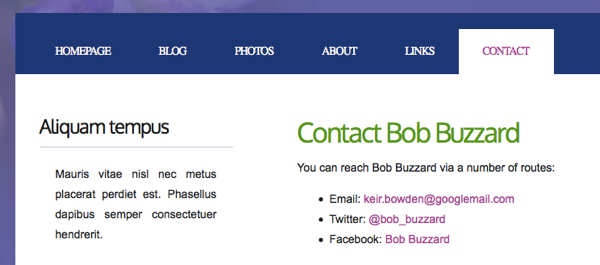
Looking at my contact page, now, the correct tab is highlighted:

Screen Shot 2012 12 15 at 12 30 49

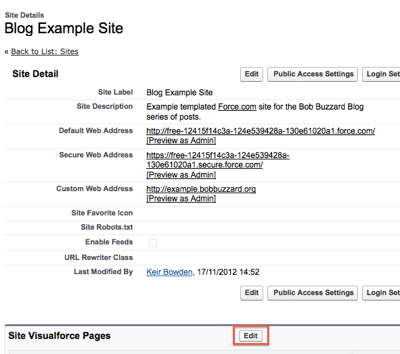
All that remains is to add the new Visualforce pages to my Force.com site.  On the site setup page (Setup -> App Setup -> Develop -> Sites and click through the site label), select the Edit button on the Site Visualforce Pages section:

Screen Shot 2012 12 15 at 12 32 50

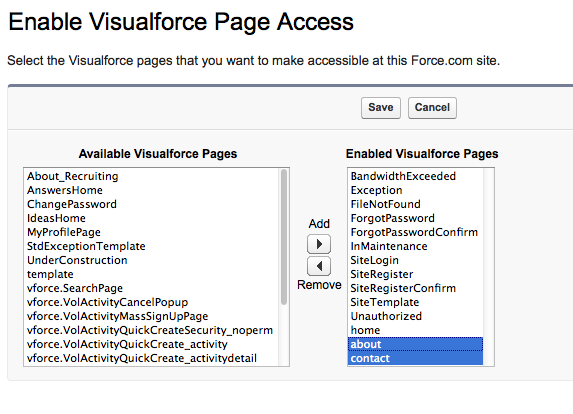
and then add the new pages via the dialog and click the 'Save' button:

Screen Shot 2012 12 15 at 12 36 49

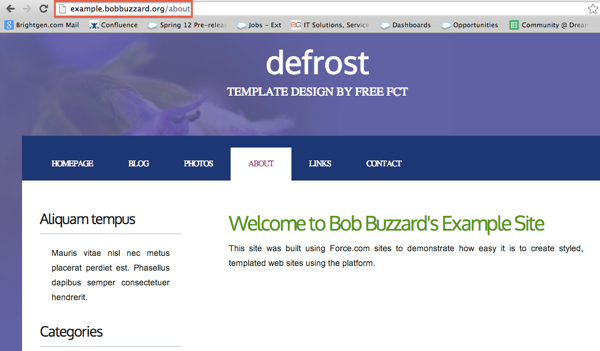
Navigating to the about page via the site's custom URL, shows that all of my new functionality has been made available to the site:


Screen Shot 2012 12 15 at 12 38 05

The template, pages and static resources are available in the Part4 directory of the github repository for this blog series at:

https://github.com/keirbowden/blog_force_com_sites

This post is probably the final one in this series, unless another topic occurs to me or is suggested in the comments.


Saturday, 17 November 2012

Building a Templated Web Site with Force.com - Part 3

In Part 1 of this series, I looked at how to turn an HTML page into a Visualforce page in order to use it as a template for a Force.com site.  Part 2 covered how to turn the page into a template and create a home page that used the template to provide the common content.  

Up to now the pages have only been available to users that have logged in to the Salesforce system. This post will show how to expose the pages in a Force.com site, to allow access from the wider web.

Before creating a Force.com site I have to choose my domain name - so I navigate to Setup -> App Setup -> Develop -> Sites and the following page is presented:

Screen Shot 2012 11 17 at 11 30 13

As I'm using a Force.com Free Edition org (yes, I was lucky enough to be able to grab a couple of these when they were available - I only wish I'd had the foresight to grab about 50!) I can't change the rather ugly default domain name, but in Enterprise/Unlimited Edition you can choose what you like, as long as someone else hasn't taken it.  I'm not stuck with this domain name however, as I can define a custom 'vanity' URL for my site, which I'll set up later.

Ticking the box and confirming that I understand I can't change the domain name, registers my domain and takes me to the back to the Sites page with my domain defined.

Screen Shot 2012 11 17 at 11 35 02

I then click the 'New' button to create my new site.  As this is for demo purposes only, I've filled in the minimum amount of information.  If you'd like more information on the purpose of each of these fields, check the help page by clicking the 'Help for this Page' link at the top right.

Screen Shot 2012 11 17 at 11 40 27

As I have specified my 'home' Visualforce page, this is automatically included in the list of pages for the site:

Screen Shot 2012 11 17 at 11 43 59

As an aside, whenever you add a Visualforce page to a site, your site automatically gets access to any Apex classes that it depends on. 

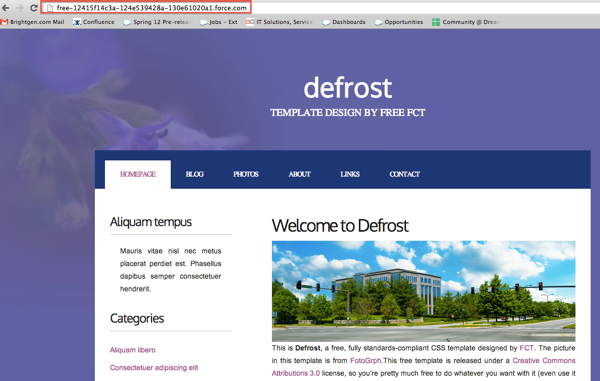
And that's it!  I can now navigate to the default site address and access my page without going through any form of authentication.

Screen Shot 2012 11 17 at 11 48 47

While my site is now available on the internet, the chances of anyone bothering to type in the full URL are pretty slim, so the next task is to set up the vanity URL. This has to be a CNAME redirect from my personal domain to the Force.com site domain name.  In my case I'm going to create a subdomain to bobbuzzard.org of example.bobbuzzard.org.  My registration system is Freeparking, and I have to set up an alias to the Force.com A record in order for the CNAME record to be created:

Screen Shot 2012 11 17 at 12 09 25

I can then verify that my record has been created using an online nslookup tool:

Screen Shot 2012 11 17 at 12 18 09


Finally, update the site configuration to define the custom URL:

Screen Shot 2012 11 17 at 14 52 53

Sometimes the DNS records don't propagate for a while, so if the vanity URL doesn't work, give it a couple of hours and try again.

Accessing my site via http://example.bobbuzzard.org shows that everything is set up correctly and propagated:


Screen Shot 2012 11 17 at 14 56 01

In the next post I'll add pages for one or two of the other tabs and show one way to highlight the tab associated with the page.


Saturday, 3 November 2012

Building a Templated Web Site with Force.com - Part 2

In Part 1 of this series, I looked at how to turn an HTML page into a Visualforce page in order to use it as a template for a Force.com site.  This post covers how to turn the page into a template and create a home page that uses the template to provide the common content.

Visualforce supports templating via a combination of three tags:

  • <apex:insert />
    This tag appears in the template page and is used to inject the content specific to the page actually being rendered. 
  • <apex:composition/>
    This tag appears in the home page and defines the template page that will provide the common content.
  • <apex:define/>
    This tag appears in the home page and defines the content to be injected into the template.  For each define element, there must be an associated <apex:insert/> tag with the same name present in the template page.

My page has the following common content:

Header

Screen Shot 2012 11 03 at 14 15 42

Sidebar:

Screen Shot 2012 11 03 at 14 17 19

and footer

Screen Shot 2012 11 03 at 14 18 03

while the home page has the specific article content:

Screen Shot 2012 11 03 at 14 20 12

Thus my template page needs a single <apex:insert/> component for the article body.  However, I also want to be able to define the title on a per-page basis, so I'll need to add another for that.

Looking at the current source of my page, the following two elements need to be moved out to my home page and replaced with <apex:insert /> tags:

<title>Defrost by FCT</title>

and

<div id="content">
	<div class="post">
		<h2 class="title"><a href="#">Welcome to Defrost</a></h2>
		<div class="entry">
			<p><apex:image url="{!URLFOR($Resource.Defrost, 'images/pics01.jpg')}" alt="" width="600" height="200"/>This is <strong>Defrost</strong>, a free, fully standards-compliant CSS template designed by  <a href="http://www.freecsstemplates.org">FCT</a>.  The picture in this template is from <a href="http://fotogrph.com/">FotoGrph</a>.This free template is released under a <a href="http://creativecommons.org/licenses/by/3.0/">Creative Commons Attributions 3.0</a> license, so you’re pretty much free to do whatever you want with it (even use it commercially) provided you keep the links in the footer intact. Aside from that, have fun with it :)</p>
		</div>
	</div>
	<div class="post">
		<h2 class="title"><a href="#">Lorem ipsum sed aliquam</a></h2>
		<div class="entry">
			<p><apex:image url="{!URLFOR($Resource.Defrost, 'images/pics02.jpg')}" alt="" width="600" height="200"/>Sed lacus. Donec lectus. Nullam pretium nibh ut turpis. Nam bibendum. In nulla tortor, elementum vel, tempor at, varius non, purus. Mauris vitae nisl nec metus placerat consectetuer. Donec ipsum. Proin imperdiet est. Phasellus <a href="#">dapibus semper urna</a>. Pellentesque ornare, consectetuer nisl felis ac diam. Sed lacus. Donec lectus. Nullam pretium nibh ut turpis. Nam bibendum. Mauris vitae nisl nec metus placerat consectetuer. </p>
		</div>
	</div>
	<div class="post">
		<h2 class="title"><a href="#">Phasellus pellentesque turpis </a></h2>
		<div class="entry">
			<p><apex:image url="{!URLFOR($Resource.Defrost, 'images/pics01.jpg')}" alt="" width="600" height="200"/>Sed lacus. Donec lectus. Nullam pretium nibh ut turpis. Nam bibendum. In nulla tortor, elementum vel, tempor at, varius non, purus. Mauris vitae nisl nec metus placerat consectetuer. Donec ipsum. Proin imperdiet est. Pellentesque ornare, orci in consectetuer hendrerit, urna elit eleifend nunc. Donec ipsum. Proin imperdiet est. Pellentesque ornare, orci in consectetuer hendrerit, urna elit eleifend nunc.</p>
		</div>
	</div>
	<div style="clear: both;">&nbsp;</div>
</div>
<!-- end #content -->
 

These become: 

<title><apex:insert name="title"/></title>

and

<apex:insert name="content" />
 

I can then create my home page, containing the <apex:composition/> component that defines my template, and the <apex:define/> tags for the title - 'Bob Buzzard Blog Site - Home' and the article content:

<apex:page sidebar="false" showheader="false" standardstylesheets="false">
  <apex:composition template="template">
    <apex:define name="title">
       Bob Buzzard Blog Site - Home
    </apex:define>
    <apex:define name="content">
		<div id="content">
			<div class="post">
				<h2 class="title"><a href="#">Welcome to Defrost</a></h2>
				<div class="entry">
					<p><apex:image url="{!URLFOR($Resource.Defrost, 'images/pics01.jpg')}" alt="" width="600" height="200"/>This is <strong>Defrost</strong>, a free, fully standards-compliant CSS template designed by  <a href="http://www.freecsstemplates.org">FCT</a>.  The picture in this template is from <a href="http://fotogrph.com/">FotoGrph</a>.This free template is released under a <a href="http://creativecommons.org/licenses/by/3.0/">Creative Commons Attributions 3.0</a> license, so you’re pretty much free to do whatever you want with it (even use it commercially) provided you keep the links in the footer intact. Aside from that, have fun with it :)</p>
				</div>
			</div>
			<div class="post">
				<h2 class="title"><a href="#">Lorem ipsum sed aliquam</a></h2>
				<div class="entry">
					<p><apex:image url="{!URLFOR($Resource.Defrost, 'images/pics02.jpg')}" alt="" width="600" height="200"/>Sed lacus. Donec lectus. Nullam pretium nibh ut turpis. Nam bibendum. In nulla tortor, elementum vel, tempor at, varius non, purus. Mauris vitae nisl nec metus placerat consectetuer. Donec ipsum. Proin imperdiet est. Phasellus <a href="#">dapibus semper urna</a>. Pellentesque ornare, consectetuer nisl felis ac diam. Sed lacus. Donec lectus. Nullam pretium nibh ut turpis. Nam bibendum. Mauris vitae nisl nec metus placerat consectetuer. </p>
				</div>
			</div>
			<div class="post">
				<h2 class="title"><a href="#">Phasellus pellentesque turpis </a></h2>
				<div class="entry">
					<p><apex:image url="{!URLFOR($Resource.Defrost, 'images/pics01.jpg')}" alt="" width="600" height="200"/>Sed lacus. Donec lectus. Nullam pretium nibh ut turpis. Nam bibendum. In nulla tortor, elementum vel, tempor at, varius non, purus. Mauris vitae nisl nec metus placerat consectetuer. Donec ipsum. Proin imperdiet est. Pellentesque ornare, orci in consectetuer hendrerit, urna elit eleifend nunc. Donec ipsum. Proin imperdiet est. Pellentesque ornare, orci in consectetuer hendrerit, urna elit eleifend nunc.</p>
				</div>
			</div>
			<div style="clear: both;">&nbsp;</div>
		</div>
		<!-- end #content -->
    </apex:define>
  </apex:composition>
</apex:page>

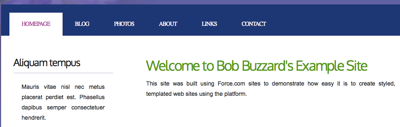
 accessing my home visualforce page shows that the template has been correctly picked up:

Screen Shot 2012 11 03 at 14 52 10

The template and home page are available in the Part 2 directory of the github repository for this blog series at:

https://github.com/keirbowden/blog_force_com_sites

In the next post I'll look at how to make the page available on the web via a Force.com site, including a custom web address.  


Saturday, 27 October 2012

Building a Templated Web Site with Force.com - Part 1

An area of Salesforce that often seems underrated to me is Force.com sites.  If you are an Enterprise or Unlimited Edition customer, you can create up to 25 sites with a total hosting cost of zero down and zero a month. All you need is some Visualforce capability, and maybe Apex if you want to hook the site up with your Salesforce records. 

If you've been following this blog for a while, you'll know there's a couple of web sites that I've built using Force.com sites:

  • http://www.bobbuzzard.org/ - this is a site I use to demonstrate some interesting (hopefully) Force.com functionality, including Dojo charting, an opportunity progression chart and a mobile survey application
  • http://tests.bobbuzzard.org/ - my online tests site, allowing Force.com developers to test their knowledge of various features of the platform.  This has proved quite popular I'm very pleased to say.
My company, BrightGen, also moved our website to Force.com sites earlier this year. For us this decision was more about maximising our capability to maintain the site rather than hosting costs.  As we have a large pool of Apex and Visualforce developers, it means that we aren't reliant on a third party to make changes at short notice.
 
 In this series of posts I'll show you how to build a templated web site from scratch.  

Choosing Your Template

A templated web site simply means that the content that is repeated across all pages (header, footer, sidebar etc) is generated from a template.  Each page on the web site uses this template as its starting point and injects its specific content.  So a contact us page, for example, would have the same header and footer as a news page, but would inject a form that the end user can fill in to make contact.  When we moved the BrightGen web site to Force.com sites, each of the pre-existing pages had the header, footer and sidebar repeated in each page, so we had to spend some time analysing those to build a template that worked for all of them.  For the purposes of my demo site, I'm going to start with a clean sheet which makes it a lot more straightforward.

The first thing you might be tempted to do when building a Force.com site is to dive straight in and configure the site.  However, as the site is based on Visualforce pages, I prefer to get a basic version available before making it available externally.  Thus the first step for me is always to decide on the template that I'm going to use.

If you look closely at either of the Bob Buzzard sites I've mentioned above, you'll see the following text in the footer:

     Design by FCT.

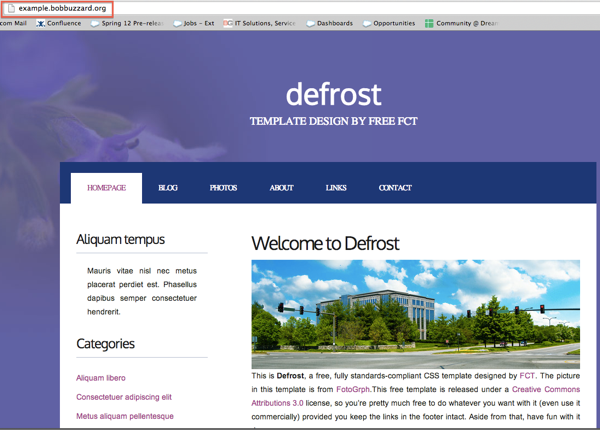
FCT stands for Free CSS Templates and these are free as in beer.  The only requirement is that you link back to the http://www.freecsstemplates.org/ website.  As any template you download will have a link somewhere on the page already, its often just a case of leaving an area of the page alone!  I've gone for the defrost template, as shown below:


The templates are downloadable as a zip file. There's not a lot to them, as can be seen by the expanded contents of the file:


The index.html is the example page from the template gallery - this is a key file for me as I'll be using this as the basis for my site template, so the first thing I do is to extract this to my local file system.  As I'll be using the images and css on my site, I need to make it available via the Force.com platform, so I upload the zip as a static resource named 'Defrost'.  Make sure to set the Cache Control to Public when uploading the static resource, as this will make your site more performant when you release it into the wild.

Next up I need to convert the index.html page into a Visualforce page.  As I'm going to be using this as my template and I'm exceptionally creative, I've named my page 'template'.  To get started, I paste the contents of the html file into my new Visualforce page:


<!DOCTYPE html PUBLIC "-//W3C//DTD XHTML 1.0 Strict//EN" "http://www.w3.org/TR/xhtml1/DTD/xhtml1-strict.dtd">
<!--
Design by Free CSS Templates
http://www.freecsstemplates.org
Released for free under a Creative Commons Attribution 2.5 License

Name       : Defrost
Description: A two-column, fixed-width design with dark color scheme.
Version    : 1.0
Released   : 20111121

-->
<html xmlns="http://www.w3.org/1999/xhtml">
<head>
<meta name="keywords" content="" />
<meta name="description" content="" />
<meta http-equiv="content-type" content="text/html; charset=utf-8" />
<title>Defrost by FCT</title>
<link href="http://fonts.googleapis.com/css?family=Oxygen" rel="stylesheet" type="text/css" />
<link href="style.css" rel="stylesheet" type="text/css" media="screen" />
</head>
<body>
<div id="wrapper">
	<div id="header-wrapper">
		<div id="header">
			<div id="logo">
				<h1><a href="#">Defrost</a></h1>
				<p>template design by free <a href="http://www.freecsstemplates.org/">FCT</a></p>
			</div>
		</div>
	</div>
	<!-- end #header -->
	<div id="menu">
		<ul>
			<li class="current_page_item"><a href="#">Homepage</a></li>
			<li><a href="#">Blog</a></li>
			<li><a href="#">Photos</a></li>
			<li><a href="#">About</a></li>
			<li><a href="#">Links</a></li>
			<li><a href="#">Contact</a></li>
		</ul>
	</div>
	<!-- end #menu -->
	<div id="page">
		<div id="page-bgtop">
			<div id="page-bgbtm">
				<div id="content">
					<div class="post">
						<h2 class="title"><a href="#">Welcome to Defrost</a></h2>
						<div class="entry">
							<p><img src="images/pics01.jpg" width="600" height="200" alt="" />This is <strong>Defrost</strong>, a free, fully standards-compliant CSS template designed by  <a href="http://www.freecsstemplates.org">FCT</a>.  The picture in this template is from <a href="http://fotogrph.com/">FotoGrph</a>.This free template is released under a <a href="http://creativecommons.org/licenses/by/3.0/">Creative Commons Attributions 3.0</a> license, so you’re pretty much free to do whatever you want with it (even use it commercially) provided you keep the links in the footer intact. Aside from that, have fun with it :)</p>
						</div>
					</div>
					<div class="post">
						<h2 class="title"><a href="#">Lorem ipsum sed aliquam</a></h2>
						<div class="entry">
							<p><img src="images/pics02.jpg" width="600" height="200" alt="" />Sed lacus. Donec lectus. Nullam pretium nibh ut turpis. Nam bibendum. In nulla tortor, elementum vel, tempor at, varius non, purus. Mauris vitae nisl nec metus placerat consectetuer. Donec ipsum. Proin imperdiet est. Phasellus <a href="#">dapibus semper urna</a>. Pellentesque ornare, consectetuer nisl felis ac diam. Sed lacus. Donec lectus. Nullam pretium nibh ut turpis. Nam bibendum. Mauris vitae nisl nec metus placerat consectetuer. </p>
						</div>
					</div>
					<div class="post">
						<h2 class="title"><a href="#">Phasellus pellentesque turpis </a></h2>
						<div class="entry">
							<p><img src="images/pics01.jpg" width="600" height="200" alt="" />Sed lacus. Donec lectus. Nullam pretium nibh ut turpis. Nam bibendum. In nulla tortor, elementum vel, tempor at, varius non, purus. Mauris vitae nisl nec metus placerat consectetuer. Donec ipsum. Proin imperdiet est. Pellentesque ornare, orci in consectetuer hendrerit, urna elit eleifend nunc. Donec ipsum. Proin imperdiet est. Pellentesque ornare, orci in consectetuer hendrerit, urna elit eleifend nunc.</p>
						</div>
					</div>
					<div style="clear: both;">&nbsp;</div>
				</div>
				<!-- end #content -->
				<div id="sidebar">
					<ul>
						<li>
							<h2>Aliquam tempus</h2>
							<p>Mauris vitae nisl nec metus placerat perdiet est. Phasellus dapibus semper consectetuer hendrerit.</p>
						</li>
						<li>
							<h2>Categories</h2>
							<ul>
								<li><a href="#">Aliquam libero</a></li>
								<li><a href="#">Consectetuer adipiscing elit</a></li>
								<li><a href="#">Metus aliquam pellentesque</a></li>
								<li><a href="#">Suspendisse iaculis mauris</a></li>
								<li><a href="#">Urnanet non molestie semper</a></li>
								<li><a href="#">Proin gravida orci porttitor</a></li>
							</ul>
						</li>
						<li>
							<h2>Blogroll</h2>
							<ul>
								<li><a href="#">Aliquam libero</a></li>
								<li><a href="#">Consectetuer adipiscing elit</a></li>
								<li><a href="#">Metus aliquam pellentesque</a></li>
								<li><a href="#">Suspendisse iaculis mauris</a></li>
								<li><a href="#">Urnanet non molestie semper</a></li>
								<li><a href="#">Proin gravida orci porttitor</a></li>
							</ul>
						</li>
						<li>
							<h2>Archives</h2>
							<ul>
								<li><a href="#">Aliquam libero</a></li>
								<li><a href="#">Consectetuer adipiscing elit</a></li>
								<li><a href="#">Metus aliquam pellentesque</a></li>
								<li><a href="#">Suspendisse iaculis mauris</a></li>
								<li><a href="#">Urnanet non molestie semper</a></li>
								<li><a href="#">Proin gravida orci porttitor</a></li>
							</ul>
						</li>
					</ul>
				</div>
				<!-- end #sidebar -->
				<div style="clear: both;">&nbsp;</div>
			</div>
		</div>
	</div>
	<!-- end #page -->
</div>
<div id="footer">
	<p>Copyright (c) 2012 Sitename.com. All rights reserved. Design by <a href="http://www.freecsstemplates.org/">FCT</a>. Photos by <a href="http://fotogrph.com/">fotogrph</a>.</p>
</div>
<!-- end #footer -->
</body>
</html>

Attempting to save this page as-is will result in failure, as it isn't a well formatted Visualforce page.  To fix that I need to wrap the page in an <apex:page> component and change the doctype from an element to an attribute of the <apex:page>.  I also remove the header, sidebar and standard stylesheets as I want the page only to use the defrost styling.  This allows the page to save, but accessing the page shows that the job isn't done yet:

This is because the css and image elements don't have the correct path - they still have relative paths based on the original zip file.  While fixing these up I also take the opportunity to convert them to the equivalent Visualforce elements - <apex:styleSheet> and <apex:image>.  As I have the resources available in my zipped static resource, I use the URLFOR function to access the zip contents.

Here's an example of each before: 

<link href="style.css" rel="stylesheet" type="text/css" media="screen" />
<img src="images/pics01.jpg" width="600" height="200" alt="" />

 and after:

<apex:stylesheet value="{!URLFOR($Resource.Defrost, 'style.css')}"/>
<apex:image url="{!URLFOR($Resource.Defrost, 'images/pics01.jpg')}" alt="" width="600" height="200"/>

Accessing the page again shows that my changes have done the trick and it is now rendering the same as the original index.html (I've included the location bar of my browser just to prove there's no trickery):

The updated version of this page and the defrost zip file are available in the Part 1 directory of the github repository for this blog series at:

https://github.com/keirbowden/blog_force_com_sites

In the next post I'll look at how we can take this page and turn it into the template for our site, and create a home page based on that template.  


Saturday, 20 October 2012

Press Enter to Submit

As is so often the case with my blog, this post is in response to repeated questions on the same topic on the Developerforce Discussion Boards. This is one that has been cropping up for 3-4 years now, and concerns form behaviour when pressing the enter key in an <apex:inputField/> or <apex:inputText/> component.

The only reference to the expected behaviour can be found in the HTML 2.0, which states:

When there is only one single-line text input field in a form, the user agent should accept Enter in that field as a request to submit the form.

Over the years browsers have interpreted the enter key in different ways. Early versions of Firefox required an <input type=’submit’> element in the form for the submission to take place. Internet explorer would submit the form but if there was only a single field it would omit the name/value from the submit button, but if there was more than one field the button information would be included.

Modern browsers now share common behaviour, in that the enter key is interpreted as a request to submit the form via the first submit button. However, if you want to use a different button to submit the form, or you have to contend with old (and unsupported) browsers you need another solution.

In my case, I have a form that is used to search for duplicate accounts before creation. This has a number of text input fields to capture the search criteria and a couple of buttons to clear the criteria or execute the search. A screenshot is show below:

Screen Shot 2012 10 20 at 11 17 25

When the user hits the enter key, I want to carry out the search via the second button rather than the first so the default browser behaviour won't work for me in this case.

The solution is to bind a javascript handler to the onkeypress event of each of the inputs. In my case I've named it 'noenter':

<apex:inputText id="name" value="{!searchCriteria.name}" onkeypress="return noenter(event);"/> 

the noenter function has some code at the end to get at the actual code of the key pressed, taking into account the number of different ways that browsers may present it, and then if the code is 13, aka the enter key, then the search button element is located on the form and its click method executed.  Note that if the enter key is detected, the function returns false - this is a vital part of the solution as it tells the browser not to continue with the default behaviour, which was to submit the form via the first button.  If false isn't returned, you are into an interesting race condition with two form submissions battling it out for supremacy.

    <script>
      function noenter(ev)
      {
         if (window.event)
         {
             ev=window.event;
         }
         
         var keyCode;
         if (ev.keyCode)
         {
            keyCode=ev.keyCode;
         }
         else
         {
            keyCode=ev.charCode;
         }
         
         if (keyCode == 13)
         {
            var ele=document.getElementById('{!$Component.form.crit_block.crit_section.searchbtn}');
            ele.click();
            return false;
         }
         else
         {
            return true;
         }
      }
   </script>

I've tested this on Chrome, Firefox, Opera and Safari and it behaves as expected - if you encounter any problems, please let me know via the comments section below.