Showing posts with label sites. Show all posts

Saturday, 15 December 2012

Building a Templated Web Site with Force.com - Part 4

In Part 1 of this series, I looked at how to turn an HTML page into a Visualforce page in order to use it as a template for a Force.com site. Part 2 covered how to turn the page into a template and create a home page that used the template to provide the common content.  Part 3 explained how to expose the pages to the world via an unauthenticated Force.com site.

Thus far I've focused on a single page, but the site has a number of tabs that are supplied by default in the template - Blogs, Photos, About, Links and Contacts.  For the purposes of this blog post, I'm going to create two additional pages - About and Contacts.

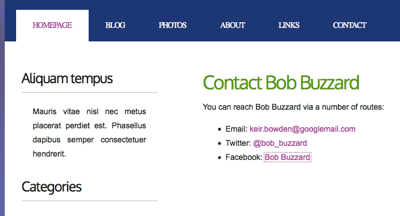
As I already have a home page that uses the template, I've cloned this to create new visualforce pages named 'about' and 'contact'.  These contain minimal content.

The contact page:
Screen Shot 2012 12 15 at 11 53 30

and the about page:

Screen Shot 2012 12 15 at 11 53 44

Next I need to create a way to navigate to the pages.  While the tabs contain links, these are empty anchor tags, as can be seen from the template markup:

<div id="menu">
	<ul>
		<li class="current_page_item"><a href="#">Homepage</a></li>
		<li><a href="#">Blog</a></li>
		<li><a href="#">Photos</a></li>
		<li><a href="#">About</a></li>
		<li><a href="#">Links</a></li>
		<li><a href="#">Contact</a></li>
	</ul>
</div>

Changing the links to point to my Visualforce pages might seem as simple as replacing the '#' with the Visualforce page link.  Unfortunately, Force.com sites need the page to be specified as '/contact', while if the pages are accessed from the Salesforce UI it needs to be specified as '/apex/contact'.  For this reason, its best practice to use the $Page global variable - this will generate the appropriate link based on the user's context.  As I've created pages for the Homepage, About and Contact tabs, the new markup is:

<div id="menu">
	<ul>
		<li class="current_page_item"><a href="{!$Page.Home}">Homepage</a></li>
		<li><a href="#">Blog</a></li>
		<li><a href="#">Photos</a></li>
		<li><a href="{!$Page.about}">About</a></li>
		<li><a href="#">Links</a></li>
		<li><a href="{!$Page.Contact}">Contact</a></li>
	</ul>
</div>

The links now work correctly, but the Homepage tab is always the one highlighted due to the class="current_page_item" attribute. This markup exists in the template, so I need find a way to identify the actual page and set the attribute on the appropriate tab.  

I could write a Visualforce controller for the page, but I'm trying to avoid that at this point and build the site entirely in Visualforce.  I could also add some markup to determine the name of the current URL, and highlight the tab that matches.  The downside to that is if I change the purpose of a page, I have to update the template.  Ideally I'd like to define the tab that should be highlighted in the underlying page, and make the template responsible for the rendering only.

The way that I've handed this is to set the tab name into a variable using the <apex:variable/> component, and then conditionally render the class name based on this variable.

In the underlying pages, its simply another define component - here's the markup from the about page:

<apex:define name="tabdef">
	<apex:variable var="tab" value="about"/>
</apex:define>

there's a little more to do in the template page - I have to define an initial value for the 'tab' variable, otherwise I can't use it elsewhere in the page - I've defaulted to the Homepage tab - that way if I have pages that don't belong to a particular tab, the leftmost will be highlighted.  Then I have to include the value from the underlying page (if this isn't present the default will be used) and finally check the value of tab variable when rendering each tab element.

<div id="menu">
	<apex:variable var="tab" value="home" />
	<apex:insert name="tabdef" />
	<ul>
		<li class="{!IF(tab=='home', 'current_page_item', '')}"><a href="{!$Page.Home}">Homepage</a></li>
		<li><a href="#">Blog</a></li>
		<li><a href="#">Photos</a></li>
		<li class="{!IF(tab=='about', 'current_page_item', '')}"><a href="{!$Page.about}">About</a></li>
		<li><a href="#">Links</a></li>
		<li class="{!IF(tab=='contact', 'current_page_item', '')}"><a href="{!$Page.Contact}">Contact</a></li>
	</ul>
</div>

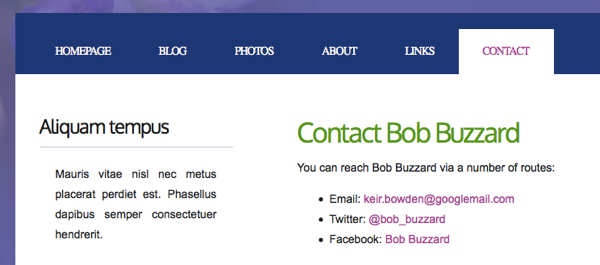
Looking at my contact page, now, the correct tab is highlighted:
Screen Shot 2012 12 15 at 12 30 49

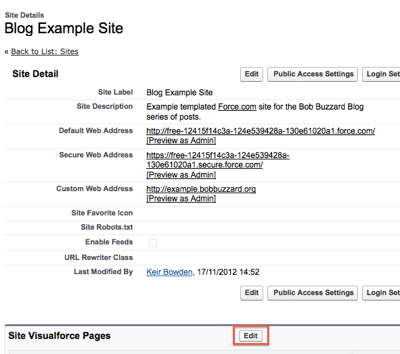
All that remains is to add the new Visualforce pages to my Force.com site.  On the site setup page (Setup -> App Setup -> Develop -> Sites and click through the site label), select the Edit button on the Site Visualforce Pages section:
Screen Shot 2012 12 15 at 12 32 50

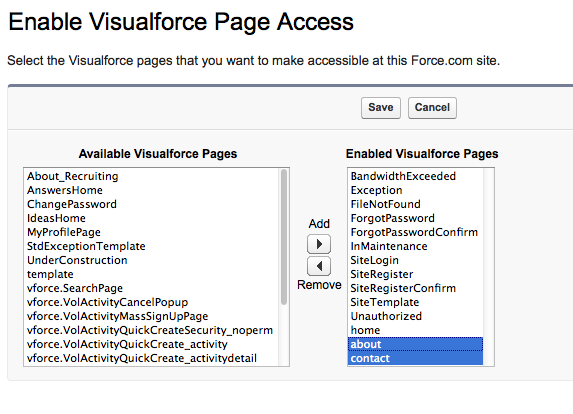
and then add the new pages via the dialog and click the 'Save' button:
Screen Shot 2012 12 15 at 12 36 49

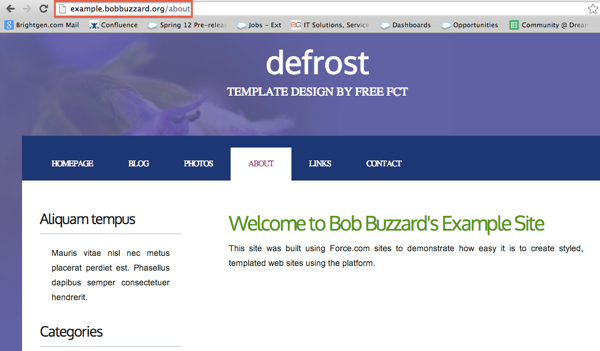
Navigating to the about page via the site's custom URL, shows that all of my new functionality has been made available to the site:
 

Screen Shot 2012 12 15 at 12 38 05

The template, pages and static resources are available in the Part4 directory of the github repository for this blog series at:

https://github.com/keirbowden/blog_force_com_sites

This post is probably the final one in this series, unless another topic occurs to me or is suggested in the comments.


Saturday, 17 November 2012

Building a Templated Web Site with Force.com - Part 3

In Part 1 of this series, I looked at how to turn an HTML page into a Visualforce page in order to use it as a template for a Force.com site.  Part 2 covered how to turn the page into a template and create a home page that used the template to provide the common content.  

Up to now the pages have only been available to users that have logged in to the Salesforce system. This post will show how to expose the pages in a Force.com site, to allow access from the wider web.

Before creating a Force.com site I have to choose my domain name - so I navigate to Setup -> App Setup -> Develop -> Sites and the following page is presented:

Screen Shot 2012 11 17 at 11 30 13

As I'm using a Force.com Free Edition org (yes, I was lucky enough to be able to grab a couple of these when they were available - I only wish I'd had the foresight to grab about 50!) I can't change the rather ugly default domain name, but in Enterprise/Unlimited Edition you can choose what you like, as long as someone else hasn't taken it.  I'm not stuck with this domain name however, as I can define a custom 'vanity' URL for my site, which I'll set up later.

Ticking the box and confirming that I understand I can't change the domain name, registers my domain and takes me to the back to the Sites page with my domain defined.

Screen Shot 2012 11 17 at 11 35 02

I then click the 'New' button to create my new site.  As this is for demo purposes only, I've filled in the minimum amount of information.  If you'd like more information on the purpose of each of these fields, check the help page by clicking the 'Help for this Page' link at the top right.

Screen Shot 2012 11 17 at 11 40 27

As I have specified my 'home' Visualforce page, this is automatically included in the list of pages for the site:

Screen Shot 2012 11 17 at 11 43 59

As an aside, whenever you add a Visualforce page to a site, your site automatically gets access to any Apex classes that it depends on. 

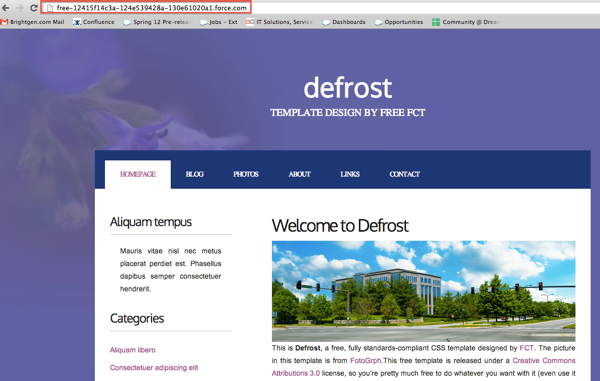
And that's it!  I can now navigate to the default site address and access my page without going through any form of authentication.

Screen Shot 2012 11 17 at 11 48 47

While my site is now available on the internet, the chances of anyone bothering to type in the full URL are pretty slim, so the next task is to set up the vanity URL. This has to be a CNAME redirect from my personal domain to the Force.com site domain name.  In my case I'm going to create a subdomain to bobbuzzard.org of example.bobbuzzard.org.  My registration system is Freeparking, and I have to set up an alias to the Force.com A record in order for the CNAME record to be created:

Screen Shot 2012 11 17 at 12 09 25

I can then verify that my record has been created using an online nslookup tool:

Screen Shot 2012 11 17 at 12 18 09


Finally, update the site configuration to define the custom URL:

Screen Shot 2012 11 17 at 14 52 53

Sometimes the DNS records don't propagate for a while, so if the vanity URL doesn't work, give it a couple of hours and try again.

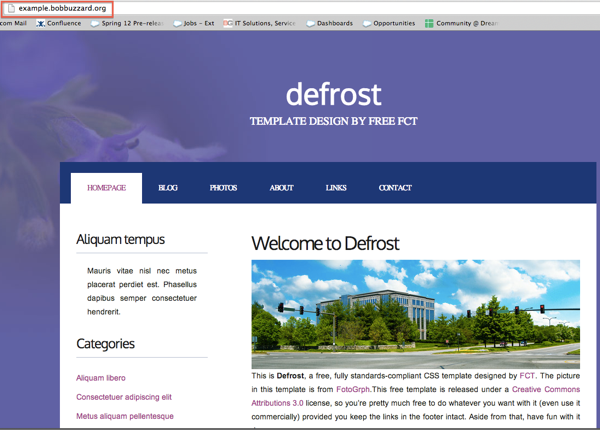
Accessing my site via http://example.bobbuzzard.org shows that everything is set up correctly and propagated:


Screen Shot 2012 11 17 at 14 56 01

In the next post I'll add pages for one or two of the other tabs and show one way to highlight the tab associated with the page.


Saturday, 3 November 2012

Building a Templated Web Site with Force.com - Part 2

In Part 1 of this series, I looked at how to turn an HTML page into a Visualforce page in order to use it as a template for a Force.com site.  This post covers how to turn the page into a template and create a home page that uses the template to provide the common content.

Visualforce supports templating via a combination of three tags:

  • <apex:insert />
    This tag appears in the template page and is used to inject the content specific to the page actually being rendered. 
  • <apex:composition/>
    This tag appears in the home page and defines the template page that will provide the common content.
  • <apex:define/>
    This tag appears in the home page and defines the content to be injected into the template.  For each define element, there must be an associated <apex:insert/> tag with the same name present in the template page.

My page has the following common content:

Header

Screen Shot 2012 11 03 at 14 15 42

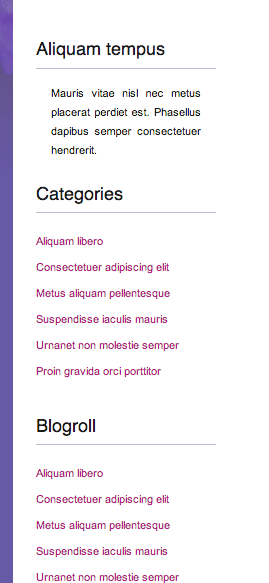
Sidebar:

Screen Shot 2012 11 03 at 14 17 19

and footer

Screen Shot 2012 11 03 at 14 18 03

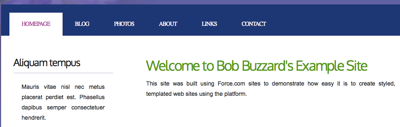
while the home page has the specific article content:

Screen Shot 2012 11 03 at 14 20 12

Thus my template page needs a single <apex:insert/> component for the article body.  However, I also want to be able to define the title on a per-page basis, so I'll need to add another for that.

Looking at the current source of my page, the following two elements need to be moved out to my home page and replaced with <apex:insert /> tags:

<title>Defrost by FCT</title>

and

<div id="content">
	<div class="post">
		<h2 class="title"><a href="#">Welcome to Defrost</a></h2>
		<div class="entry">
			<p><apex:image url="{!URLFOR($Resource.Defrost, 'images/pics01.jpg')}" alt="" width="600" height="200"/>This is <strong>Defrost</strong>, a free, fully standards-compliant CSS template designed by  <a href="http://www.freecsstemplates.org">FCT</a>.  The picture in this template is from <a href="http://fotogrph.com/">FotoGrph</a>.This free template is released under a <a href="http://creativecommons.org/licenses/by/3.0/">Creative Commons Attributions 3.0</a> license, so you’re pretty much free to do whatever you want with it (even use it commercially) provided you keep the links in the footer intact. Aside from that, have fun with it :)</p>
		</div>
	</div>
	<div class="post">
		<h2 class="title"><a href="#">Lorem ipsum sed aliquam</a></h2>
		<div class="entry">
			<p><apex:image url="{!URLFOR($Resource.Defrost, 'images/pics02.jpg')}" alt="" width="600" height="200"/>Sed lacus. Donec lectus. Nullam pretium nibh ut turpis. Nam bibendum. In nulla tortor, elementum vel, tempor at, varius non, purus. Mauris vitae nisl nec metus placerat consectetuer. Donec ipsum. Proin imperdiet est. Phasellus <a href="#">dapibus semper urna</a>. Pellentesque ornare, consectetuer nisl felis ac diam. Sed lacus. Donec lectus. Nullam pretium nibh ut turpis. Nam bibendum. Mauris vitae nisl nec metus placerat consectetuer. </p>
		</div>
	</div>
	<div class="post">
		<h2 class="title"><a href="#">Phasellus pellentesque turpis </a></h2>
		<div class="entry">
			<p><apex:image url="{!URLFOR($Resource.Defrost, 'images/pics01.jpg')}" alt="" width="600" height="200"/>Sed lacus. Donec lectus. Nullam pretium nibh ut turpis. Nam bibendum. In nulla tortor, elementum vel, tempor at, varius non, purus. Mauris vitae nisl nec metus placerat consectetuer. Donec ipsum. Proin imperdiet est. Pellentesque ornare, orci in consectetuer hendrerit, urna elit eleifend nunc. Donec ipsum. Proin imperdiet est. Pellentesque ornare, orci in consectetuer hendrerit, urna elit eleifend nunc.</p>
		</div>
	</div>
	<div style="clear: both;">&nbsp;</div>
</div>
<!-- end #content -->
 

These become: 

<title><apex:insert name="title"/></title>

and

<apex:insert name="content" />
 

I can then create my home page, containing the <apex:composition/> component that defines my template, and the <apex:define/> tags for the title - 'Bob Buzzard Blog Site - Home' and the article content:

<apex:page sidebar="false" showheader="false" standardstylesheets="false">
  <apex:composition template="template">
    <apex:define name="title">
       Bob Buzzard Blog Site - Home
    </apex:define>
    <apex:define name="content">
		<div id="content">
			<div class="post">
				<h2 class="title"><a href="#">Welcome to Defrost</a></h2>
				<div class="entry">
					<p><apex:image url="{!URLFOR($Resource.Defrost, 'images/pics01.jpg')}" alt="" width="600" height="200"/>This is <strong>Defrost</strong>, a free, fully standards-compliant CSS template designed by  <a href="http://www.freecsstemplates.org">FCT</a>.  The picture in this template is from <a href="http://fotogrph.com/">FotoGrph</a>.This free template is released under a <a href="http://creativecommons.org/licenses/by/3.0/">Creative Commons Attributions 3.0</a> license, so you’re pretty much free to do whatever you want with it (even use it commercially) provided you keep the links in the footer intact. Aside from that, have fun with it :)</p>
				</div>
			</div>
			<div class="post">
				<h2 class="title"><a href="#">Lorem ipsum sed aliquam</a></h2>
				<div class="entry">
					<p><apex:image url="{!URLFOR($Resource.Defrost, 'images/pics02.jpg')}" alt="" width="600" height="200"/>Sed lacus. Donec lectus. Nullam pretium nibh ut turpis. Nam bibendum. In nulla tortor, elementum vel, tempor at, varius non, purus. Mauris vitae nisl nec metus placerat consectetuer. Donec ipsum. Proin imperdiet est. Phasellus <a href="#">dapibus semper urna</a>. Pellentesque ornare, consectetuer nisl felis ac diam. Sed lacus. Donec lectus. Nullam pretium nibh ut turpis. Nam bibendum. Mauris vitae nisl nec metus placerat consectetuer. </p>
				</div>
			</div>
			<div class="post">
				<h2 class="title"><a href="#">Phasellus pellentesque turpis </a></h2>
				<div class="entry">
					<p><apex:image url="{!URLFOR($Resource.Defrost, 'images/pics01.jpg')}" alt="" width="600" height="200"/>Sed lacus. Donec lectus. Nullam pretium nibh ut turpis. Nam bibendum. In nulla tortor, elementum vel, tempor at, varius non, purus. Mauris vitae nisl nec metus placerat consectetuer. Donec ipsum. Proin imperdiet est. Pellentesque ornare, orci in consectetuer hendrerit, urna elit eleifend nunc. Donec ipsum. Proin imperdiet est. Pellentesque ornare, orci in consectetuer hendrerit, urna elit eleifend nunc.</p>
				</div>
			</div>
			<div style="clear: both;">&nbsp;</div>
		</div>
		<!-- end #content -->
    </apex:define>
  </apex:composition>
</apex:page>

 accessing my home visualforce page shows that the template has been correctly picked up:

Screen Shot 2012 11 03 at 14 52 10

The template and home page are available in the Part 2 directory of the github repository for this blog series at:

https://github.com/keirbowden/blog_force_com_sites

In the next post I'll look at how to make the page available on the web via a Force.com site, including a custom web address.  


Sunday, 9 September 2012

Online Quizzes Built on Force.com

If you're a Facebook friend of mine, over the last few weeks you'll have seen status updates regarding an online quiz app that I've been working on.  I started off calling it an online testing system, but decided against that as it had too many connotations of an app that allowed unit tests to be executed!

My original idea for the app was to use it to determine individual's readiness for Salesforce certification exams and crowdsource the questions as a free for all. However, I'm rethinking how the questions will be authored based on the various compromises of real questions that have taken place this year.  I'm still planning to allow the community access to author questions, but in a more controlled fashion and limiting the number of questions an individual can write on a single topic.

A screenshot of a question is shown below :


One of the key aspects for me is the ability for candidates to give a percentage rating to their confidence in the answer.  This is based on my approach to taking the real exams, as it allows me to determine how close I think I am to the pass mark.  I find it particularly useful when assessing a candidate's readiness, as if they are getting questions wrong when they were 100% confident in their answer, that implies there is a fundamental lack of understanding in that particular concept.  There's also a couple of free text areas for candidate notes and feedback on each question.

Each question is marked with a topic, which identifies which test it belongs to, and an area which is simply a free text sub-topic - Workflow is an area under the Force.com topic for example. The areas are used to provide feedback to candidates about areas they are weak on - at the moment its simply the first five unique areas encountered when marking.  I do plan to make this more sophisticated, taking into account the candidate's confidence and the number of incorrect answer in each area, for example

Something that applies both to tests and surveys (and many other question and answer scenarios) is the requirement to decouple the questions from those presented in a test instance. For example, if a questions is worded incorrectly and I fix it, I don't want to retrospectively update that question as posed to a particular candidate, as its not the question they answered. The trick here is to have the concept of questions as templates, and clone these when creating a test instance. Mine are called question responses, and that is where things like the feedback live.

Questions can be single answer (radio button), multi-answer (checkboxes), putting answers in order (picklists) or free text (long text area). The first three are automatically marked when the test is submitted, while free text requires a human to review the text.

As I want to be able to have (at least) users and contacts as test candidates, I couldn't use master-detail relationships and standard roll up summary fields. Instead I used this excellent utility from Anthony Victorio that allows roll up summary behaviour via regular lookup fields. It only takes a few minutes to set up and has worked fine for me thus far. The only trick is to remember to "touch" all the child objects when you add a new parent summary field.

The app is built on Force.com sites using composition templates.  The design is from Free CSS Templates - a great resource if, like me, design isn't your strong suit.

At the moment there's just a single test on Dreamforce X to allow me to test the site out in a controlled fashion.  So give it a go and let me know what you think.  If you would be interested in writing or marking questions, please tick the boxes on the test signup form.  On the results page there's a link to tweet out the score - don't feel any pressure to do this, but if you do want to that would be cool.


You can access the site at: http://tests.bobbuzzard.org