Saturday, 1 December 2018

Apex Snippets in VS Code

Apex Snippets in Visual Studio Code

Snippet

Introduction

As I’ve written about before, I switched over to using Microsoft Visual Studio Code as soon as I could figure out how to wire the Salesforce CLI into it for metadata deployment. I’m still happy with my decision, although I do wish that more features were also supported when working in the metadata API format rather than the new source format. When using an IDE with plugins for a specific technology, such as the Salesforce Extension Pack, it’s easy to focus on what the plugins provide and forget to look at the standard features. Easy for me anyway. 

Snippets

Per the docs, "Code snippets are small blocks of reusable code that can be inserted in a code file using a context menu command or a combination of hotkeys”. What this means in practice is that if I type in ‘try”, I’ll get offered the following snippets, which I can move between with the up and down arrow (cursor) keys:
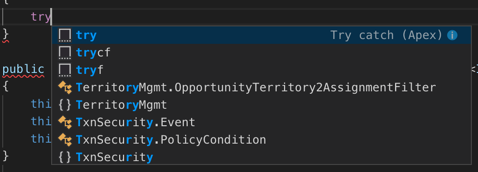
Screenshot 2018 12 01 at 16 34 09

Note the information icon on the first entry - clicking this shows me the documentation for each snippet and what will be inserted if I choose the snippet. This is particularly important if I install an extension containing snippets from the marketplace that turns out to have been authored by my Evil Co-Worker - I can see exactly what nefarious code would be inserted before I continue:

Screenshot 2018 12 01 at 16 34 17

Which is pretty cool - with the amount of code i write, saving a few keystrokes here and there can really add up.

User Defined Snippets

The good news is that you aren’t limited to the snippets provided by the IDE or plugins - creating user defined snippets is, well a snip (come on, you knew I was going there).  On MacOS you access the Code ->Preferences -> User Snippets menu option:

Screenshot 2018 12 01 at 16 41 46

and choose the language - Apex in my case - and start creating your own snippet.

Example

Here’s an example from my apex snippets:

	"SObject_List": {
		"prefix": "List<",
		"body": [
			"List<${1:object}> ${2:soList}=new List<${1}>();"
		],
		"description":"List of sObjects"
	}

Breaking up the JSON:

  • The name of my snippet is “SObject_List”.
  • The prefix is “List<“ - this is the sequence of characters that will activate offering the snippet to the user.
  • The body of the snippet is "List<${1:object}> ${2:soList}=new List<${1}>();” 
    •  $1 and $2 are tabstops, which are cursor locations. When the user chooses the snippet, their cursor will initially be placed in $1 so they can enter a value, then they hit tab and move to $2 etc. 
    • $1.object is a tabstop with a placeholder - in this case the first tabstop will contain the value “object” for the user to change. 
    • If you use the same tabstop in several places, when the user updates the first instance this will change all other references
  • Description is the detail that will be displayed if the user has hit the information  icon.

The following video shows the snippet in use while creating an Apex class - note how I only type ‘Contact’ once, but both instances of ‘object’ get changed.

Nice eh? And all done via a configuration file.

Related Posts


Sunday, 18 November 2018

Wrapping the Salesforce CLI

Wrapping the Salesforce CLI

Wrp

Introduction

(This post is aimed at beginners to the command line and scripting - all of the examples in this post are for MacOS)

Anyone who has read my blog or attended my recent talks at the London Salesforce Developers or Dreamforce will know I’m a big fan of the Salesforce CLI. I use it for pretty much everything I do around metadata and testing on Salesforce, and increasingly for things that don’t involve directly interacting with Salesforce. I think everyone should use it, but I also realise that not everyone is that comfortable with the command line, especially if their career didn’t start with it!

The range of commands and number of options can be daunting, for example to deploy local metadata to production and execute local tests, waiting for up to 2 minutes for the command to complete:

sfdx force:mdapi:deploy -d src -w 2 -u keir.bowden@sfdx.deploy -l RunLocalTests

If you are a developer chances are you’ll be executing commands like this fairly regularly, but for infrequent use, it’s quite a bit to remember. If you have colleagues that need to do this, consider creating a wrapper script so that they don’t have to care about the detail.

Wrapper Script

A wrapper script typically encapsulates a command and a set of parameters,  simplifying the invocation and easing the burden of remembering the correct sequence.A wrapper script for the Salesforce CLI can be written in any language that supports executing commands - I find that the easiest to get started with is bash, as it’s built in to MacOS.

A Bash wrapper script to simplify the deploy command is as follows:

#!/bin/bash

echo "Deploying to production as user $1"

sfdx force:mdapi:deploy -d src -w 2 -u $1 -l RunLocalTests

Taking the script a line at a time:

#!/bin/bash

This is known as a shebang - it tells the interpreter to execute the '/bin/bash' command, passing the wrapper script as a parameter.

echo "Deploying to production as user $1"

This outputs a message to the user, telling them the action that is about to be taken. The ‘$’ character access the positional parameters, or arguments, passed to the script. ‘$0' is set to the name that the script is executed with, '$1' is the first argument, ‘$2' the second and so on. The script expects the ‘targetusername' for the deployment to be passed as the first argument, and wastes no time checking if this is the case or not :)

sfdx force:mdapi:deploy -d src -w 2 -u $1 -l RunLocalTests

This executes the embedded Salesforce CLI command, once again accessing the parameter at position 1 via ‘$1' to set the ‘targetusername’ of the command.

Executing the Wrapper Script

The script assumes it is being executed from the project directory (the parent directory of src), so I’ve put it there, named as ‘deployprod’.

To execute the script, I type ‘./deployprod’ in the terminal - the ‘./‘ prefix simply tells the interpreter that the command is located in the local directory.

Attempting to execute the script after I create it shows there is still some work to do:

> ./deployprod keir.bowden@sfdx.deploy
-bash: ./deployprod: Permission denied

In order to allow the wrapper script to be as a command, I need to make it executable, via the chmod command:

> chmod +x deployprod

Re-running the command then produces the expected output:

> ./deployprod keir.bowden@sfdx.deploy

Deploying to production as user keir.bowden@sfdx.deploy
2884 bytes written to /var/folders/tn/q5mzq6n53blbszymdmtqkflc0000gs/T/src.zip using 60.938ms
Deploying /var/folders/tn/q5mzq6n53blbszymdmtqkflc0000gs/T/src.zip...

etc

So in future, when the user wants to deploy to production, they simply type:

./deployprod keir.bowden@sfdx.deploy

rather than

sfdx force:mdapi:deploy -d src -w 2 -u keir.bowden@sfdx.deploy -l RunLocalTests

which is a lot less for them to remember and removes any chance that they might specify the wrong value for the -d or -l switches.

Of course there is always the chance that my Evil Co-Worker will update the script for nefarious purposes (to carry out destructive changes, for example) and the user will be none the wiser unless they inspect the output in detail (which they never will unless they see an error trust me), but the risk of this can be mitigated by teaching users good security practices around allowing access to their machines. And reminding them regularly of the presence of the many other evil people that they don’t happen to work with.

All Bash, all the time?

I  created the original command line tools on top of the Force CLI  for deployment of our BrightMedia appcelerator using Bash, and it allowed us to get big quick. However, there were a couple of issues:

  1. Only I knew how to write  bash scripts
  2. Bash isn’t the greatest language for carrying out complex business logic
  3. When the Salesforce CLI came along I wanted to parse the resulting JSON output, and that is quite a struggle in Bash.

Point 1 may or may not be an issue in your organisation, though I’d wager that you won’t find a lot of bash scripting experience outside of devops teams these days. Points 2 and 3 are more important - if you think you’ll be doing more than simple commands (or blogs about those simple commands!) then my advice would be to write your scripts in Node JS. You’ll need to be comfortable writing JavaScript, and you have to do a bit more in terms of installation, but in the long run you’ll be able to accomplish a lot more.

Bash does allow you to get somewhat complex quite quickly, so you’ll likely be some way down the wrong path when you realise it - don’t be tempted to press on. The attitude that “we’ve invested so much in doing the wrong thing that we have to see it through” never pays off!


Monday, 5 November 2018

Situational Awareness

Introduction

Train

This is the eighth post in my ‘Building my own Learning System” series, in which I finally get to implement one of the features that started me down this path in the first place - the “Available Training” component.

The available training component has situational awareness to allow it to do it’s job properly. Per Wikipedia, ituational awareness comprises three elements:

  • Perception of the elements in the environment - who the user is and where they are an application
  • Comprehension of the situation - what they are trying to do and what training they have taken
  • Projection of future status - if there is more training available they will be able to do a better job

Thus rather than telling the user that there is training available, regardless of whether they have already completed it, this component tells the user that there is training, how much of it they have completed, and gives them a simple way to continue. Push versus pull if you will.

Training System V2.0

Some aspects were already in place in V1 of the training system - I know who the user is based on their email address, for example, However, I only knew what training they had taken for the current endpoint so some work was required there. Polling all the endpoints to find out information seemed like something that could be useful to the user, which lead to sidebar search. Sidebar search allows the user to enter terms and search for paths or topics containing those terms across all endpoints:

Screen Shot 2018 11 05 at 15 47 18

Crucially the search doesn’t just pull back the matching paths. it also includes information about the progress of the currently logged in user for those paths - in this case, like so much of my life, I’ve achieved nothing:

Screen Shot 2018 11 05 at 15 47 24

In order to use this search, the available training component needs to know what the user is trying to do within the app. It’s a bit of a stretch for it to work this out itself, so it takes a topic attribute. 

I also want the user to have a simple mechanism to access the training that they haven’t taken, so the available training component also takes an attribute of there URL of a page containing the training single page application. 

Examples

Hopefully everyone read this in the voice of Jools from Pulp Fiction, otherwise the fact that there’s only a single example means it doesn’t make a lot of sense.

An example of using the new component is from my BrightMedia dev org. It’s configured in the order booking page as follows:

<c:TrainingAvailable modalVisible="{!v.showTraining}" 
    trainingSPAURL="https://bgmctest-dev-ed.lightning.force.com/lightning/n/Training" 
    topic="Order Booking" />

where trainingSPAURL is the location of the single page application.

Also in my booking page I have an info button (far right): 

Screen Shot 2018 11 05 at 16 12 45

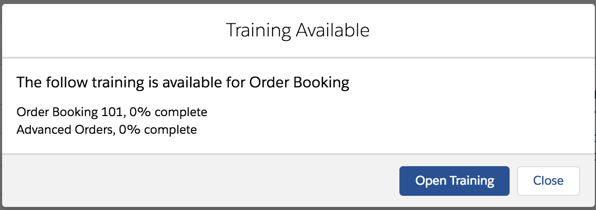
clicking this toggles the training available modal:

Screen Shot 2018 11 05 at 16 15 10


Which shows that there are a couple of paths that I haven’t started. Clicking the ‘Open Training’ button takes me to the training page with the relevant paths pre-loaded:

Screen Shot 2018 11 05 at 16 15 24

Related Posts


Saturday, 13 October 2018

All Governor Limits are Created Equal

All Governor Limits are Created Equal

Soql

Introduction

Not all Salesforce governor limits inspire the same fear in developers. Top of the pile are DML statements and SOQL queries, followed closely by heap size, while the rest are relegated to afterthought status, typically only thought about when they breach. There’s a good reason for this - the limits that we wrestle with most often bubble to the top of our thoughts when designing a solution. Those that we rarely hit get scant attention, probably because on some level we assume that if we aren’t breaching these limits regularly, we must have some kind of superpower to write code that is inherently defensive against it. Rather than what it probably is - either the limit is very generous or dumb luck.

This can lead to code being written that is skewed to defending against a couple of limits, but will actually struggle to scale due to the lack of consideration for all limits. To set expectation, the example that follows is contrived - a real world example would require a lot more code and shift the focus away from the point I’m trying to make. 

The Example

For some reason, I want to create two lists in my Apex class - one that contains all leads in the system where the last name starts with the letter ‘A’ and another list containing all the rest. Because I’m scared of burning SOQL queries, I query all the leads and process the results:

List<Lead> leads=[select id, LastName from Lead];
List<Lead> a=new List<Lead>();
List<Lead> btoz=new List<Lead>();
for (Lead ld : leads)
{
    String lastNameChar1=ld.LastName.toLowerCase().substring(0,1);
    if (lastNameChar1=='a')
    {
        a.add(ld);
    }
    else 
    {
        btoz.add(ld);
    }
}

System.debug('A size = ' + a.size());
System.debug('btoz size = ' + btoz.size());

The output of this shows that I’ve succeeded in my mission of hoarding as many SOQL queries as I can for later processing:

Screen Shot 2018 10 13 at 16 20 14

But look towards the bottom of the screenshot - while I’ve only used 1% of my SOQL queries, I’ve gone through 7% of my CPU time limit. Depending on what else needs happens in this transaction, I might have created a problem now or in the future. But I don’t care, as I’ve satisfied myself requirement of minimising SOQL queries.

If I fixate a bit less on the SOQL query limit, I can create the same lists in a couple of lines of code but using an additional query:

List<Lead> a=[select id, LastName from Lead where LastName like 'a%'];
List<Lead> btoz=[select id, LastName from Lead where ID not in :a];
System.debug('A size = ' + a.size());
System.debug('btoz size = ' + btoz.size());

because the CPU time doesn’t include time spent in the database, I don’t consume any of that limit:

Screen Shot 2018 10 13 at 16 23 59

Of course I have consumed another SOQL query though, which might create a problem now or in the future. There’s obviously a trade-off here and fixating on minimising the CPU impact and ignoring the impact of additional SOQL queries is equally likely to cause problems.

Conclusion

When designing solutions, take all limits into account. Try out various approaches and see what the impact of the trade-offs is, and use multiple runs with the same data to figure out the impact on the CPU limit, as my experience is that this can vary quite a bit. There’s no silver bullet when it comes to limits, but spreading the load across all of them should help to stretch what you can achieve in a single transaction. Obviously this means the design time takes a bit longer, but there’s an old saying that programming is thinking not typing, and I find this to be particularly true when creating Salesforce applications that have to perform and scale for years. The more time you spend thinking, the less time you’ll spend trying to fix production bugs when you hit the volumes that everybody was convinced would never happen.


Saturday, 6 October 2018

Dreamforce 2018

Dreamforce 2018

IMG 4447

2018 marked my 9th Dreamforce, although the first of these was staffing a booth in the Expo for 4 days so it’s difficult to count that. In a change of pace, the event started on day -1 with a new initiative from Salesforce.

Monday - CTA Summit

IMG 4432

The CTA Summit was pretty much my favourite part this year - an audience of CTAs and travelling bands of Product Managers giving us lightning (the pace, not the technology, although we did get some of that as well!) presentations and answering difficult questions - for me the questions were as informative as the presentations, especially if it was an area that I haven’t done a lot of work in. Nothing like knowing what others are struggling with so you can be ahead of the game.

The format was one that I’m reasonably familiar with, having been lucky enough to attend 3 MVP summits over the years, especially the constant reminders that you are under NDA and can’t share any of the content. Sorry about that! One thing I can share is that Richard Socher (Salesforce Chief Scientist) is an excellent speaker and if you get a chance to attend one of his talks, grab it. Some of the sessions were hosted at the Rincon Centre, where I saw a couple of outfits that looked really familiar.

IMG 4444

Tuesday - Keynote

Early start as the Community Group Leaders State of the Union session was a breakfast presentation at the Palace Hotel from 7am, then more CTA Summit sessions before heading over to Moscone Center.

For the first (no pun intended) time that I can remember, Marc Benioff’s keynote took place on Day 1. As an MVP I’m lucky enough to get reserved seating for the keynote and made sure I was there in plenty of time - queueing with Shell Black prior to security opening put us in the first row of reserved seating, three rows back from the stage.

IMG 4464

The big announcements from the keynote were Einstein Voice (conversational CRM + voice bots) and Customer 360. If you want to know more about these, here’s a slide from the BrightGen Winter 19 release webinar with links to the appropriate keynote recordings (if you can’t read the short links, you can access the original deck here


Screen Shot 2018 10 06 at 15 57 48

The keynote wasn’t the end of the day though, with CTA and MVP receptions on offer I was networking and learning late into the evening,

Wednesday - Speaking

After a couple of days listening to other people talking, it was my turn. First up was the Climbing Mount CTA panel session over at the Partner Lodge, where I was up the front in some stellar company. We even had parity between the male and female CTAs on the panel, which is no mean feat when you look at the stats, something the Ladies Be Architects team in the foreground and working hard to address.

DodPm5pVAAIjddj


After this I headed back to Trailhead in Moscone West, showing incredible self-control as the partner reception was just starting. I limited myself to a single bite sized corn dog and ignored the voice in my head telling me that a couple of beers would loosen me up nicely, and went straight over the speaker readiness room to remind myself of the content for my Developer Theatre session “Quickstart Templates with the Salesforce CLI” (picture courtesy of my session owner, Caroline Hsieh).

IMG 1632

Once the talk was over I continued in a tradition started last year and went out for a beer with some of the contingent from Sweden - Johan (aka Kohan, Mohan) Karlsteen, the creator of Top Trailblazers, and one of his colleagues. As is also traditional, we took a picture and included a snapshot of the guy who couldn’t make it so that he didn’t feel left out :)

DobGxdpWkAEwH97


Thursday - More Keynotes and the Return of @adamse

Thursday was the second highlight of the event for me - the Developer Keynote, closely followed by the Trailhead keynote. A big surprise at the Dev Keynote was the presence of Adam Seligman, formerly of Salesforce but now with Google.

DoIF5RaV4AAa6gW

And I had pretty good seats in the second row for this keynote, better than Dave Carroll in fact. Did I mention I’m an MVP.

DoIE1RzV4AAbR 9


The gap between the Dev and Trailhead keynotes was only 30 minutes, but as they are literally over the road from each other I made it in about 20 (there’s a few people attend Dreamforce, so crossing the road isn’t as simple as it sounds!). I typically sit a bit further back in this one as there is huge amount of exuberance in the front few rows and I try to avoid displaying any excitement or enthusiasm in public if I can. 

After the keynotes I caught a couple more sessions before heading over to Embarcadero for the annual BrightGen customer dinner. I’d said to my colleagues when I bumped into them on Monday night that I’d see them again on Thursday, Some of those that hadn’t been thought I was joking, but they weren’t laughing when I showed up at 7pm. 

I also got to catch up with the winner of the UK and Ireland social media ambassador at Dreamforce competition - long time BrightGen customer, Cristina Bran, who told me all about her amazing week.

DoKpmxgU8AAZizB

Friday - Salesforce Tower Trip

I’d been lucky enough to have my name picked out of the hat to get to visit the Ohana floor of the Salesforce Tower. It was a bit of a foggy day (what are the odds) but the views were still pretty spectacular.

IMG 4517

and that was Dreamforce over for another year!

Vegas Baby!

The BrightGen contingent traveled home via Las Vegas for a little unwinding and team building. Like the CTA Summit, what happens in Vegas stays in Vegas, so I can only show this picture of me arriving at the airport, still sporting some Salesforce branding.

IMG 4541


Thursday, 13 September 2018

Background Utility Items in Winter 19

Background Utility Items in Winter 19

Introduction

The Winter 19 release of Salesforce introduces the concept of Background Utility Items, Lightning Components that are added to the Lightning Experience utility bar but don’t take up any real estate, can’t be opened and have no user interface. This is exactly what I was looking for when I put together my Toast Message from a Visualforce Page blog - the utility bar component that received the notification to show a toast message doesn’t need to interact with the user, but still has an entry. The user can also click on the item and receive a lovely empty popup window:

Screen Shot 2018 09 08 at 08 09 52

Not the worst user experience in the world, but not the best either. I guess in production I’d probably put a message that this item isn’t user configurable. One item like this isn’t so bad, but imagine if there were half a dozen - a large chunk of the utility bar would be taken up with items that only serve to distract the user, although I’d definitely loo to combine them all into a single item if I could.

Refresher

In case you haven’t committed the original blog post to memory (and I’m not going to lie, that hurts), here’s how it works:

Toast


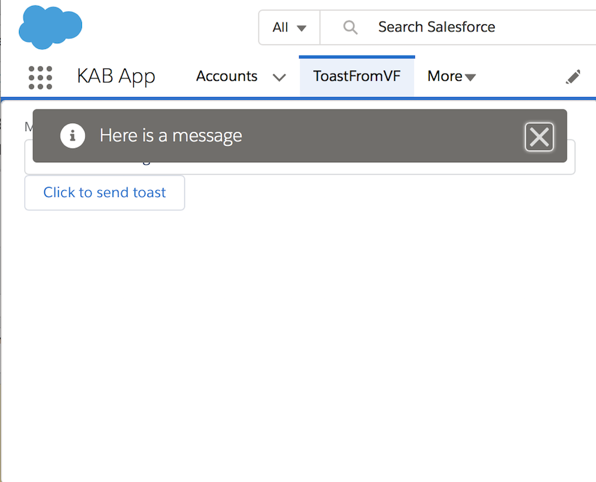
I enter a message in my Lightning component, which fires a toast event (1), this is picked up by the event handle in the Visualforce JavaScript, which posts a message (2) that is received by the Lightning component in the utility bar. This fires it’s own toast event (3) that, as it is executing in the one.app container, displays a toast message to the user.

Implement the Interface

Removing the UI aspect is as simple as implementing an interface - lightning:backgroundUtilityItem. Once i’ve updated my component definition with this (and changed the domain references to match my pre-release org):

<aura:component 
    implements="flexipage:availableForAllPageTypes,lightning:backgroundUtilityItem" 
    access="global" >

    <aura:attribute name="vfHost" type="String"
             default="kabprerel-dev-ed--c.gus.visual.force.com"/>
    <aura:handler name="init" value="{!this}" action="{!c.doInit}"/>
</aura:component>

When I open my app now, there’s nothing in the utility bar to consume space or attract the user, but my functionality works the same:

Toast2

You can find the updated code at my Winter 19 Samples github repo.

Related


Tuesday, 4 September 2018

Callable in Salesforce Winter 19

Callable in Salesforce Winter 19

Call

Introduction

The Winter 19 Salesforce release introduces the Callable interface which, according to the docs:

Enables developers to use a common interface to build loosely coupled integrations between Apex classes or triggers, even for code in separate packages. 

upon reading this I spent some time scratching my head trying to figure out when I might use it. Once I stopped thinking in terms of I and started thinking in terms of we, specifically a number of distributed teams, it made a lot more sense.

Scenario

The example scenario in this post is based on two teams working on separate workstreams in a single org, the Core team and the Finance team. The Core team create functionality used across the entire org, for the Finance team and others.

The Central Service

The core team have created a Central Service interface, defining key functionality for all teams (try not to be too impressed by the creativity behind my shared action names):

public interface CentralServiceIF {
    Object action1();
    Object action2();
}

and an associated implementation for those teams that don’t have specific additional requirements:

public class CentralServiceImpl implements CentralServiceIF {
    public Object action1() {
        return 'Interfaced Action 1 Result';
    }
public Object action2() { return 'Interfaced Action 2 Result'; } }

The Finance Implementation

The Finance team have specific requirements around the Central Service, so they create their own implementation - in the real world this would likely delegate to the Central Service and enrich with finance data, but in this case it returns a slightly different string (artist at work eh?) :

public class CentralServiceFinanceImpl implements CentralServiceIF {
    public Object action1() {
        return 'Finance Action 1 Result';
    }
public Object action2() { return 'Finance Action 2 Result'; } }

The New Method

Everything ticks along quite happily for a period of time, and then the Core team updates the interface to introduce a new function - the third action that everyone thought was the stuff of legend. The interface now looks like:

public interface CentralServiceIF {
    Object action1();
    Object action2();
    Object action3();
}

and the sample implementation:

public class CentralServiceImpl implements CentralServiceIF {
    public Object action1() {
        return 'Interfaced Action 1 Result';
    }
public Object action2() { return 'Interfaced Action 2 Result'; }
public Object action3() { return 'Interfaced Action 3 Result'; } }

This all deploys okay, but when the finance team next trigger processing via their implementation, there’s something rotten in the state of the Central Service:

Line: 58, Column: 1 System.TypeException: 
Class CentralServiceFinanceImpl must implement the method:
Object CentralServiceIF.action3()

Now obviously this was deployed to an integration sandbox, where all the code comes together to make sure it plays nicely, so the situation surfaces well away from production. However, if the Core team have updated the Central Service interface in response to an urgent request from another team, then the smooth operation of the workstreams has been disrupted. As the interface is a shared resource that is resistant to change - updating it requires coordination across all teams.

The Callable Implementations

Implementing the Core Central Service as a callable:

public class CentralService implements Callable {
   public Object call(String action, Map<String, Object> args) {
       switch on action {
           when 'action1' {
               return 'Callable Action 1 result';
           }
           when 'action2' {
               return 'Callable Action 2 result';
           }
           when else {
               return null;
           }
       }
   }
}

and the Finance equivalent:

public class CentralServiceFinance implements Callable {
    public Object call(String action, Map<String, Object> args) {
        switch on action {
            when 'action1' {
                return 'Callable Action 1 result';
            }
            when 'action2' {
                return 'Callable Action 2 result';
            }
            when else {
                return null;
           }
       }
    }
}

Now when a third method is required in the Core implementation, it’s just another entry in the switch statement:

switch on action {
    when 'action1' {
        return 'Callable Action 1 result';
    }
    when 'action2' {
        return 'Callable Action 2 result';
    }
    when 'action3' {
        return 'Callable Action 3 result';
    }
    when else {
        return null;
    }
}

while the Finance implementation can remain blissfully unaware of the new functionality until it is needed, or a task to provide support for it can be added into the Finance workstream.

Managed Packages

I can also see a lot of use cases for this if you have common code distributed via managed packages to a number of orgs. You can include new functions in a release of your package without requiring every installation to update their code to the latest interface version - as you can’t update a global interface once published, you have to shift everything to a new interface (typically using a V<release> naming convention), which may cause some churn across the codebase.

Conclusion

So is this something that I’ll be using on a regular basis? Probably not. In the project that I’m working on at the moment I can think of one place where this kind of loose coupling would be helpful, but it obviously makes the code more difficult to read and understand, especially if the customer’s team doesn’t have a lot of development expertise.

My Evil Co-Worker likes the idea of building a whole application around a single Callable class - everything else would be a thin facade that hands off to the single Call function. They claim it's a way to obfuscate code, but I think it's just to annoy everyone.

Related


Monday, 27 August 2018

Lightning Emp API in Winter 19

Emp API in Winter 19

Introduction

It’s August. After weeks of unusually sunny days, the schools in the UK have broken up and the weather has turned. As I sit looking out at cloudy skies, my thoughts turn to winter. Winter 19 to be specific - the release notes are in preview and some of the new functionality has hit my pre-release org. The first item that I’ve been playing with is the new Emp API component, which takes away a lot of the boilerplate code that I have to copy and paste every time I create a component that listens for platform events.

From the preview docs, this component

Exposes the EmpJs Streaming API library which subscribes to a streaming channel and listens to event messages using a shared CometD connection. This component is supported only in desktop browsers. This component requires API version 44.0 and later.

What I Used to Do

Previously, to connect to the streaming API and start listening for events, I’d need code to:

  • Download the cometd library and put it into a static resource
  • Add the static resource to my component
  • Instantiate org.cometd.CometD
  • Call the server to get a session id
  • Configure cometd with the session id and the Salesforce endpoint
  • Carry out the cometd handshake
  • Subscribe to my platform event channel
  • Wiat for messages

What I do Now

  • Add the lightning:empApi component inside my custom component:
  • Add an error handler in case anything goes wrong
  • Subscribe to my platform event channel
  • Wait for a message

In practice this means my controller code has dropped from 70 odd lines to around 20,

Example

The first thing I need for an example is a platform event - I’ve created one called Demo_Event__e, which contains a single field named ‘Message__c’. This holds the message that I’ll display to the user.

My example component (Demo Events) actually uses a couple of standard components - the Emp API and the notifications library - the latter is used to show a toast message when I receive an event:

<lightning:empApi aura:id="empApi" /> 
<lightning:notificationsLibrary aura:id="notifLib"/>

The controller handles all the setup via a method invoked when the standard init event is fired. Before I can do anything I need a reference for the Emp API component:

var empApi = component.find("empApi");

Once I have this I can subscribe to my demo event channel - I’ve chosen a replayId of -1 to say start with the next event published. Note that I also capture the subscription object returned by the promise so that I can unsubscribe later if I need to (although my sample component doesn’t actually do anything with it).

var channel='/event/Demo_Event__e';
var sub;
var replayId=-1;
empApi.subscribe(channel, replayId, callback).then(function(value) {
      console.log("Subscribed to channel " + channel);
      sub = value;
      component.set("v.sub", sub);
});

I also provide a callback function that gets invoked whenever I receive a message. This simply finds the notification library and executes the showToast aura method that it exposes.

var callback = function (message) {
	component.find('notifLib').showToast({
      	"title": "Message Received!",
        "message": message.data.payload.Message__c
	}); 
}.bind(this);

On the server side I have a class exposing a single static method that allows me to publish a platform event:

public class PlatformEventsDemo 
{
    public static void PublishDemoEvent(String message)
    {
	    Demo_Event__e event = new Demo_Event__e(Message__c=message);
                Database.SaveResult result = EventBus.publish(event);
                if (!result.isSuccess()) 
        {
            for (Database.Error error : result.getErrors()) 
            {
                System.debug('Error returned: ' +
                             error.getStatusCode() +' - '+
                             error.getMessage());
            }
        }
    }
}

Running the Example

I’ve added my component to a lightning page - s it doesn’t have any UI you’ll have to take my word for it! Using the execute anonymous feature of the dev console, I publish a message:

Screen Shot 2018 08 25 at 13 51 12


And on my lightning app page, shortly afterwards I see the toast message:


Screen Shot 2018 08 25 at 13 49 55


More Information


Sunday, 5 August 2018

Putting Your TBODY on the Line

Putting Your TBODY on the Line

Table

Introduction

This week I’ve been working on a somewhat complex page built up from a number of Lightning components. One of the areas of the page is a table showing the paginated results of a query, with various sorting options available from the headings, and a couple of summary rows at the bottom of the page. The screenshot below shows the last few rows, the summary info and the pagination buttons.

Screen Shot 2018 08 04 at 17 34 06

The markup for this is of the following format:

<table>
<thead>
<tr>
<aura:iteration ...>
<th> _head_ </th>
</aura:iteration ...>
<tr>
</thead>
<tbody>
<tr>
<aura:iteration ...>
<td> _data_ </td>
</aura:iteration ...>
</tr>
...
<tr>
<td>_summary_</td>
<td>_summary_</td>
</tr>
<tr>
<td>_summary_</td>
<td>_summary_</td>
</tr>
</tbody>
</table>

So pretty much a standard HTML table with a couple of aura:iteration components to output the headings and rows. Obviously there’s a lot more to it than this, and styling etc, but for the purposes of this post those are the key details.

The Problem

Once I’d implemented the column sorting (and remembered that you need to return a value from an inline sort function, otherwise it’s deemed to mean that all the elements are equal to each other!), I was testing by mashing the column sort buttons and after a few sorts something odd happened:

Screen Shot 2018 08 04 at 17 35 10

The values inserted by the aura:iteration were sandwiched in between the two summary rows that should appear at the bottom.  I refreshed the page and tried again and this time it got a little worse:

Screen Shot 2018 08 04 at 17 33 32

This time the aura:iteration values appeared below both summary rows. I tested this on Chrome and Firefox and the behaviour was the same for both browsers. 

The Workaround

I’ve hit a few issues around aura:iteration in the past, although usually it’s been the body of that components rather than the surround ones, and I recalled that often the issue could be solved by separating the standard Lightning components with regular HTML. I could go with <tfoot>, but according to the docs this indicates that if the table is printed the summary rows should appear at the end of each page, which didn’t seem quite right.

I already had a <tbody>, but looking at the docs a table can have multiple <tbody> tags, to logically separate content, so another one of these sounded exactly what I wanted. Moving the summary rows into their own “section” as follows:

<table>
<thead>
<tr>
<aura:iteration ...>
<th> _head_ </th>
</aura:iteration ...>
<tr>
</thead>
<tbody>
<tr>
<aura:iteration ...>
<td> _data_ </td>
</aura:iteration ...>
</tr>
...
</tbody>
<tbody>
<tr>
<td>_summary_</td>
<td>_summary_</td>
</tr>
<tr>
<td>_summary_</td>
<td>_summary_</td>
</tr>
</tbody>
</table>

worked a treat. Regardless of how much I bounced around and clicked the headings, the summary rows remained at the bottom of the table as they were supposed to.

I haven’t been able to reproduce this with a small example component - it doesn’t appear to be related to the size of the list backing the table as I’ve tried a simple variant with several thousand members and the summary rows stick resolutely to the bottom fo the table. Given that I have a workaround I’m not sure how much time I’ll invest in digging deeper, but if I do find anything you’ll read about it here.

Related Posts


Saturday, 21 July 2018

Exporting Folder Metadata with the Salesforce CLI

Exporting Folder Metadata with the Salesforce CLI

Folder

Introduction

In my earlier post, Exporting Metadata with the Salesforce CLI, I detailed how to replicate the Force.com CLI export command using the Salesforce CLI. One area that neither of these handle is metadata inside folders, so reports, dashboards and earl templates. Since then I’ve figured out how to do this, so the latest version of the CLIScripts Github repo has the code to figure out which folders are present, and includes the contents of each of these in the export.

Identifying the Folders

This turned out to be a lot easier than I expected - I can simply execute a SOQL query on the Folder sobject type and process the results:

let query="Select Id, Name, DeveloperName, Type, NamespacePrefix from Folder where DeveloperName!=null";
let foldersJSON=child_process.execFileSync('sfdx', 
    ['force:data:soql:query',
        '-q', query, 
        '-u', this.options.sfdxUser,
        '--json']);

Note that I’m not entirely sure what it means when a folder has a DeveloperName of null - I suspect it indicates a system folder, but as the folders I was interested in appeared, I didn’t look into this any further.

I then created a JavaScript object containing a nested object for each folder type:

this.foldersByType={'Dashboard':{},
                    'Report':{}, 
                    'Email':{}}

and then parsed the resulting JSON, adding each result into the appropriate folder type object as a property named as the folder Id. The property contains another nested object wrapping the folder name and an array where I will store each entry from the the folder:

var foldersForType=this.foldersByType[folder.Type];
if (foldersForType) {
    if (!foldersForType[folder.Id]) {
        foldersForType[folder.Id]={'Name': folder.DeveloperName, 'members': []};
    }
}

Retrieving the Folder Contents

Once I have all of the folders stored in my complex object structure, I can query the metadata for each folder type - the dashboards in this instance - and build out my structure modelling all the folders and their contents:

let query="Select Id, DeveloperName, FolderId from Dashboard";
let dashboardsJSON=child_process.execFileSync('sfdx', 
    ['force:data:soql:query',
        '-q', query, 
        '-u', this.options.sfdxUser,
        '--json']);

I then iterate the results and add these to the members for the specific folder:

var foldersForDashboards=this.foldersByType['Dashboard'];
var folderForThisDashboard=foldersForDashboards[dashboard.FolderId];
if (folderForThisDashboard) {
    folderForThisDashboard.members.push(dashboard);
}

Adding to the Manifest

As covered in the previous post on this topic, once I’ve identified the metadata required, I have to add it to the manifest file - package.xml. 

I already had a method to add details of a metadata type to the package, so I extended that to include a switch statement to change the processing for those items that have folders. Using dashboards as the example again, I iterate all the folders and their contents, adding the appropriate entry for each:

case 'Dashboard':
    var dbFolders=this.foldersByType['Dashboard'];
    for (var folderId in dbFolders) {
        if (dbFolders.hasOwnProperty(folderId)) {
            var folder=dbFolders[folderId];
            this.addPackageMember(folder.Name);
            for (var dbIdx=0; dbIdx<folder.members.length; dbIdx++) {
                var dashboard=folder.members[dbIdx];
                this.addPackageMember(folder.Name + '/' + dashboard.DeveloperName);
            }
        }
    }
    break;

In the case of our BrightMedia appcelerator, the package.xml ends up looking something like this:

<types>
    <members>BG_Dashboard</members>
    <members>BG_Dashboard/BrightMedia</members>
    <members>BG_Dashboard/BrightMedia_digital_dashboard</members>
    <members>Best_Practice_Service_Dashboards</members>
    <members>Best_Practice_Service_Dashboards/Service_KPIs</members>
    <members>Sales_Marketing_Dashboards</members>
    <members>Sales_Marketing_Dashboards/Sales_Manager_Dashboard</members>
    <members>Sales_Marketing_Dashboards/Salesperson_Dashboard</members>
    <name>Dashboard</name>
</types>

Exporting the Metadata

One thing to note is that the export is slowed down a bit as there are now six new round trips to the server - three for each of the folder types, and three more to retrieve the metadata for each type of folder. Exporting the metadata using the command:

node index.js export -u <username> -d output

creates a new output folder containing the zipped metadata. Unzipping this shows that the dashboard metadata has been retrieved as expected:

> ls -lR dashboards

total 24
drwxr-xr-x 5 kbowden staff 160 21 Jul 15:29 BG_Dashboard
-rw-r--r-- 1 kbowden staff 154 21 Jul 14:27 BG_Dashboard-meta.xml
drwxr-xr-x 5 kbowden staff 160 21 Jul 15:29 Best_Practice_Service_Dashboards
-rw-r--r-- 1 kbowden staff 174 21 Jul 14:27 Best_Practice_Service_Dashboards-meta.xml
drwxr-xr-x 6 kbowden staff 192 21 Jul 15:29 Sales_Marketing_Dashboards
-rw-r--r-- 1 kbowden staff 180 21 Jul 14:27 Sales_Marketing_Dashboards-meta.xml

dashboards//BG_Dashboard:
total 48
-rw-r--r-- 1 kbowden staff 2868 21 Jul 14:27 BrightMedia.dashboard
-rw-r--r-- 1 kbowden staff 6917 21 Jul 14:27 BrightMedia_digital_dashboard.dashboard


dashboards//Best_Practice_Service_Dashboards:
total 88
-rw-r--r-- 1 kbowden staff 8677 21 Jul 14:27 Service_KPIs.dashboard

dashboards//Sales_Marketing_Dashboards:
total 96
-rw-r--r-- 1 kbowden staff 10317 21 Jul 14:27 Sales_Manager_Dashboard.dashboard
-rw-r--r-- 1 kbowden staff 8046 21 Jul 14:27 Salesperson_Dashboard.dashboard

One more thing

I also fixed the export of sharing rules, so rather than specifying SharingRules as the metadata type, it specifies the three subtypes of sharing rule (SharingCriteriaRule, SharingOwnerRule, SharingTerritoryRule) required to actually export them!

Related Posts


Saturday, 14 July 2018

Lighting Component Attributes - Expect the Unexpected

Lighting Component Attributes - Expect the Unexpected


UnexpectedIntroduction

A couple of weeks ago my BrightGen colleague, Firoz Mirza, described some unexpected (by us at least) behaviour when dealing with Lightning Component attributes. I was convinced that there must be something else going on so spent some time creating a couple of simple tests, only to realise that he was absolutely correct and attributes work a little differently to how I thought, although if I’m honest, I’ve never really thought about it.

Tales of the Unexpected 1

The basic scenario was assigning a Javascript variable to the result of extracting the attribute via component.get(), then calling another method that also extracted the value of the attribute, but crucially also changed it and set it back into the component. A sample component helper that works like this is:

({
    propertyTest : function(cmp) {
	var testVar=cmp.get('v.test');
        alert('Local TestVar = ' + JSON.stringify(testVar));
        this.changeAttribute(cmp);
        alert('Local TestVar after leaving it alone = ' + JSON.stringify(testVar));
    },
    changeAttribute : function(cmp) {
        var differentVar=cmp.get('v.test');
        differentVar.value1='value1';
        cmp.set('v.test', differentVar);
    }
})

The propertyTest function gets the attribute from the component and assigns it to testVar. After showing the value, it then invokes changeAttribute, which gets the attribute and assigns it to a new variable, updates it and then sets it back into the component.

Executing this shows the value of the property is empty, as expected to begin with:

Screen Shot 2018 07 14 at 13 49 09

but after the attribute has been updated elsewhere, my local variable reflects this:

Screen Shot 2018 07 14 at 13 50 27


Tales of the Unexpected 2

After a bit more digging, I came across something that I expected even less - updating a local variable that stored the result of the component.get() for the attribute, changed the value in the component. So I updated my sample component to test this:

    propertyTest2: function(cmp) {
	var test2=cmp.get('v.test');
        test2.value2='value2';
        alert('Local test2 = ' + JSON.stringify(test2));
        this.checkAttribute(cmp);
    },
    checkAttribute: function(cmp) {
        var otherVar=cmp.get('v.test');
        alert('Other var = ' + JSON.stringify(otherVar));
    }

Executing this shows my local property value being updated as expected:

Screen Shot 2018 07 14 at 14 01 51

but then retrieving this via another variable showed that it appeared to have been updated in the component:

Screen Shot 2018 07 14 at 14 02 28

“Maybe it’s just because everything is happening in the same request” I thought, but after this request completed I executed the first test, so extracting the value in a separate request (transaction) showed that the attribute had indeed been updated in a way that persisted across requests:

Screen Shot 2018 07 14 at 14 03 44

Checking the Docs

Convinced that I must have missed this in the docs, I went back to the Lightning Components Developer Guide, Working with Attribute Values in JavaScript section, but only found the following:

component.get(String key) and component.set(String key, Object value) retrieves and assigns values associated with the specified key on the component.

which didn’t add anything to what I already knew. 

Asking the Experts

I then asked the question of Salesforce, with my sample components, and received the following response:

The behavior you’re seeing is expected. 

component.set() is a signal to the framework that you’ve changed a value. The framework then fires change handlers, rerenders, and so forth. 

The underlying value is a JavaScript object, array, primitive, or otherwise. JavaScript object’s and arrays are mutable. Aura’s model requires that you send that signal when you mutate an object or array.

Conclusion

So there you have it - a local variable assigned the result of component.get() gives you a live hook to the component attribute, and if it’s mutable then any changes you make to the local variable update the attribute regardless of whether you call component.set() or not. Good to know!

I think the docs could certainly use with some additional information to make this clear. It’s written down here, at least, so hopefully more people will know going forward!

Related Posts


Saturday, 7 July 2018

Exporting Metadata with the Salesforce CLI

Exporting Metadata with the Salesforce CLI

Exit

Introduction

Regular readers of this blog are all too aware that I’m a big fan of the Salesforce CLI. I rarely use anything else to interact with Salesforce orgs, outside of the main UI. Prior to this I used the Force.com CLI, which is another excellent tool, though didn’t give me quite enough information about operations to switch to it exclusively.

One area where the Force.com CLI still beats the default functionality of the Salesforce CLI is the export command, which pull back most of the metadata from an org (except reports, dashboards, and email templates, where you have to jump through a few hoops to get folder names first). Switching back to the Force.com CLI to take a backup of an org started to get a bit repetitive, so I decided to write something to replicate the functionality using the Salesforce CLI.

To Plugin or Not to Plugin

After some consideration, I decided not to plugin. I need to do some work and then execute a deployment via the Salesforce CLI, and there’s currently no way to execute a command from a plugin. I could shell out of the plugin and execute the CLI as a new child process, but that seemed a bit clunky. Plus where does it end? We’d end up with plugins creating child sfdx commands that were plugins that created child sfdx commands - a house of cards made of processes and just as fragile. I’d also seen Dave Carroll call this approach an anti-pattern on twitter and I didn’t want him mad at me, so I went with a node script that wraps everything up into a single command from the users point of view.

The Node Code

As I plan to do more of this sort of thing, rather than having loads of different scripts to execute I went with one script that offers subcommands. Kind of like a CLI all of it’s own, but very lightweight.

In order to support subcommands I used the commander module - I’ve used this a few times in the past and it’s really straightforward. I just configure it with the subcommands and their options and it figures out which one to execute and parses the arguments for me:

var exportCmd=program.command('export')
		 .option("-u, --sfdx-user [which]", "Salesforce CLI username")
		 .option("-d, --directory [which]", "Output directory")
                 .action(function(options) {new ExportCommand(options).execute()});

program.parse(process.argv);

The export command is responsible for generating a package.xml manifest file containing details of all the metadata to retrieve and then executing a metadata API retrieve.


It contains a list of the names metadata components to extract:

const allMetadata=[
    "AccountSettings",
    "ActivitiesSettings",
    "AddressSettings",
    "AnalyticSnapshot",
    "AuraDefinitionBundle",
         ...
“CustomObject”,
... "ValidationRule", "Workflow" ];

The one wrinkle here is the standard objects. If I wildcard the CustomObject metadata type, this will just retrieve my custom objects. To include the standard objects, I have to explicitly name each of them. Luckily the Salesforce CLI provides a way for me to extract these - force:schema:sobject:list, so I can pull these back and turn them into a list of names:

var standardObjectsObj=child_process.execFileSync('sfdx', 
                    ['force:schema:sobject:list', 
                        '-u', this.options.sfdxUser, 
                        '-c', 'standard']);

var standardObjectsString=standardObjectsObj.toString();
standardObjects=standardObjectsString.split('\n');

for (var idx=standardObjects.length-1; idx>=0; idx--) {
    if ( (standardObjects[idx].endsWith('__Tag')) ||
         (standardObjects[idx].endsWith('__History')) ||
         (standardObjects[idx].endsWith('__Tags')) ) {
         standardObjects.splice(idx, 1);
    }
}

Then I can generate the package.xml by iterating the list of metadata names and adding a wildcard entry for each of them, and append the standard objects when the metadata name is CustomObject:

for (var idx=0; idx<allMetadata.length; idx++) {
    var mdName=allMetadata[idx];
    this.startTypeInPackage();
    if (mdName=='CustomObject') {
        for (var soIdx=0; soIdx<standardObjects.length; soIdx++) {
            this.addPackageMember(standardObjects[soIdx]);
        }
    }
    this.addPackageMember('*');
    this.endTypeInPackage(mdName);
}

Once the package.xml is written, I can then execute a force:mdapi:retrieve to pull back all of the available metadata:

child_process.execFileSync('sfdx', 
                ['force:mdapi:retrieve', 
                    '-u', this.options.sfdxUser, 
                    '-r', this.options.directory, 
                    '-k', this.packageFilePath]);

Export all the Metadata!

(The full source code is available at the Github repo. If you want to try this out yourself, clone the repo, change into the directory containing the clone and run npm install to pull down the dependencies.)

To export the metadata I execute:

node index.js export -u keir.bowden@train.bb -d output

Where -u specifies the username that I’ve previously authorised with the Salesforce CLI (I’m using the client dev org for my training system), and -d is the directory where the package.xml will be created and the metadata extracted to. If this directory doesn’t exist it will be created.

The output is just a couple of lines telling me it succeeded:

Exporting metadata
Metadata written to output/unpackaged.zip

The contents of the output subdirectory shows the package.xml and zip file retrieved from Salesforce:

$ ls -lrt
total 928
-rw-r--r-- 1 kbowden staff 20110 7 Jul 12:49 package.xml
-rw-r--r-- 1 kbowden staff 453236 7 Jul 12:50 unpackaged.zip

unzipping the unpackaged.zip file creates an unpackaged directory containing the retrieved metadata:

$ unzip unpackaged.zip
Archive: unpackaged.zip
inflating: unpackaged/labels/CustomLabels.labels
   …

$ cd unpackaged
$ ls -l
total 48
drwxr-xr-x 16 kbowden staff 512 7 Jul 12:52 applications
drwxr-xr-x 4 kbowden staff 128 7 Jul 12:52 assignmentRules
    …
drwxr-xr-x 7 kbowden staff 224 7 Jul 12:52 tabs
drwxr-xr-x 4 kbowden staff 128 7 Jul 12:52 triggers

and hey presto, my org is exported without having to revert back to the Force.com CLI.

Related Posts


Friday, 29 June 2018

Adding Signature Capture to a Lightning Flow

Adding Signature Capture to a Lightning Flow

Screen Shot 2016 11 07 at 18 36 19

Introduction

As regular readers of this blog know, a few years ago I wrote a Lightning Component for the launch of the Component Exchange called Signature Capture which, in a shocking turn of events, allows a user to capture a signature image and attach it to a Salesforce record. Over the years it’s received various enhancements and when these are notable I write a blog post about it. The latest version satisfies this requirement as it adds support for inclusion in Lightning flows. Note that the rest of this post assumes that you are working with V1.31 of Signature Capture or higher.

The Scenario

I’m going for a pretty simple scenario - a custom button on the a Salesforce record starts a flow that contains just the Signature Capture component. Once the user is happy with the signature and saves it, finishing the flow returns them to the record that they started from.

Creating the Flow

If you are a metadata type, you can install the demo flow from the Signature Capture Samples Git repository. It’s called Signature_Capture don’t forget to activate it.

If not, carry out the following steps to create the flow:

  1. Open the flow designer
  2. Click on the ‘Resources’ tab and on the resulting list click ‘Variable'

    Screen Shot 2018 06 28 at 16 51 15

  3. Create a new variable named ‘recordId’ and click OK - this will contain the Id of the record that the user wishes to capture a signature against.

    Screen Shot 2018 06 28 at 16 47 32
     
  4. Click the ‘Palette’ tab and on the resulting list drag ‘Screen’ onto the canvas:

    Screen Shot 2018 06 28 at 16 52 41

  5. Fill in the ‘Name’ as desired - I went for ‘Signature Capture’ as I’m a creative type:

    Screen Shot 2018 06 28 at 16 56 54

  6. Click the ‘Add a Field’ tab and scroll to the bottom of the list and choose ‘Lightning Component’:

    Screen Shot 2018 06 28 at 16 57 27

  7. Click the ‘Field Settings’ and configure as shown below - note that I had to remove the entry that was automatically added to the ‘Outputs’ tab before I could save. Make sure to set the value of the 'Record Id' attribute to the 'recordId’ variable - this ensures that the captured signature is stored against the correct Salesforce record.

    Screen Shot 2018 06 28 at 16 58 23

  8. Set the screen as the start element
  9. Save the flow
  10. Activate the flow

And that’s it! Straightforward but the flow isn’t very useful as it’s not attached to anything.

Creating the Custom Button

Using the URL of the flow seems pretty clunky, but what can we do?

  1. Open the flow and copy the URL value:

    Screen Shot 2018 06 28 at 17 02 40

  2. Navigate to the setup page for the object you want to be able to launch the flow from (I’ve gone for Account) and click ‘Buttons, Actions, and Links’
  3. On the resulting page, click ‘New Button or Link'
  4. Configure the button as follows, replacing the ‘Button or Link URL’ with the concatenation of your flow URL (copied in step 1) and the appropriate record id for for the sobject type. The retURL parameter is the secret sauce to send the user back to the record when they finish the flow:

    Screen Shot 2018 06 28 at 17 19 11

  5. After saving, click the ‘Page Layouts’ link from the sObject setup page.
  6. Choose the layout to add the button to.
  7. On the resulting page builder, select the 'Mobile & Lightning Actions’ item from the palette:

    Screen Shot 2018 06 28 at 17 08 23

  8. And drag your new custom button on to the 'Salesforce Mobile and Lightning Experience Actions’ section:

    Screen Shot 2018 06 28 at 17 08 26

  9. Save the page layout

Enable Lightning Flow

Flows containing Lightning components require lightning flow to be enabled.

  1. Navigate to Setup -> Process Automation -> Process Automation Settings
  2. Check the ‘Enable Lightning runtime for flows’ box:


    Screen Shot 2018 06 28 at 17 12 53

  3. Save the settings.

Take it for a Spin

Once everything is in place you can launch the flow by navigating to a record of the appropriate sObject type and clicking the custom button. The video below shows my flow configured above being launched and completed from an account record:

Related Posts