Saturday, 23 May 2015

Lightning Component Events

Introduction

One of the common challenges in Visualforce involved communication between pages and components, or components and components.  Solutions typically involved passing controller instances as attributes, preferably wrapped up in an interface to avoid directly coupling presentation items to specific Apex classes.  This allowed a component to execute a callback in the related component/page controller, but only in response to a postback, as JavaScript remoting or Rest API is stateless and wouldn’t have access to the controller passed in as an attribute. 

Lightning Application Events

Lightning components simplify this enormously via the application events functionality. This allows components/applications to fire events that are consumed by other components that subscribe to them - publish and subscribe in all its glory.

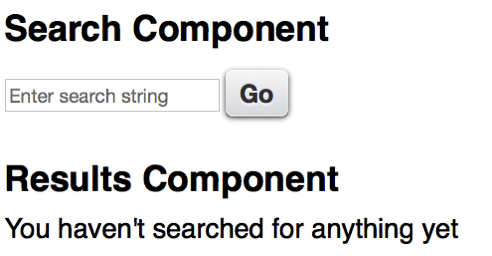
To give a simple and useless example, I have an application that allows a user to enter a search term:

Screen Shot 2015 05 23 at 17 34 39

and when the search term is entered, display an unhelpful message about it;

Screen Shot 2015 05 23 at 17 37 13

The Event

The markup for the event is pretty simple:

<aura:event type="APPLICATION" description="Search Event">
    <aura:attribute name="term" type="String" />
</aura:event>

this event takes a single attribute - the string that has been searched for.

Search Component

The search component declares that it fires the event:

<aura:registerEvent name="SearchEvent" type="bblightning:SearchEvent" />

while the event is constructed and fired from the helper, via a controller method, when the user clicks the search button:

var searchTerm=component.get("v.term");
    $A.get("e.bblightning:SearchEvent").
	 setParams({term: searchTerm}).fire();

“v.term” here refers to a component attribute, which backs the search term input field.

Results Component

The results component declares that it handles the event via the searched controller function:

<aura:handler event="bblightning:SearchEvent" action="{!c.searched}"/>

the searched function simply delegates handling of the event to a helper method, which generates the message to let the user know that their efforts haven’t been in vain:

searched : function(component, event) {
    var searchedTerm=event.getParam("term");
    component.set('v.msg',
                  'You searched for the term [' + searchedTerm +
                  '] - if I had an Apex controller, ' +
                  ' I might find some matching records');
}


Putting It All Together

The actual functionality here is pretty immaterial, hence my being so dismissive of it.  The important aspect is revealed when viewing the application markup:

<aura:application >
    <div class="padded">
	<c:SearchForm />
    	<c:SearchResults />
    </div>
</aura:application>

The first component produces the form, while the second component displays the results. Note that there is nothing wiring the two components together in the markup, so I could just as easily assemble this application using the Lightning App Builder. What isn’t apparent through the markup is that all of this takes place client side and is very fast. Any future components that want to capture the search term, for logging/audit purposes for example, simply need to handle the event and be added to the application.

The full source for this marvellous application, related components and event is available in my Lighting Examples GitHub repository - look for the src/aura/Search* elements.

Related Posts


Wednesday, 6 May 2015

International Day against DRM

2015 Banner

If you’ve ever visited this blog before, you’ll know that I wrote a bestseller called the Visualforce Development Cookbook, and that each page of this blog contains a link to allow a smooth and easy purchase.  If you’ve been holding off adding to your cart waiting for a better price, wait no longer. For today only (6th May 2015) you can have your very own copy for just $10.

That’s right, $10. Packt Publishing are celebrating International Day against DRM by offering all e-books and videos for just $10 for one day only. Here’s the official word:


Packt celebrates International Day Against DRM, May 6th 2015 


Packt Publishing firmly believes that you should be able to read and interact with your content when you want, where you want, and how you want – to that end they have been advocates of DRM-free content since their very first eBook was published  back in 2004. 


This year, to demonstrate their continuing support for Day Against DRM, Packt is offering all its DRM-free content at $10 for 24 hours only on May 6th – with more than 3000 eBooks and 100 Videos available across the publisher’s website www.packtpub.com, there’s plenty to discover, whatever you’re interested in.

“Our top priority at Packt has always been to meet the evolving needs of developers in the most practical way possible, while at the same time protecting the hard work of our authors. DRM-free content continues to be instrumental in making that happen, providing the flexibility and freedom that is essential for an efficient and enhanced learning experience. That’s why we’ve been DRM-free from the beginning – we’ll never put limits on the innovation of our users.” 

– Dave Maclean, CEO


Advocates of Day Against DRM are invited to spread the word and celebrate on May 6th by exploring the full range of DRM-free content at www.packtpub.com - all eBooks and Videos will be $10 for 24 hours, including the latest hot titles.


You can find out more information at: http://bit.ly/1AEPeiW

Sunday, 3 May 2015

Lightning Components and CSS Media Queries


NewImage

Overview

When building Lightning Components, its highly likely that you will be aiming to support multiple form factors - tablets, phones and maybe even desktops.  In order to achieve this, Responsive Web Design techniques need to be employed (for an overview of Responsive Design and an example of achieving this using Visualforce and the Bootstrap framework, see my post in the Salesforce Developers Technical Library). 

When using a framework such as Foundation or Bootstrap, its simply a matter of using the appropriate Lightning component, as described my earlier post on Lightning Components and JavaScript Libraries. Keeping the styling with the component presents a little more of a challenge.

Styling Lightning Components

Styling Lightning components is well documented, and involves adding styles to the component bundle. Here’s an component that renders a case, generating two fields per line through use of CSS floats.

Component:

<aura:component >
    <aura:attribute name="case" type="Case" description="Case to display" />
	<h1>
        <ui:outputText aura:id="caseNum" value="{!v.case.CaseNumber}"/>
    </h1>
	<div class="caseFieldLeft">
        <label>Subject: </label>
        <ui:outputText aura:id="subject" value="{!v.case.Subject}"/>
    </div>
	<div class="caseFieldRight">
        <label>Created: </label>
        <ui:outputDateTime aura:id="created" value="{!v.case.CreatedDate}"/>
    </div>
	<div class="caseFieldLeft">
        <label>Priority: </label>
        <ui:outputText aura:id="priority" value="{!v.case.Priority}"/>
    </div>
	<div class="caseFieldRight">
        <label>Status: </label>
        <ui:outputText aura:id="subject" value="{!v.case.Status}"/>
    </div>
</aura:component>

Style:

.THIS.caseFieldLeft {
    padding: 2px 4px 2px 2px;
    width: 45%;
    float: left;
    clear: both;
}
.THIS.caseFieldRight {
    padding: 2px 4px 2px 2px;
    width: 45%;
    float: right;
}
h1.THIS {
    padding: 4px 2px 4px 2px;
    font-size: 1.5em;
    clear: both;
}

For the sake of completeness, here are gists for the containing Lightning App, JavaScript Controller, JavaScript Helper and Apex Controller.

Using this component to render a list of cases results in the following:

NewImage

which is readable, if not exactly easy on the eye. However, when rendered on a phone sized viewport the experience is not so good:

NewImage

The Subject in particular isn’t really readable, and ideally I’d drop down to a field per line.

Adding Media Queries

Generating a field per line is simply a matter of adding a media query that takes effect for smaller devices - below is an example which does this for devices with a width of 980px or less:

@media all and (max-width: 980px) {
    .caseFieldLeft {
	    padding: 2px 4px 2px 2px;
	    width: 100%;
	    float: none;
	}
	.caseFieldRight {
	    padding: 2px 4px 2px 2px;
	    width: 100%;
	    float: none;
	}
}

As of May 2015 there’s one problem using this - the Style element of the component bundle won’t accept media queries. I’ve tried quite a number of combinations which always end up with the same result - a parse error.

Update 20/08/2015

The media query syntax is now supported in Lightning Component style elements (and may have been since the Summer 15 release I guess - this is the first chance I've had to revisit). Simply use the same style names that aren’t subject to the media query (remembering to include the .THIS to namespace to the component) :

 
@media all and (max-width: 980px) {
.THIS.caseFieldLeft {
padding: 2px 4px 2px 2px;
width: 100%;
float: none;
}
	.THIS.caseFieldRight {
padding: 2px 4px 2px 2px;
width: 100%;
float: none;
	}
}

and now viewing on a small device is an improved, if not enjoyable, experience!

NewImage

Related Posts

Saturday, 25 April 2015

Lightning Components and JavaScript Libraries

Lightning Components and JavaScript Libraries

The Problem

Anyone who has been following the Salesforce developer community’s work with Lightning Components closely will no doubt have read a few posts around including JavaScript libraries into components. This has more stringent security requirements, in that you have to load the JavaScript via a static resource rather than an external CDN from the likes of Google or Microsoft, but that’s not really anything to worry about, as it only adds a few minutes to development. What has been an issue is the order of library loading, and the fact that the libraries aren’t always initialised as they should be in an afterRender handler.  

Workarounds

Enrico Murro did a great job of writing this up on his blog, and produced a sample solution based on Require.js. Another solution was provided by Skip Sauls, as detailed on this Stack Exchange thread.

I wasn’t particularly keen on adding additional libraries and/or unmanaged packages, so my approach was to move the JavaScript that relied on included libraries out of initialisation functions and behind buttons that users clicked. I wasn’t particularly keen on my own solution either, but it looking for better workarounds seemed likely to be a not great use of my time, as I was convinced that there would be a native solution before long.

The Solution

And here is the native solution as of the Spring 15 release - the <ltng:require /> component. This allows you to specify the JavaScript and CSS files that your component relies on, and these will be loaded in the order that you list them.  It also provides an afterScriptsLoaded attribute that allows you to define a client-side controller to execute once everything is loaded, to carry out your initialisation processing. 

Here’s an example of where I’ve used this to load the QUnit JavaScript testing framework and the SinonJS stub/mock framework and then execute a test from the controller. First the markup that lists the required artifacts:

<ltng:require scripts="/resource/qUnitJS_1_18_0,/resource/Sinon_1_14_1"
    styles="/resource/qUnitCSS_1_18_0" afterScriptsLoaded="{!c.doInit}"/>

the controller method:

doInit : function(component, event, helper) {
	helper.runTests();
}

which is a lot less effort and/or a better user experience than the workarounds. Once again, masterful inactivity pays off!

Related

Saturday, 18 April 2015

Lightning, Visualforce and the DOM

Lightning, Visualforce and the DOM

Introduction

Lightning Components entered beta in the Spring 15 release, were the subject of a Salesforce Developer Week and have been generating a huge amount of interest ever since. Developers now face a choice when building a custom Salesforce UI of whether to use Visualforce or Lightning. To my mind they each bring their own pros and cons, but one scenario where Lighting is an obvious choice (with a few caveats) an application where the business logic will reside on the client in JavaScript.

Demo Page

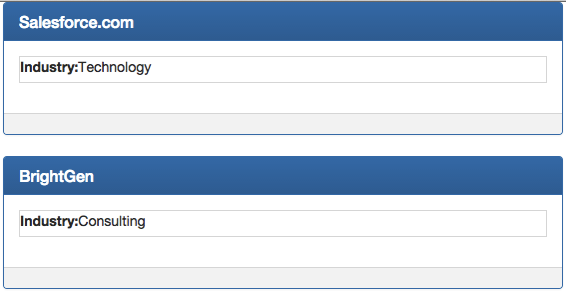
To demonstrate this, I’m building two versions of a simple page to output basic account details in Bootstrap panels:
Screen Shot 2015 04 18 at 15 31 40

Lightning Implementation

One distinguishing feature of the lightning implementation is the number of artefacts :

  • Apex Controller to provide access to data
  • Lightning Component Bundle to output the account panels, consisting of:
    • Lightning Component
    • JavaScript controller
    • JavaScript helper
  • Lightning Application to provide an URL-addressable "page" to view the component

The Apex controller has a single method to retrieve the accounts - note how I can re-use the same method across Lightning and Visualforce by applying more than one annotation:

public class AccountsListController
{
    @AuraEnabled
    @RemoteAction
    public static List<Account> GetAccounts()
    {
        return [SELECT id, Name, Industry, CreatedDate
                FROM Account
                ORDER BY createdDate DESC];
    }
 }

The lightning component is a little lengthy, due to the HTML markup to generate the Bootstrap panels, so I’ve made it available at this gist. The interesting aspects are:

<aura:attribute name="accounts" type="Account[]" />
<aura:handler name="init" value="{!this}" action="{!c.doInit}" />

the first line defines the list of accounts that the component will operate on, while the second defines the JavaScript controller action that will be executed when the component is initialised, which will populate the accounts from the database into the attribute.

The markup to output the panels for the accounts utilises an aura:iteration component,which wraps the bootstrap panel HTML and allows merge fields to be used to access account fields:

<aura:iteration items="{!v.accounts}" var="acc">
  <div class="row-fluid">
    <div class="col-xs-12 fullwidth">
      <div class="panel panel-primary">
        <div class="panel-heading">
	  <h3 class="panel-title">{!acc.Name}</h3>
        </div>
      ....
</aura:iteration>

for those from a Visualforce background this is a familiar paradigm - a custom tag that binds to the collection, followed by HTML and merge fields to format the collection elements.

The JavaScript controller is very simple, most of the work is done in the helper, in order to allow reuse elsewhere in the bundle in the future: 

({
    doInit: function(component, event, helper) {
	// Display accounts
	helper.getAccounts(component);
    }
})

The JavaScript helper doesn’t have a huge amount of code in it either - it creates an action tied to a server side method, defines the callback to be executed when the action completes and queues the action:

({
  getAccounts: function(component) {
	var action = component.get("c.GetAccounts");
	var self = this;
	action.setCallback(this, function(a) {
		component.set("v.accounts", a.getReturnValue());
	});
	$A.enqueueAction(action);
  }
})

the most interesting aspect of this code is the line that sets component’s accounts attribute to the result of the action:

component.set("v.accounts", a.getReturnValue());

that’s all I need to do to update the contents of the page - due to the data binding of the aura:iterator, updating the attribute rewrites the DOM with the new markup to display the accounts. 

For the sake of completeness, here’s the markup for the Lightning application, which provides a way for the component to be accessed via a URL:

<aura:application >
    <c:AccountsList />
</aura:application>

Visualforce Implementation

To implement the page in Visualforce, I have the following artefacts:

  • Apex Controller (the same one as in the Lightning section, above)
  • Visualforce Page
  • Visualforce Component containing the JavaScript business logic. This could reside in the page, but I find it easier to write JavaScript in a component without the potential distraction or confusion of the HTML markup. 

The Visualforce page has a small amount of markup to pull in the bootstrap resources and provide the containing responsive grid:

<apex:page controller="AccountsListController" applyHtmlTag="false" sidebar="false"
           showHeader="false" standardStyleSheets="false">
  <html>
    <head>
      <apex:stylesheet value="{!URLFOR($Resource.Bootstrap_3_3_2, 'bootstrap-3.3.2-dist/css/bootstrap.min.css')}"/>
      <apex:stylesheet value="{!URLFOR($Resource.Bootstrap_3_3_2, 'bootstrap-3.3.2-dist/css/bootstrap-theme.min.css')}"/>
      <apex:includescript value="{!$Resource.JQuery_2_1_3}" />
      <apex:includeScript value="{!URLFOR($Resource.Bootstrap_3_3_2, 'bootstrap-3.3.2-dist/js/bootstrap.min.js')}"/>
      <c:AccountsListJS />
    </head>
    <body>
      <div class="container-fluid">
        <div class="row-fluid">
            <div class="col-xs-12 col-md-9">
                <div id="accountsPanel">
                </div>
            </div>
        </div>
      </div>
    </body>
  </html>
</apex:page>

while the heavy lifting is done by the JavaScript in the AccountsListJS component. Again this is somewhat lengthy so I’ve made it available as a gist. One aspect that stands out is the JavaScript to process the accounts received from the server and display the bootstrap panels:

renderAccs : function(accounts) {
            var markup='';
            $.each(accounts, function(idx, acc) {
                            markup+= '  <div class="row-fluid"> \n' +
                                    '    <div class="col-xs-12 fullwidth"> \n' +
                                    '      <div class="panel panel-primary"> \n' +
                                    '        <div class="panel-heading"> \n' +
                                    '          <h3 class="panel-title">' + acc.Name + '</h3> \n' +
                                    '        </div> \n' +
                                    '        <div class="panel-body"> \n' +
                                    '          <div class="top-buffer table-responsive"> ' +
                                    '            <label>Industry: </label>' + acc.Industry +
                                    '          </div> \n' +
                                    '        </div> \n' +
                                    '        <div class="panel-footer"> \n' +
                                    '       </div> \n' +
                                    '      </div> \n' +
                                    '    </div> \n' +
                                    '  </div> \n' +
                                    '  <div class="fluid-row"> \n' +
                                    '    <div class="col-xs-12 top-buffer"> \n ' +
                                    '    </div> \n' +
                                    '  </div> \n';
                        });
    $('#accountsPanel').html(markup);
}

 in the Visualforce case, the DOM manipulation to render the Bootstrap panels is entirely down to me - I have to iterate the returned list of accounts, programmatically generate all of the HTML and then set this into the HTML element with the id of “accountsPanel”. This hardly satisfies the separation of concerns design principle, as it tightly couples the business logic with the presentation. If I decide to move to another presentation framework, I have to change the HTML markup and the JavaScript. Its also much more error prone - Douglas Crockford described the browser as a hostile environment to program in for good reason. I could alleviate this by introducing a framework such as Knockout, but that comes with its own learning curve.

Conclusion

So does this mean that we can forget about Visualforce when building apps that primarily execute client-side? Not entirely at present, at least in in my opinion.  Bootstrap lends itself well to Lightning, as its only really concerned with the display of data - it doesn’t try to handle requests and routing, and doesn’t make much use of JavaScript to style elements.  Integration with a framework that carries out progressive enhancement, such as jQuery Mobile, would require a fair bit of custom JavaScript to re-apply the progressive enhancement to the updated DOM elements. 
Saturday, 4 April 2015

Loading Salesforce Data into Analytics Cloud

Loading Salesforce Data into Analytics Cloud

Introduction

In my earlier post on Analytics Cloud (aka Salesforce Wave) I showed how to load data from a CSV file. Another common use case is to load Salesforce data, such as Cases and Opportunities, for example to see how performance has improved (or otherwise!) over time.

Setting Up

To get started, access the Data Monitor page by clicking the gear icon:

Screen Shot 2015 04 04 at 16 44 04

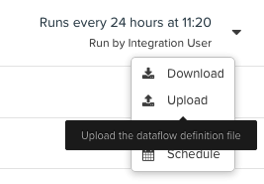
this takes you to the Dataflow View. The Analytics Cloud provides a Default Salesforce Dataflow that you can download from the drop down on the right hand side of the page:

Screen Shot 2015 04 04 at 16 47 23

This will download a Dataflow Definition file in JSON format. The default data flow is documented in the Analytics Cloud Implementation Guide, so I won’t go into further detail on that here. Instead I’ll walk through a Dataflow Definition that I use to bring the case data from my Salesforce instance. The full JSON file can be downloaded from the Related section below.

Loading Case Data

The following JSON stanza pulls the Case records and creates an interim dataset called “Extract_Cases” - the dataset name is important as will be explained later:

    "Extract_Cases":{
        "action":"sfdcDigest",
        "parameters":{
            "object":"Case",
            "fields":[
                {
                    "name":"CaseNumber"
                },
                {
                    "name":"ContactId"
                },
                {
                    "name":"AccountId"
                },
                {
                    "name":"Type"
                },
                {
                    "name":"Hours_Worked__c"
                },
                {
                    "name":"Subject"
                },
                {
                    "name":"Status"
                },
                {
                    "name":"Description"
                },
                {
                    "name":"CreatedDate"
                },
                {
                    "name":"ClosedDate"
                }
            ]
        }
    }

this pulls all of the case data, but the account and contact information is only available as Salesforce IDs, which isn’t particularly helpful if I want to investigate performance for specific customers, so I need to augment the dataset with the Account and Contact details. The first thing I need to do is extract the Account and Contact data to interim datasets:

    "Extract_Contacts":{
        "action":"sfdcDigest",
        "parameters":{
            "object":"Contact",
            "fields":[
                {
                    "name":"Id"
                },
                {
                    "name":"Name"
                }
            ]
        }
    },
    "Extract_Accounts":{
        "action":"sfdcDigest",
        "parameters":{
            "object":"Account",
            "fields":[
                {
                    "name":"Id"
                },
                {
                    "name":"Name"
                }
            ]
        }
    }

 Once I have the Account/Contact datasets, I can augment the interim Case dataset, first with the contact name. Note that I have to specify the “Extract_Cases” interim cases dataset as the “left” parameter value and the “Extract_Contacts” dataset as the “right”. the left/right_key parameters define the fields from each dataset that tie the contacts to the cases, The results of the transformation are stored in the interim dataset “Transform_Augment_CaseWithContactDetails" :

    "Transform_Augment_CaseWithContactDetails":{
        "action":"augment",
        "parameters":{
            "left":"Extract_Cases",
            "left_key": [ "ContactId" ],
            "relationship": "CaseContact",
            "right":"Extract_Contacts",
            "right_key": [ "Id" ],
            "right_select":[
                "Name"
            ]
        }
    }

Next, I augment the Account name - note that the “left” parameter dataset value is “Transform_Augment_CaseWithContactDetails” - the dataset created after augmenting with the contact name.  If I use the original “Extract_Cases” dataset I discard the contact information I’ve worked so hard to add. This is something I have real trouble remembering for some reason!

    "Transform_Augment_CaseWithAccountDetails":{
        "action":"augment",
        "parameters":{
            "left":"Transform_Augment_CaseWithContactDetails",
            "left_key": [ "AccountId" ],
            "relationship": "CaseAccount",
            "right":"Extract_Accounts",
            "right_key": [ "Id" ],
            "right_select":[
                "Name"
            ]
        }
    }

Now that the Account/Contact information has been added to the Cases, I can register the fully augmented dat set so that it can be used in the Analytics Cloud: 

    "Register_Dataset_ClosedCases":{
        "action":"sfdcRegister",
        "parameters":{
            "alias":"AllCases",
            "name":"AllCases",
            "source":"Transform_Augment_CaseWithAccountDetails"
        }
    }

I then upload the Dataflow via the same drop down that I downloaded it from:

Screen Shot 2015 04 04 at 17 20 42

and then choose the Start option from the same menu to execute the load:

Screen Shot 2015 04 04 at 17 27 10

Once the dataset is loaded, I receive an email notification and I can then start exploring it, for example to see the average days worked for cases grouped by customer:

Screen Shot 2015 04 04 at 17 23 43

(I can only show the BrightGen figure as this dataset contains real customer data!)

Related

Tuesday, 24 March 2015

Lightning Strikes the Trails

Lightning Strikes the Trails

Lightning london

Overview

Just in time for Lightning Developer Week around the globe, new Lightning modules were released for Trailhead including one for Lighting Components. Up until now, most of the content on Trailhead has been subjects that i’m very familiar with (although that hasn’t stopped me dropping points through not reading the challenges properly :) 

The Lightning Components was a different experience - as these have not long made it into beta, and more importantly still don’t play nicely with canvas apps, I’d been dabbling at best, mainly around follow along tutorials where I didn’t have to concentrate too hard.  The Trailhead challenges get you to write real code against a set of requirements and then automatically validates whether you’ve succeeded.

We’re not in Kansas any more

This is really useful as Lightning Components present a different programming challenge to the Apex/Visualforce paradigm we’ve used in the past:

  • The majority of the code is in JavaScript. This will no doubt scare a few old school developers who think anything not related to presentation should be handled by the server, but its the future - of that I have no doubt.
  • The Apex that you do use is stateless - if you don’t send information from the front end as a parameter, the controller won’t have access to it.
  • Communication between components is via JavaScript events.  This is awesome.  Previously to communicate between Visualforce components you had to pass instances of a parent page or component controller around so that they could know there was something there to communicate with. Where this is really powerful is in the Lightning App Builder, as I demonstrated at the London Lightning Developer week by dropping two components into the app builder which were able to communicate with each other without any further wiring up. 

The Lighting module has a guide time of four hours, which is a pretty good estimate.  This isn’t something you’ll want to dip into for 5 minutes here and there. Its also a good idea to have the Lighting Components Developer’s Guide open while you are working it, so that you can read more around the various concepts.

Debugging JavaScript - oh the humanity

There are currently 9 steps in the Lightning Components module. In addition to the steps that cover the points I’ve made above, there’s one that I’d like to particularly draw attention to: Debugging Your Components - this will stand you in good stead when you apply the learning from the module to build your own components when they inevitably don’t work.

Douglas Crockford described browsers as “the most hostile software development environment imaginable” and he should know!  Knowing the tools that are available and how to use them will make things a little easier on you.

So what’s keeping you?

As Columbo would say, just one more thing: if you haven’t tried Trailhead yet,consider how much content is now available and hazard a guess at how much you’d have to pay for that sort of training elsewhere. If that isn’t a reason to get started straight away I don’t know what is.

Related Posts