Sunday, 24 June 2018

Sharing your Salesforce App on Github

Sharing your Salesforce App on Github

Share

Introduction

Over the years there’s been a few ways to give away Salesforce apps. When I first started 10 years ago there was a Google Code Share accessible from the Developerforce site, but that star waned some time ago. There’s also unmanaged packages, but that typically requires someone to install your package into an org before they can look at the contents of the app, which is fine if they know they want to use it in it’s entirety, but less useful if they want to use your app as s starting point or example for something that they are doing.

Over the last few years, Github has become the de-facto way to share and collaborate on code. As well as providing (free for public) Git repository hosting, it has a bunch of other cool features to allow people to collaborate:

  • Pull requests, to allow changes to be reviewed, discussed and refined before they are merged.
  • Issue tracking, to capture ideas, feature requests, bugs
  • Releases, so that you can wrap and ship specific versions

A collection of useful applications in Github is also a signal to potential employers that you are passionate about app creation and I’m sure won’t do your career any harm. It’s also a great way to share a sample application after presenting at a user group or World Tour event.

I’m using my Summer 18 samples codebase as the example Salesforce application for this post. Note that this post assumes you have created a Github account and completed Git setup.

But Github is Microsoft now

It is, but under Satya Nadella we’re seeing a new Microsoft, particularly around open source. Even if you are nervous around what might happen to Github in the future, you are putting your application out there for everyone to use, so it’s not like it’s some big secret that Microsoft might help themselves to. I can see how a Microsoft competitor with a business account might be worried about security,  but for public applications it’s not something I’d be concerning myself with.

Metadata

The most common mechanism of storing an application outside of Salesforce is extracting the metadata via the Metadata API (SalesforceDX Scratch Org format is the new kid on the block, but at the moment is more likely to be of interest to ISVs in my opinion). There are various mechanisms for extracting metadata, requiring various degrees of setup, such as:

  • An IDE, such as the Force.com IDE, where you can choose from a subset of metadata to retrieve
  • The Force.com Migration Tool (ant), where you’ll need to define a manifest file (package.xml) describing the metadata you want to retrieve
  • The Salesforce CLI, via the force:mdapi:retrieve subcommand - again you’ll need a manifest file
  • The Force.com CLI, via the export and fetch commands.

In my view the Force.com CLI is still the easiest tool to use to export metadata - I wrote a blog post explaining how to do this a while ago.

Once you have your metadata exported you will have a structure similar to the following:

Screen Shot 2018 06 24 at 10 27 04


Creating a Local Repository

Github uses Git to manage the set of files that make up your application, stored in a data structure known as a repository. This enables tracking of changes to files (and much more besides). In order to create a repository, however, you need to extract your application from Salesforce.

Once your metadata is extracted from Salesforce it’s in a state where you can easily migrate it to other orgs, but it isn’t set up to be managed by Git. To turn your codebase into a local Git repository, you use the git init command:

$ git init .

Initialized empty Git repository in /Users/kbowden/GithubBlog/.git/

You can then run git status and see that you have indeed turned your app into a repository:

$ git status 

On branch master
No commits yet
Untracked files:

  (use "git add ..." to include in what will be committed)

       src/

nothing added to commit but untracked files present (use "git add" to track)

So you have a repository, but none of your applications files are being tracked by it. To achieve this, execute git add to stage the files and then git commit to commit them to the repository:

$ git add src

$ git commit
[master (root-commit) 35fa327] Created.
31 files changed, 202 insertions(+)
create mode 100644 src/aura/Navigator/Navigator.auradoc
create mode 100644 src/aura/Navigator/Navigator.cmp
      ...

create mode 100644 src/classes/UtilityController.cls
create mode 100644 src/classes/UtilityController.cls-meta.xml

Note that the git commit command will open an editor for your commit message.

Create the Remote Repository

Now that the code is being tracked by Git, the final step is to create the remote Github repository and push your local changes to it.

There are various ways to set up a remote repository, I use the following steps as it reminds me to set up the README.md file that serves as the “home page” for the repository on Github:

  1. Login to Github
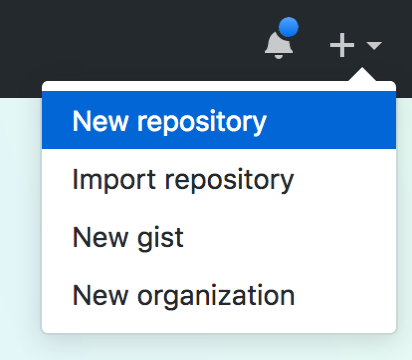
  2. Click the + button on the top right and on the resulting dropdown menu, select New Repository
    Screen Shot 2018 06 24 at 11 02 08
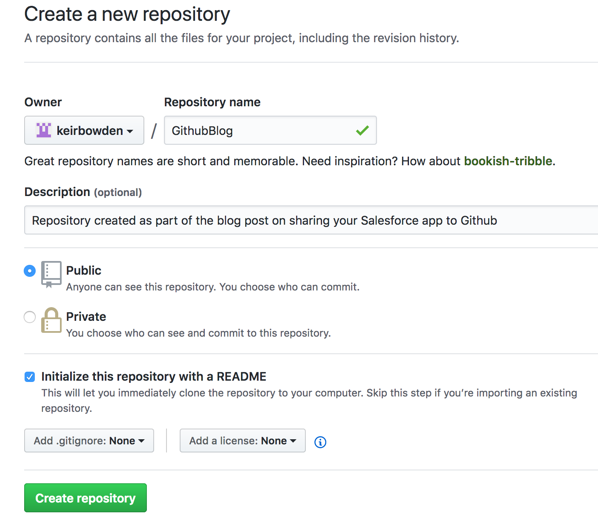
  3. Fill out the resulting form, making sure to tick the box titled 'Initialize this repository with a README’, and click the Create Repository button
    Screen Shot 2018 06 24 at 11 03 45

  4. On the resulting page, click the ‘Clone or Download’ button and copy the Web URL:

    Screen Shot 2018 06 24 at 11 06 44

  5. Add the remote repository, using the Web URL copied in the step above. I’ve named the remote ‘origin’ as this is going to be the main repository going forward:
    $ git remote add origin https://github.com/keirbowden/GithubBlog.git
  6. Verify the remote:
    $ git remote -v

    origin https://github.com/keirbowden/GithubBlog.git (fetch)
    origin https://github.com/keirbowden/GithubBlog.git (push)

Pushing Local to Remote

The remote Github repository is now created and associated with the local repository. There’s nothing in the remote repository apart from the README.md file, so the next step is to push the contents of the local repository. Before this can be done, the contents of the remote repository must be merged in, as it has changes (README.md) that aren’t in the local repo.

The git pull command fetches the changes from the remote repository and merges them into the named branch in a single action. As the local and the remote repository have been created separately, use the '--allow-unrelated-histories' option to allow everything to be coerced into a single set of files:

$ git pull origin master --allow-unrelated-histories

From https://github.com/keirbowden/GithubBlog
* branch master -> FETCH_HEAD
Merge made by the 'recursive' strategy.
README.md | 2 ++
1 file changed, 2 insertions(+)
create mode 100644 README.md

Finally, push the consolidated repository to Github via the git push command:

$ git push origin master

Counting objects: 30, done.
Delta compression using up to 8 threads.
Compressing objects: 100% (24/24), done.
Writing objects: 100% (30/30), 4.71 KiB | 1.57 MiB/s, done.
Total 30 (delta 2), reused 0 (delta 0)
remote: Resolving deltas: 100% (2/2), done.
To https://github.com/keirbowden/GithubBlog.git
f956682..be01baf master -> master

All Done

Accessing the repository on Github shows the entire Salesforce application is now available:

Screen Shot 2018 06 24 at 11 28 15

Related Posts


Thursday, 14 June 2018

Building my own Learning System - Part 7

Building my own Learning System - Part 7

Learning

Introduction

Since I last blogged about my learning system I’ve started using it at BrightGen, for example to onboard developers onto our BrightMedia accelerator, where it has been generally well received. Not least by me, as it means that I don’t need to spend multiple hours with every developer, going through the same content which they may or may not be listening to. I’m also seeing some customers indicating that they’d like to pick up development tasks in BrightMedia projects. Thanks to my original design decision of distributing content across multiple endpoints, I can expose content to upskill the customers without giving away internal BrightGen content, or them even knowing that other content exists.

I’ve added in some features that are useful, to me at least, including:

  • Filtering by topic
  • Executing as a user (the github repo has the concept of running as a specific email address, as it’s unauthenticated)
  • Added an info modal, detailing the recent changes, which I keep forgetting to update, so if you use the unmanaged package to install it will likely be at least one version out of date :)

The great thing about building my own learning system though, is that I am learning by building it.

Learning by Building

As I’m adding features to my learning system I’m also learning more. Not just the Salesforce features that I expected to learn about, such as using the latest standard lightning components, but other areas that aren’t even Salesforce related.

Most recently I’ve been learning more about how to operate on Github. Up until now I’ve just typically created a repo when I wrote a blog post and added to it when I wrote another blog post on the same topic. Now that I’ve got a project that I’m trying to keep a bit more organised, I’m :

  • Adding details of fixes/features into CHANGELOG.md (I’m pretty good on this one - much better than my modal. I probably need to automate updating the modal from the change log).
  • Creating releases
  • Adding diffs to CHANGELOG.md that show all changes between releases 

This wasn’t something that I expected when I started working on my learning system and, once again, shows the value of side projects. I knew that I’d learn, but surprised even myself.

Related Information

All previous posts about the learning system have moved to a dedicated page on my blog. The code is available in the following repositories.


Tuesday, 12 June 2018

Accessing Lightning Component URL Parameters

Accessing Lightning Component URL Parameters

Introduction

One of the more common challenges when working with Lightning Components is how to access parameters passed on the URL. In a Lightning App it’s straightforward - simply define an attribute with the parameter name:

<aura:application >
    <aura:attribute name="param1" type="String" />
        Param1 = {!v.param1}
</aura:application>

and then add that parameter to the URL for the app:

    https://kabtutorial-developer-edition.lightning.force.com/KAB_TUTORIAL/UAApp.app?param1=test

and this is picked up and displayed in the resulting page:

Screen Shot 2018 06 11 at 08 07 30

However, Lightning Apps are rarely the solution - not least because they execute outside the Lightning Experience.

Accessing via JavaScript

In a Lightning Component’s JavaScript controller or helper, the parameters can be accessed directly from the window location, or with the locker service enabled for a component at API 40 and higher, the secure window location:

getURLParameter : function(param) {
    var result=decodeURIComponent
        ((new RegExp('[?|&]' + param + '=' + '([^&;]+?)(&|#|;|$)').
            exec(location.search)||[,""])[1].replace(/\+/g, '%20'))||null;
    console.log('Param ' + param + ' from URL = ' + result);
    return result;
}

In case you were wondering, I didn’t come up with the regular expression myself. If it weren’t for stack overflow I suspect I’d be using indexOf and working around errors for some time after.

There’s nothing wrong with this approach, but it feels a little .. clunky.

isUrlAddressable Interface

Summer 18 introduces the lightning:isUrlAddressable interface - I wrote a post about it’s navigational capability a short while ago. Near the bottom of the documentation for this component is an example of how to replace the deprecated force:navigateToComponent with a custom component implementing isUrlAddressable. This example includes an attribute that I hadn’t come across before - v.pageReference - which allows access to the parameters on the URL via the state property. 

I can now create a component that accesses the parameters as easily as an app:

<aura:component implements="flexipage:availableForAllPageTypes,lightning:isUrlAddressable" 
                access="global" >
    <lightning:card>
        Param1 = {!v.pageReference.state.param1}
    </lightning:card>
</aura:component>

Really? That easy?

Yes and no. It’s that easy if you are navigating directly to a component that implements the isUrlAddressable interface, but not if you are:

  • Opening a Lightning Application Page created with the Lightning App Builder
  • Inside another component, even if that component implements the isUrlAddressable interface

In these situations, and any other where the component accessing the v.pageReference attribute isn’t that component that you navigated to, the v.pageReference attribute will be undefined and you’ll have to fall back on accessing via JavaScript, as shown earlier. 

So definitely a step in the right direction, but not the silver bullet I’m still looking for.

Related Posts


Sunday, 27 May 2018

Building a Salesforce CLI Plugin


Introduction

Plug

As regular readers of this blog will know, I’m a big fan of the command line in general and the Salesforce CLI in particular. Up until now I’ve been layering functionality onto the CLI by wrapping it in bash or node scripts, so I was interested to read about the Plugin Development beta program as this seemed like a neater way to extend it.

The examples I’ve seen to date are mainly focused on extracting information from the org, or performing local processing on files that have already been generated by another CLI command, so I wanted to push things a little further and change something in the org. In the command line tool that I’ve written to manage our BrightMedia projects we update the org with a bunch of information, including the Git commit id, after a successful deployment, and this felt like a good challenge to start with

Creating the Plugin

Simply following the instructions from the plugin generator Github repo gave me the initial version of the plugin. This creates fairly hefty folder structure, but the most interesting bit is the src/commands folder - anything I put in here becomes a command for my plugin and the folder structure from here down gives me the topic/subtopic etc.

I have the structure :

Screen Shot 2018 05 27 at 15 08 58

which gives me the topic bbuzz and the command gitstamp. This concluded the simple part of creating my plugin.

More to Learn

The example plugin that the generator creates is coded in TypeScript, a typed superset of JavaScript that compiles down to plain old JavaScript. I hadn’t used this before, but it’s not too different to JavaScript so I was able to get going reasonably quickly, with the compiler telling me what I’d missed or broken.

The Command

A plugin command needs to extend SfdxCommand - I inadvertently left the name of mine as Org, which is the name for the command created by the plugin generator, but thus far it hasn’t caused me any problems.

export default class Org extends SfdxCommand {

and as I will be connecting to an org I’ll need to enable that. I also want this to be executed from a SalesforceDX project, as the name of the custom setting and the specific field to write the commit id to can be overridden through the sfdx-project.json file:

 protected static requiresUsername = true;
 protected static requiresProject = true;

I then fetch the configuration from the project configuration file, supplying defaults if no config is found:

const projectJson = await this.project.retrieveSfdxProjectJson();
const settingConfig = _.get(projectJson.get('plugins'),'bb.gitSetting');
const settingName=settingConfig.settingName || 'Git_Info__c';
const commitIdField=settingConfig.commitIdField || 'Commit_Id__c';

I then query the setting from the org, as if there is already one I need to update it with it’s id:

const query = 'Select Id, SetupOwnerId, ' + commitIdField + ' from ' + settingName + ' where SetupOwnerId = \'' + orgId + '\'';

interface Setting{
  Id? : string,
  SetupOwnerId : string,
  [key: string] : string
}

// Query the setting to see if we need to insert or update
const result = await conn.query<Setting>(query);

let settingInstance : Setting;
settingInstance={"SetupOwnerId": orgId};

if (result.records && result.records.length > 0) {
  settingInstance.Id=result.records[0].Id
}

Note that I define a typescript interface for the custom setting. As I don’t know the name of the field that the commit id will be stored in, I just define the generic [key:string] rather than a specific name.

Then I get the current commit id and fill that in on the settingInstance:

const util=require('util');
const exec=util.promisify(require('child_process').exec);

const {error, stdout, stderr} = await exec('git rev-parse HEAD');

const commitId=stdout.trim();
settingInstance[commitIdField]=commitId;

Then I had to figure out how to insert or update the custom setting record. Checking the Org class of the Salesforce DX Core library didn’t show me many options, but after a short while I realised that the core library is built on top of jsforce, and sure enough Connection extends jsforce.Connection which had the CRUD commands that I needed:

let opResult;
if (settingInstance.Id) {
  opResult=await conn.sobject(settingName).update(settingInstance);
}
else {
  opResult=await conn.sobject(settingName).insert(settingInstance);
}

this.ux.log('Done');

if (!opResult.success) {
  this.ux.log('Error updating commit id' + JSON.stringify(opResult.errors));
}
else {
  this.ux.log('Stamped the Git commit id in the org');
}

and finally I output a JSON format result string so that if I need to use it in a script I can:

return { orgId: this.org.getOrgId(), 
         commitId: commitId, 
         success: opResult.success, 
         errors: opResult.errors };

Something I wasn’t expecting was that every time I made code changes, simply executing the plugin caused it to be recompiled, which was a real time saver.

Publishing

Once I had my plugin working, I then had to figure out how to publish to the npm.js registry - once again I hadn’t done this before so it was another opportunity to learn.  Luckily this is well documented so it wasn’t as hard as I was expecting. There’s a little bit of hoop jumping around creating the releases on Github, but I’d recently been through at least this aspect with my training system.

Take it for a Spin

To try out the plugin, follow the instructions on the npm page. If you’d like to dig into the code, it's available at the Github repo.

Related Posts


Saturday, 19 May 2018

Lightning Utility Bar Click Handling in Summer 18

Lightning Utility Bar Click Handler in Summer 18

Bar

Introduction

As I’ve written about before, I’m a big fan of the lightning utility bar.It allows me to add components to an application that persist on the screen regardless of which tab/record the user is working in/on. One area that has always been a bit of a let down is that I have no way of knowing that the user has opened the utility bar item. In our BrightMEDIA appcelerator I have some utility items that can be added to applications that can change during the application’s lifecycle as components register and deregister. While I can hook in to the original rendering, the item doesn’t get fire a rerender when it is opened, so there is nowhere for me to latch on. In this case I usually put a message up that the information may be out of date and a ‘Refresh’ button - very familiar if the user has viewed Salesforce dashboards in the past.

Enter Summer 18

This problem goes away in Summer 18 (assuming this feature goes live, forward looking statement, safe harbor etc) as the lightning;utilityBar API gets a new event handler - onUtilityClick(). As per the docs, this allows you to register an event handler that is called whenever the utility is clicked.The utility bar API is a headless service component, which is the direction Salesforce are clearly heading for this kind of functionality. The only slightly tricksy aspect to this is that the headless component needs to be rendered in the utility before it can be accessed and a handler can be registered. I tried initialising the utility component at startup ,via the standard checkbox, but everything went null. For this reason I register the event handler from a custom renderer when my utility component handles the render event.

There’s a Sample, right?

As usual I’ve created a sample component to demonstrate this new functionality - this is a utility item that shows the total open opportunity value for my pre-release org user. It executes a server side method whenever the utility is clicked to make it visible. The short video below shows how the utility refreshes itself as when it is visible and displays the correct amount, even if I’ve just edited the opportunity I’m on.

The component includes the lightning utility API :

<lightning:utilityBarAPI aura:id="utilitybar" />

Which is then located by the rendered function to register the handler (a function from the helper) :

var utilityBarAPI = component.find("utilitybar");
var eventHandler = function(response){
    helper.handleUtilityClick(component, response);
};

and the helper method checks if the component is visible, via the panelVisible function of the response parameter passed to it by the platform, and makes a call to the server to recalculate the open opportunity value and display it:

handleUtilityClick : function(cmp, response) {
    if (response.panelVisible) {
        this.recalculate(cmp);
    }
},
recalculate : function(cmp) {
    cmp.set('v.message', 'Calculating ...');
    var action = cmp.get("c.GetOpenOpportunityValue"); 

    self=this;
    action.setCallback(self, function(response) {
        var result = response.getReturnValue();
        cmp.set('v.message', 'Open opps = ' + result);
    });
    $A.enqueueAction(action);
}

You can access the entire component, and it’s Apex controller, at the 

What else can this API do?

Check out Andy Fawcett’s blog for more details.

Related Posts


Friday, 11 May 2018

Lightning Component Navigation in Summer 18

Lightning Component Navigation in Summer 18

Introduction

In my last but one post (Toast Message from a Visualforce Page) I explained how I needed to solve the problem due to the force:createRecord event not respecting overrides, instead always opening the standard modal-style form and there was no GA mechanism to navigate to a component, force:navigateToComponent being still in beta.

A couple of days after, the Summer 18 release notes came out in preview and towards the end I saw that there was finally a solution for this.

lightning:isUrlAddressable Interface

The new lightning:isUrlAddressable interface allows me to expose a Lightning Component via a dedicated URL. I simply implement this on my component and my component is available at the (current) URL :

   https://<instance>.lightning.force.com/lightning//cmp/<namespace>__<component name>

However, one thing we can be certain of with Lightning Components is change, so rather than hardcoding the URL to my component, there’s a way to get the platform to dynamically generate it.

lightning:navigation Component

The new lightning:navigation component is a headless (i.e. does not have a user interface aspect) service component that exposes methods to help with navigation. The method that I’m interested in is navigate(PageReference). Using this I can create a PageReference JavaScript object that describes the location I want to navigate to and leave it up to the lightning:navigation component to figure out the appropriate URL to hit. 

The beauty of using this mechanism is that my components are decoupled from the URL format. If the Lightning Components team decide the change this, it has no impact on me - the Lightning Navigation component gets updated and everything still works as it always did.

Example

Note - as these features are part of Summer 18, at the time of writing they aren’t available outside of pre-release orgs, which was where I created my example.

I’ve created a component (WebinarOverride)that implements lightning:actionOverride, so that I can use it to override the default new action, just to show that it has no effect, and lightning:isUrlAddressable so that I can navigate to it.

<aura:component implements="force:appHostable,flexipage:availableForAllPageTypes,force:hasRecordId,lightning:actionOverride,lightning:isUrlAddressable">
	<lightning:card iconName="standard:event" title="Override">
	    <lightning:formattedText class="slds-p-left_small" 
value="This is the webinar override component."/> </lightning:card> </aura:component>

Note that it doesn’t do anything in terms of functionality, it’s just intended to obviously identify that we’ve ended up at this component.

I then have a component that can navigate to the override called, creatively, NavigationDemo:

<aura:component implements="force:appHostable,flexipage:availableForAllPageTypes">
    <lightning:navigation aura:id="navService"/>
    <lightning:button label="Force Navigate" onclick="{!c.forceNavigate}" />
    <lightning:button label="Lightning Navigate" onclick="{!c.lightningNavigate}" />
</aura:component>

That this has two buttons - one that uses force:createRecord:

var createRecordEvent = $A.get("e.force:createRecord");
createRecordEvent.setParams({
    "entityApiName": "Webinar__c"
});
createRecordEvent.fire();

and one that uses the lightning:navigation component:

var navService = cmp.find("navService");
var pageReference = {
    "type": "standard__component",
    "attributes": {
        "componentName": "c__WebinarOverride" 
    }, 
    "state": {}
};

navService.navigate(pageReference); 

Note that as the navigation aspect is provided by a headless service component, I have to locate the components via cmp.find() and then execute the method on that. Note also my pageReference object, which has a type of standard__component (even though this is a custom component - go figure) and supplies the component name as an attribute.

I’ve overridden the Lightning Experience actions for the Webinar custom object with my WebinarOverride component:

Screen Shot 2018 05 06 at 10 14 56

So clicking the New button on the webinar home page takes me to the override. If I now open my NavigationDemo component:

Screen Shot 2018 05 06 at 10 18 27

clicking the Force Navigate button is disappointing as always:

Screen Shot 2018 05 06 at 10 18 37

however, clicking on the Lightning Navigate button takes me to my WebinarOverride component:

Screen Shot 2018 05 06 at 10 18 55

You can find the full component code at the Github repository.

Conclusion

The lightning:navigate component also retires the force:navigateToComponent() function, although it’s not clear if there was a WWE-style ladder match to determine who retired. This function has had a troubled existence, leaking out before it was ready and then being withdrawn, causing wailing and gnashing of teeth in the developer community, then entering a short beta before being deprecated. Farewell little buddy, you gave it your best shot but couldn’t cut it.

The headless component mechanism feels like the way that new functionality like this will be added, rather adding functions/events etc to the framework. I guess this keeps the framework as lightweight as it can be and doesn’t force functions on applications that don’t care about them.

One additional point to note - if you forget the lightning:isUrlAddressable interface on your target component the lightning:navigation function will still happily return the URL, but when you navigate to it you will get a not particularly helpful error message that the page isn’t supported in the Lightning Experience.

Finally, I’d still prefer force:createRecord to respect overrides. While I can make my new object component configurable via a custom setting or custom metadata type, from a low code perspective I don’t want to have to change two places to use a different one. Still, we’re in a better place that we have been for a couple of years.

Related Posts


Thursday, 3 May 2018

Lightning Application Events and Caching

Lightning Application Events and Caching

Spidey

Introduction

The lightning component framework has two types of event for intra-component communication:

  • Component
    Component events can be handled by the component that fired it, or any component above it in the containment hierarchy, so essentially any ancestor.

  • Application
    Application events can be handled by any ancestor, but also have an additional propagation phase that allows any component to receive the events, assuming they’ve already registered. 

I typically use application events in a broadcast scenario, where one of my components fires an event and a bunch of other components in my app receive it and take action. For example, when a user selects a value in a picklist and other components need to react to it. Which all worked fine until I had some cached pages.

Lightning Experience Caching

By default, the Lightning Experience will cache up to 5 last visited pages in order to speed up the browser back button. If I create a page that manages an account, and access this with the account id for Universal Contains and then AW Computing, both of these will be cached in the browser. This really speeds up performance, but has an unexpected side effect when using application events,

Even though the page managing Universal Containers is not visible, the components on it are still “live”. If my page has a custom component on it that receives application events, it will continue to receive application events while cached and not visible. This may not sound that bad, but in my case the component was receiving an event asking it to validate its contents and responding with another event to indicate the status. Both the component for AW Computing (that was visible) and the component for Universal Containers (that was not visible) received the event and responded to it. 

Once this happened I was caught in a classic race condition - whichever one responded first would be taken as the current state of my component. As always seems to happen with race conditions, it was the worst outcome that prevailed most of the time. I would be working on the AW Computing page, in which the component was in an invalid state, but the Universal Containers component, which was in a valid state, would respond first and processing would proceed when it should have been blocked. What it looked like at the time was that duplicate events were being fired - tracking down what was actually happening was rather a challenge.

What to do?

Sadly there was no way for the component to know that it had been cached, everything about the visible one was the same as the invisible one. I did try a solution where I destroyed the component once the user navigated off the page, but that meant that if I used the back button the page was cached but the component missing, which meant the user had to refresh the page - also not a great experience.

The actual fix was to move away from application events in this case and use component events. As the communication was between a custom component and it’s parent, it all worked fine. If that hadn’t been the case then I’d probably have MacGyvered something where (un)rendering the component updated a window expando to indicate which version is actually “live” - it would work but I’d feel a bit dirty for having to resort to such tricks.

Related Posts