Emp API in Winter 19
Introduction
It’s August. After weeks of unusually sunny days, the schools in the UK have broken up and the weather has turned. As I sit looking out at cloudy skies, my thoughts turn to winter. Winter 19 to be specific - the release notes are in preview and some of the new functionality has hit my pre-release org. The first item that I’ve been playing with is the new Emp API component, which takes away a lot of the boilerplate code that I have to copy and paste every time I create a component that listens for platform events.
From the preview docs, this component
Exposes the EmpJs Streaming API library which subscribes to a streaming channel and listens to event messages using a shared CometD connection. This component is supported only in desktop browsers. This component requires API version 44.0 and later.
What I Used to Do
Previously, to connect to the streaming API and start listening for events, I’d need code to:
- Download the cometd library and put it into a static resource
- Add the static resource to my component
- Instantiate org.cometd.CometD
- Call the server to get a session id
- Configure cometd with the session id and the Salesforce endpoint
- Carry out the cometd handshake
- Subscribe to my platform event channel
- Wiat for messages
What I do Now
- Add the lightning:empApi component inside my custom component:
- Add an error handler in case anything goes wrong
- Subscribe to my platform event channel
- Wait for a message
In practice this means my controller code has dropped from 70 odd lines to around 20,
Example
The first thing I need for an example is a platform event - I’ve created one called Demo_Event__e, which contains a single field named ‘Message__c’. This holds the message that I’ll display to the user.
My example component (Demo Events) actually uses a couple of standard components - the Emp API and the notifications library - the latter is used to show a toast message when I receive an event:
<lightning:empApi aura:id="empApi" />
<lightning:notificationsLibrary aura:id="notifLib"/>
The controller handles all the setup via a method invoked when the standard init event is fired. Before I can do anything I need a reference for the Emp API component:
var empApi = component.find("empApi");
Once I have this I can subscribe to my demo event channel - I’ve chosen a replayId of -1 to say start with the next event published. Note that I also capture the subscription object returned by the promise so that I can unsubscribe later if I need to (although my sample component doesn’t actually do anything with it).
var channel='/event/Demo_Event__e';
var sub;
var replayId=-1;
empApi.subscribe(channel, replayId, callback).then(function(value) {
      console.log("Subscribed to channel " + channel);
      sub = value;
      component.set("v.sub", sub);
});
I also provide a callback function that gets invoked whenever I receive a message. This simply finds the notification library and executes the showToast aura method that it exposes.
var callback = function (message) {
	component.find('notifLib').showToast({
      	"title": "Message Received!",
        "message": message.data.payload.Message__c
	});
}.bind(this);
On the server side I have a class exposing a single static method that allows me to publish a platform event:
public class PlatformEventsDemo
{
    public static void PublishDemoEvent(String message)
    {
	    Demo_Event__e event = new Demo_Event__e(Message__c=message);
                Database.SaveResult result = EventBus.publish(event);
                if (!result.isSuccess())
        {
            for (Database.Error error : result.getErrors())
            {
                System.debug('Error returned: ' +
                             error.getStatusCode() +' - '+
                             error.getMessage());
            }
        }
    }
}
Running the Example
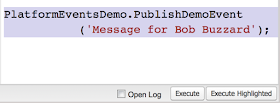
I’ve added my component to a lightning page - s it doesn’t have any UI you’ll have to take my word for it! Using the execute anonymous feature of the dev console, I publish a message:

And on my lightning app page, shortly afterwards I see the toast message:


