Pages

Friday, 29 June 2018

Adding Signature Capture to a Lightning Flow

Adding Signature Capture to a Lightning Flow

Screen Shot 2016 11 07 at 18 36 19

Introduction

As regular readers of this blog know, a few years ago I wrote a Lightning Component for the launch of the Component Exchange called Signature Capture which, in a shocking turn of events, allows a user to capture a signature image and attach it to a Salesforce record. Over the years it’s received various enhancements and when these are notable I write a blog post about it. The latest version satisfies this requirement as it adds support for inclusion in Lightning flows. Note that the rest of this post assumes that you are working with V1.31 of Signature Capture or higher.

The Scenario

I’m going for a pretty simple scenario - a custom button on the a Salesforce record starts a flow that contains just the Signature Capture component. Once the user is happy with the signature and saves it, finishing the flow returns them to the record that they started from.

Creating the Flow

If you are a metadata type, you can install the demo flow from the Signature Capture Samples Git repository. It’s called Signature_Capture don’t forget to activate it.

If not, carry out the following steps to create the flow:

  1. Open the flow designer
  2. Click on the ‘Resources’ tab and on the resulting list click ‘Variable'

    Screen Shot 2018 06 28 at 16 51 15

  3. Create a new variable named ‘recordId’ and click OK - this will contain the Id of the record that the user wishes to capture a signature against.
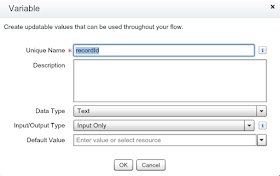
    Screen Shot 2018 06 28 at 16 47 32
     
  4. Click the ‘Palette’ tab and on the resulting list drag ‘Screen’ onto the canvas:

    Screen Shot 2018 06 28 at 16 52 41

  5. Fill in the ‘Name’ as desired - I went for ‘Signature Capture’ as I’m a creative type:
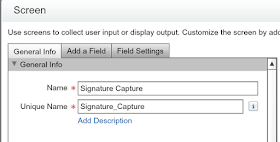
    Screen Shot 2018 06 28 at 16 56 54

  6. Click the ‘Add a Field’ tab and scroll to the bottom of the list and choose ‘Lightning Component’:

    Screen Shot 2018 06 28 at 16 57 27

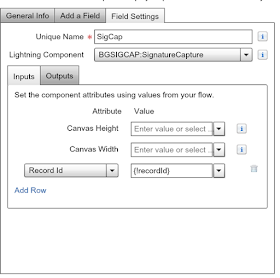
  7. Click the ‘Field Settings’ and configure as shown below - note that I had to remove the entry that was automatically added to the ‘Outputs’ tab before I could save. Make sure to set the value of the 'Record Id' attribute to the 'recordId’ variable - this ensures that the captured signature is stored against the correct Salesforce record.
    Screen Shot 2018 06 28 at 16 58 23

  8. Set the screen as the start element
  9. Save the flow
  10. Activate the flow

And that’s it! Straightforward but the flow isn’t very useful as it’s not attached to anything.

Creating the Custom Button

Using the URL of the flow seems pretty clunky, but what can we do?

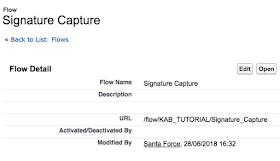
  1. Open the flow and copy the URL value:

    Screen Shot 2018 06 28 at 17 02 40

  2. Navigate to the setup page for the object you want to be able to launch the flow from (I’ve gone for Account) and click ‘Buttons, Actions, and Links’
  3. On the resulting page, click ‘New Button or Link'
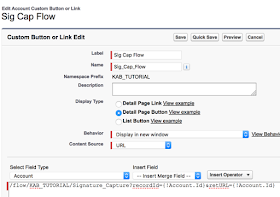
  4. Configure the button as follows, replacing the ‘Button or Link URL’ with the concatenation of your flow URL (copied in step 1) and the appropriate record id for for the sobject type. The retURL parameter is the secret sauce to send the user back to the record when they finish the flow:
    Screen Shot 2018 06 28 at 17 19 11

  5. After saving, click the ‘Page Layouts’ link from the sObject setup page.
  6. Choose the layout to add the button to.
  7. On the resulting page builder, select the 'Mobile & Lightning Actions’ item from the palette:

    Screen Shot 2018 06 28 at 17 08 23

  8. And drag your new custom button on to the 'Salesforce Mobile and Lightning Experience Actions’ section:

    Screen Shot 2018 06 28 at 17 08 26

  9. Save the page layout

Enable Lightning Flow

Flows containing Lightning components require lightning flow to be enabled.

  1. Navigate to Setup -> Process Automation -> Process Automation Settings
  2. Check the ‘Enable Lightning runtime for flows’ box:


    Screen Shot 2018 06 28 at 17 12 53

  3. Save the settings.

Take it for a Spin

Once everything is in place you can launch the flow by navigating to a record of the appropriate sObject type and clicking the custom button. The video below shows my flow configured above being launched and completed from an account record:

Related Posts


Sunday, 24 June 2018

Sharing your Salesforce App on Github

Sharing your Salesforce App on Github

Share

Introduction

Over the years there’s been a few ways to give away Salesforce apps. When I first started 10 years ago there was a Google Code Share accessible from the Developerforce site, but that star waned some time ago. There’s also unmanaged packages, but that typically requires someone to install your package into an org before they can look at the contents of the app, which is fine if they know they want to use it in it’s entirety, but less useful if they want to use your app as s starting point or example for something that they are doing.

Over the last few years, Github has become the de-facto way to share and collaborate on code. As well as providing (free for public) Git repository hosting, it has a bunch of other cool features to allow people to collaborate:

  • Pull requests, to allow changes to be reviewed, discussed and refined before they are merged.
  • Issue tracking, to capture ideas, feature requests, bugs
  • Releases, so that you can wrap and ship specific versions

A collection of useful applications in Github is also a signal to potential employers that you are passionate about app creation and I’m sure won’t do your career any harm. It’s also a great way to share a sample application after presenting at a user group or World Tour event.

I’m using my Summer 18 samples codebase as the example Salesforce application for this post. Note that this post assumes you have created a Github account and completed Git setup.

But Github is Microsoft now

It is, but under Satya Nadella we’re seeing a new Microsoft, particularly around open source. Even if you are nervous around what might happen to Github in the future, you are putting your application out there for everyone to use, so it’s not like it’s some big secret that Microsoft might help themselves to. I can see how a Microsoft competitor with a business account might be worried about security,  but for public applications it’s not something I’d be concerning myself with.

Metadata

The most common mechanism of storing an application outside of Salesforce is extracting the metadata via the Metadata API (SalesforceDX Scratch Org format is the new kid on the block, but at the moment is more likely to be of interest to ISVs in my opinion). There are various mechanisms for extracting metadata, requiring various degrees of setup, such as:

  • An IDE, such as the Force.com IDE, where you can choose from a subset of metadata to retrieve
  • The Force.com Migration Tool (ant), where you’ll need to define a manifest file (package.xml) describing the metadata you want to retrieve
  • The Salesforce CLI, via the force:mdapi:retrieve subcommand - again you’ll need a manifest file
  • The Force.com CLI, via the export and fetch commands.

In my view the Force.com CLI is still the easiest tool to use to export metadata - I wrote a blog post explaining how to do this a while ago.

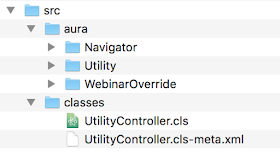
Once you have your metadata exported you will have a structure similar to the following:

Screen Shot 2018 06 24 at 10 27 04


Creating a Local Repository

Github uses Git to manage the set of files that make up your application, stored in a data structure known as a repository. This enables tracking of changes to files (and much more besides). In order to create a repository, however, you need to extract your application from Salesforce.

Once your metadata is extracted from Salesforce it’s in a state where you can easily migrate it to other orgs, but it isn’t set up to be managed by Git. To turn your codebase into a local Git repository, you use the git init command:

$ git init .

Initialized empty Git repository in /Users/kbowden/GithubBlog/.git/

You can then run git status and see that you have indeed turned your app into a repository:

$ git status 

On branch master
No commits yet
Untracked files:

  (use "git add ..." to include in what will be committed)

       src/

nothing added to commit but untracked files present (use "git add" to track)

So you have a repository, but none of your applications files are being tracked by it. To achieve this, execute git add to stage the files and then git commit to commit them to the repository:

$ git add src

$ git commit
[master (root-commit) 35fa327] Created.
31 files changed, 202 insertions(+)
create mode 100644 src/aura/Navigator/Navigator.auradoc
create mode 100644 src/aura/Navigator/Navigator.cmp
      ...

create mode 100644 src/classes/UtilityController.cls
create mode 100644 src/classes/UtilityController.cls-meta.xml

Note that the git commit command will open an editor for your commit message.

Create the Remote Repository

Now that the code is being tracked by Git, the final step is to create the remote Github repository and push your local changes to it.

There are various ways to set up a remote repository, I use the following steps as it reminds me to set up the README.md file that serves as the “home page” for the repository on Github:

  1. Login to Github
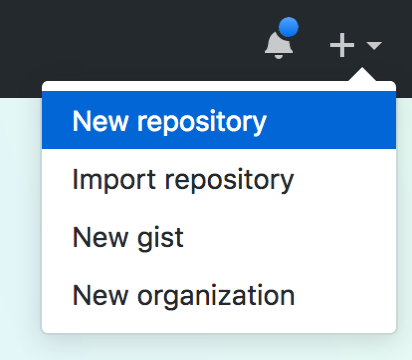
  2. Click the + button on the top right and on the resulting dropdown menu, select New Repository

    Screen Shot 2018 06 24 at 11 02 08
  3. Fill out the resulting form, making sure to tick the box titled 'Initialize this repository with a README’, and click the Create Repository button

    Screen Shot 2018 06 24 at 11 03 45

  4. On the resulting page, click the ‘Clone or Download’ button and copy the Web URL:

    Screen Shot 2018 06 24 at 11 06 44

  5. Add the remote repository, using the Web URL copied in the step above. I’ve named the remote ‘origin’ as this is going to be the main repository going forward:
    $ git remote add origin https://github.com/keirbowden/GithubBlog.git
  6. Verify the remote:
    $ git remote -v

    origin https://github.com/keirbowden/GithubBlog.git (fetch)
    origin https://github.com/keirbowden/GithubBlog.git (push)

Pushing Local to Remote

The remote Github repository is now created and associated with the local repository. There’s nothing in the remote repository apart from the README.md file, so the next step is to push the contents of the local repository. Before this can be done, the contents of the remote repository must be merged in, as it has changes (README.md) that aren’t in the local repo.

The git pull command fetches the changes from the remote repository and merges them into the named branch in a single action. As the local and the remote repository have been created separately, use the '--allow-unrelated-histories' option to allow everything to be coerced into a single set of files:

$ git pull origin master --allow-unrelated-histories

From https://github.com/keirbowden/GithubBlog
* branch master -> FETCH_HEAD
Merge made by the 'recursive' strategy.
README.md | 2 ++
1 file changed, 2 insertions(+)
create mode 100644 README.md

Finally, push the consolidated repository to Github via the git push command:

$ git push origin master

Counting objects: 30, done.
Delta compression using up to 8 threads.
Compressing objects: 100% (24/24), done.
Writing objects: 100% (30/30), 4.71 KiB | 1.57 MiB/s, done.
Total 30 (delta 2), reused 0 (delta 0)
remote: Resolving deltas: 100% (2/2), done.
To https://github.com/keirbowden/GithubBlog.git
f956682..be01baf master -> master

All Done

Accessing the repository on Github shows the entire Salesforce application is now available:

Screen Shot 2018 06 24 at 11 28 15

Related Posts


Thursday, 14 June 2018

Building my own Learning System - Part 7

Building my own Learning System - Part 7

Learning

Introduction

Since I last blogged about my learning system I’ve started using it at BrightGen, for example to onboard developers onto our BrightMedia accelerator, where it has been generally well received. Not least by me, as it means that I don’t need to spend multiple hours with every developer, going through the same content which they may or may not be listening to. I’m also seeing some customers indicating that they’d like to pick up development tasks in BrightMedia projects. Thanks to my original design decision of distributing content across multiple endpoints, I can expose content to upskill the customers without giving away internal BrightGen content, or them even knowing that other content exists.

I’ve added in some features that are useful, to me at least, including:

  • Filtering by topic
  • Executing as a user (the github repo has the concept of running as a specific email address, as it’s unauthenticated)
  • Added an info modal, detailing the recent changes, which I keep forgetting to update, so if you use the unmanaged package to install it will likely be at least one version out of date :)

The great thing about building my own learning system though, is that I am learning by building it.

Learning by Building

As I’m adding features to my learning system I’m also learning more. Not just the Salesforce features that I expected to learn about, such as using the latest standard lightning components, but other areas that aren’t even Salesforce related.

Most recently I’ve been learning more about how to operate on Github. Up until now I’ve just typically created a repo when I wrote a blog post and added to it when I wrote another blog post on the same topic. Now that I’ve got a project that I’m trying to keep a bit more organised, I’m :

  • Adding details of fixes/features into CHANGELOG.md (I’m pretty good on this one - much better than my modal. I probably need to automate updating the modal from the change log).
  • Creating releases
  • Adding diffs to CHANGELOG.md that show all changes between releases 

This wasn’t something that I expected when I started working on my learning system and, once again, shows the value of side projects. I knew that I’d learn, but surprised even myself.

Related Information

All previous posts about the learning system have moved to a dedicated page on my blog. The code is available in the following repositories.


Tuesday, 12 June 2018

Accessing Lightning Component URL Parameters

Accessing Lightning Component URL Parameters

Introduction

One of the more common challenges when working with Lightning Components is how to access parameters passed on the URL. In a Lightning App it’s straightforward - simply define an attribute with the parameter name:

<aura:application >
    <aura:attribute name="param1" type="String" />
        Param1 = {!v.param1}
</aura:application>

and then add that parameter to the URL for the app:

    https://kabtutorial-developer-edition.lightning.force.com/KAB_TUTORIAL/UAApp.app?param1=test

and this is picked up and displayed in the resulting page:

Screen Shot 2018 06 11 at 08 07 30

However, Lightning Apps are rarely the solution - not least because they execute outside the Lightning Experience.

Accessing via JavaScript

In a Lightning Component’s JavaScript controller or helper, the parameters can be accessed directly from the window location, or with the locker service enabled for a component at API 40 and higher, the secure window location:

getURLParameter : function(param) {
    var result=decodeURIComponent
        ((new RegExp('[?|&]' + param + '=' + '([^&;]+?)(&|#|;|$)').
            exec(location.search)||[,""])[1].replace(/\+/g, '%20'))||null;
    console.log('Param ' + param + ' from URL = ' + result);
    return result;
}

In case you were wondering, I didn’t come up with the regular expression myself. If it weren’t for stack overflow I suspect I’d be using indexOf and working around errors for some time after.

There’s nothing wrong with this approach, but it feels a little .. clunky.

isUrlAddressable Interface

Summer 18 introduces the lightning:isUrlAddressable interface - I wrote a post about it’s navigational capability a short while ago. Near the bottom of the documentation for this component is an example of how to replace the deprecated force:navigateToComponent with a custom component implementing isUrlAddressable. This example includes an attribute that I hadn’t come across before - v.pageReference - which allows access to the parameters on the URL via the state property. 

I can now create a component that accesses the parameters as easily as an app:

<aura:component implements="flexipage:availableForAllPageTypes,lightning:isUrlAddressable" 
                access="global" >
    <lightning:card>
        Param1 = {!v.pageReference.state.param1}
    </lightning:card>
</aura:component>

Really? That easy?

Yes and no. It’s that easy if you are navigating directly to a component that implements the isUrlAddressable interface, but not if you are:

  • Opening a Lightning Application Page created with the Lightning App Builder
  • Inside another component, even if that component implements the isUrlAddressable interface

In these situations, and any other where the component accessing the v.pageReference attribute isn’t that component that you navigated to, the v.pageReference attribute will be undefined and you’ll have to fall back on accessing via JavaScript, as shown earlier. 

So definitely a step in the right direction, but not the silver bullet I’m still looking for.

Related Posts